P1471 MIT+1389D.
SAFETY PRECAUTIONS CAUTION: TO REDUCE THE RISK OF ELECTRIC SHOCK. DO NOT REMOVE COVER (OR BACK). NO USER SERVICEABLE PARTS INSIDE. REFER SERVICING TO QUALIFIED SERVICE PERSONNEL.
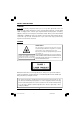
SAFETY PRECAUTIONS CAUTION Never tamper with any components inside your set, or any other adjustment controls not mentioned in this manual. All television receivers are high voltage instruments. Your PICTURE TUBE is a highly vacuum. If broken, glass fragments will be violently expelled. Scratching, Chipping or undue pressure is dangerous and should be avoided. When you clean the PICTURE TUBE FACE or CABINET, the power cord should be removed from the wall socket then wipe the receiver with a dry soft cloth.
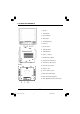
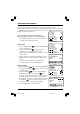
LOCATION OF CONTROLS 1. Speaker 2. Power Button 3. Channel Buttons 4. Menu Button 5. TV/AV/DVD Button 6. DVD Door 7. Remote Sensor 8. DVD Stop Button 9. DVD Play Button 10. Volume -/+ Buttons 11. DVD Open/Close Button 12. Side Audio (R) Input (AV 2) 13. Side Audio (L) Input (AV 2) 14. Side Video Input (AV 2) 15. Earphone Jack 16. 75 ohm Antenna Socket 17. Back Video/Audio Output 18. Back Video/Audio Input(AV 1) 19. Audio digital Out Socket (For DVD only) 5 P1471 MIT+1389D.
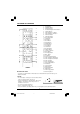
LOCATION OF CONTROLS 1. 2. 3. 4. 5. 6. 7. 8. 9. 10. 11. 12. 13. 14. 15. 16. 17. 18. 19. 20. 21. 22. 23. 24. 25. 26. 27. 28. 29. 30. 31. 32. 33. 34. 35. 36. 37. 38.
OPERATING THE TELEVISION Connect your TV aerial to the aerial input socket located on the back of the TV. Push the Main Power Switch, Power Indicator will be illuminated. After a few seconds the TV screen will light up and will show interference on the screen. The TV will require tuning into the available TV stations in your area.
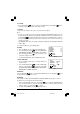
C. SYSTEM 1. Press the Navigation / button to select the C SYSTEM then press Navigation / button to change the desired colour system PAL, NTSC, AUTO. S SYSTEM 1. This unit is the single sound system, it is fixed cannot be adjust. Notes: 1. If ghost / noisy stations have been stored when using the AUTO SEARCH method, these can be removed from the channel list by entering the SKIP Mode shown in the TUNE menu. Press the Navigation / and change the OFF state to ON.
CHANNEL SELECT AND VOLUME CONTROL 1) Press CHANNEL / buttons to select TV station. 0 255 Press CHANNEL." ", the programme Press CHANNEL. " ", the programme no. no. will appear on the top right corner will change f rom a lower no. to higher and change from a higher to lower number. number. 2) Press VOLUME / button to adjust sound level.
4. REMOTE CONTROL OPERATION CHANNEL Up and Down buttons Press the CHANNEL or button to select a higher or lower channel number. 0~9 Numberic Button To select a TV station using A buttons 0~9. For example: Press number “9” button to select PROGRAMME “9”. l Two digit Programme Number For example:selecting PROGRAMME “12” 1. Press the -/-- button, on screen will show --. 2. Press the number “1” button, on screen will show “1-”. 3. Press the number “2” button, channel “12” will show.
DVD PLAYER OPERATION Basic Operation 1. Press “TV/AV/DVD” button on the unit or press the DVD MODE direct key on the remote handset to turn ON DVD. 2. Press “OPEN / CLOSE (EJECT)” button to load disc in disc tray. 3. Press “OPEN / CLOSE” button to close the tray. • Hold the disc without touching either of its surfaces, position it with the printed title side facing up. Play Discs 1. Press the OPEN/CLOSE Button on the front panel and load the Disc on the tray. The label side should be facing upwards.
OSD There are 5 OSD languages embedded in the DVD Player : English, French, German, Italian, Spanish. 1. Press the SETUP button on the remote controller to enter the setup menu GENERAL SETUP PAGE. 2. Go to the OSD LANG option and use the Navigation Arrows to do the selection. 3. Press ENTER to confirm. DVD Menu The DVD Menu Play function is only applicable for DVD movie. User can access the Casting information, Production History, Movie Introduction etc. directly through this function. 1.
Slow The Slow Forward is applicable for DVD. There are 4 steps of slow motion speed, 1/2, 1/4, 1/8, 1/16. Successive key presses will decrement the playback speed. Note : Press Play Key to switch back to normal playback speed. Repeat Mode This function is applicable for DVD and CD audio but with different effects. • For DVD disc playback, user can choose to repeat the current chapter, the current title or disc. Subsequent key press of the REPEAT key can change between these four options.
Display (Remain Time) This function is applicable for DVD only. It will display the timing information of the playback on the screen. • For DVD playback, subsequent key press on the DISPLAY Button will show the Title Elapsed Time, Title Remain Time, Chapter Elapsed Time and Chapter Remain Time one by one.
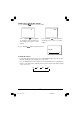
Program M ode This function is applicable for DVD and CD audio. User can assign the playback sequence according to his/her preference. For CD audio, user can assign the track sequence while for DVD disc, user can assign both the Title and Chapter sequence. 1. Press the PROGRAM button. The Program Sequence table will be shown on the screen. PROGRAM 01 02 03 04 05 06 07 08 09 10 EXIT 2. Enter the track numbers according to the user preference through the Number keys (0-9).
SPECIFICATIONS TV SECTION Receiving Channels VHFL CH 2 - 4 VHFH CH 5 - 12 UHF CH 21- 69 Tuner Type 255 Channel, VS TUNING DVD SECTION Laser Wave length 655nm Laser power Class 1 Signal System PAL/NTSC output Digital audio output Coaxial digital output; pin jack Headphone Stereo in DVD mode Mono in TV mode GENERAL SECTION AC Power Input AC 220-240V~50 Hz AC Power Consumption 74W Speaker 3” 8ohm x 2 Audio Output 1.5 W + 1.5 W Dimensions L385 x W375 x H370 (mm) Net Weight 10.
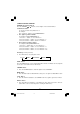
DISC MAINTENANCE Handling Discs: - Hold the disc by the edges so the surface will not be soiled with finger prints. (Fig. A) - Do not scratch the disc. Do not write on the label side with a pen. - Be careful not to drop or bend the disc. - Do not place more than 1 disk in the tray. - Do not try to close the disc tray when the disc is not installed in the tray properly. (Fig. B) - Be sure to store the disc in a disc case after playback.
P1471 MIT+1389D.
P1471 MIT+1389D.