â SMVG-600 COMPACT DISC + GRAPHICS WITH BUILT-IN TV KARAOKE CENTER OWNER’S MANUAL Please read before using this unit. The Singing Machineâ is a registered trademark of The Singing Machine Co., Inc.
WARNINGS This CD player is made and tested to meet exacting safety standards. It meets FCC requirements and complies with safety performance standards of the U.S. Department of Health and Human Services. WARNING: TO REDUCE THE RISK OF FIRE OR SHOCK HAZARD, DO NOT EXPOSE THIS PRODUCT TO RAIN OR MOISTURE. CAUTION Warnings: ! This CD player employs a laser light beam.
IMPORTANT SAFETY INSTRUCTIONS 1. Read Instructions - All the safety and operating instructions should be read before the product is operated. 2. Retain Instructions - The safety and operating instructions should be retained for future reference. 3. Heed Warnings - All warnings on the product and in the operating instructions should be adhered to. 4. Follow instructions - All operating and use instructions should be followed. 5. Cleaning - Unplug this product from the wall outlet before cleaning.
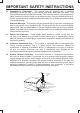
IMPORTANT SAFETY INSTRUCTIONS 12. Grounding or Polarization - This product may be equipped with a polarized alternating current line plug (a plug having one blade wider than the other). This plug will fit into the power outlet only one way. This is a safety feature. If you are unable to insert the plug fully into the outlet, try reversing the plug. If the plug should still fail to fit, contact your electrician to replace your obsolete outlet. Do not defeat the safety purpose of the polarized plug.
IMPORTANT SAFETY INSTRUCTIONS 16. Lightning - For added protection for this product during a lightning storm, or when it is left unattended and unused for long periods of time, unplug it from the wall outlet and disconnect the antenna or cable system. This will prevent damage to the product due to lightning and power-line surges. 17.
THE SINGING MACHINE KARAOKE GLOSSARY OF TERMS In addition to all of the terminology associated with consumer electronics products, a few additional terms are used almost exclusively in karaoke. These terms are meant to familiarize you with the world of Karaoke. The features listed below may not necessarily pertain to the particular model Singing Machine that you have.
INTRODUCTION Your SMVG-600 Compact Disc + Graphics with will provide you with many years of fun and entertainment. It can let you be the “star” as you sing along with your favorite recordings and hear your voice with the music through the system’s speakers. This Karaoke Center is easy to use, yet full of features with a compact design. After just a few simple instructions, you will become an expert.
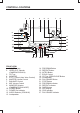
CONTROL LOCATIONS 1 2 3 4 5 6 7 8 9 10 17 11 18 12 19 13 20 14 15 21 16 22 23 FRONT VIEW 1. CAMERA Lens 2. VIDEO OUT Selector (CAMERA/CDG/AUX) 3. CD Tray 4. MONITOR 5. A.V.C. Control (Auto Voice Control) 6. MASTER Volume Control 7. BALANCE Control 8. MIC Volume Control 9. MONITOR Selector (CAMERA/CDG/AUX/OFF) 10. POWER Button 11. POWER On Indicator 12. AUDIO Selector (CDG/AUX) 13. Loudspeaker 24 25 14. 15. 16. 17. 18. 19. 20. 21. 22. 23. 24. 25. 26. 27.
CONTROL LOCATIONS 28 29 SIDE VIEW 28. MIC 1 Jack 29. MIC 2 Jack 30 34 31 35 32 33 36 37 38 39 REAR VIEW 30. BRIGHTNESS Control 31. CONTRAST Control 32. VIDEO IN Jack 33. VIDEO OUT Jack 34. AUX OUT Jack (L) 35. 36. 37. 38. 39.
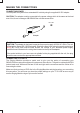
MAKING THE CONNECTIONS CONNECTING POWER You can power the system from a standardAC outlet by using the supplied AC-DC adapter. CAUTION: The adapter must be connected to the power voltage which is the same as the local area. If not, there is a danger of BURNING the unit that causes a fire. DC 16V Adapter For UK only CAUTION: The adapter is designed to operate from a main supply of 230V AC~50Hz. The unit is fitted with a 13amp (BS 1363) main plug.
MAKING THE CONNECTIONS VIDEO CONNECTION (for TV) Please follow the steps below to display CDG lyrics on the TV screen: (1) Locate the multicolored patch cords. (2) Connect Video Cable (yellow) to the Video Out of the back of the Singing Machine. (3) Connect the other end of the Video Cable (yellow) to the Video Input on your TV or VCR.
MAKING THE CONNECTIONS If your television or VCR does not have the required Video Input, you will need an RF Modulator (Radio Frequency Modulator), which connects through your TV Antenna or cable line and serves as Video Input. An RF Modulator can be purchased at almost any consumer electronics retailer. If you are connecting the video from the Singing Machine to either a television or a VCR video input jack, you must specify the source the TV or VCR is to display.
MAKING THE CONNECTIONS CONNECTING A VIDEO COMPONENT FOR INPUT Please follow the steps below to display CDG lyrics on the Singing Machine’s monitor from another video source: (1) Locate the multicolored patch cords. (2) Connect Video Cable (yellow) to the Video In of the back of the Singing Machine. (3) Connect the other end of the Video Cable (yellow) to the Video Output on another video source such as a VCR. (4) Set the MONITOR Selector to AUX mode and the AUDIO Selector to AUX mode.
MAKING THE CONNECTIONS CONNECTING AN AUDIO COMPONENT FOR INPUT To connect another audio source (such as a Tuner, an AV Receiver or a VCR) so you can sing along with its music, simply connect the Audio Output jacks (Red & White RCA jacks) to the Singing Machine’s AUX IN L & R jacks.
CD OR CD+G OPERATION *Warning - Tapping or dropping the microphone while it is on can permanently damage your microphone. Resist the urge to swing the microphone around by the cord! PREPARATION This unit is designed to play CD’s bearing the identification logo " ". If CD’s do not conform to the CD standard, they may not play properly. ! Fingerprints and dust should be carefully wiped off with a soft cloth. Wipe in a straight motion from the center of the disc to the outside edge.
CD OR CD+G OPERATION PLAY/PAUSE MODE To start playing, press the PLAY/PAUSE button, the first track [ ] and the PLAY/PAUSE LED Indicator will be displayed. ! To temporarily stop playing, press the PLAY/PAUSE button, the PLAY/PAUSE LED Indicator will flash. ! To resume play, press this button again. PLEASE NOTE: Pressing pause when a CDG is playing may cause distorted lyrics on the monitor.
CARE AND MAINTENANCE POWER SWITCH After using the SMVG-600, turn off the power by pressing the POWER button. CLEANING DISC Cleaning will not normally be necessary. However, should fingerprints, dust or dirt appear, you can wipe them off with a soft, lint-free cloth. Wipe the disc in a straight line from center to edge. You can moisten the disc first with ordinary tap water if necessary.
TROUBLE SHOOTING GUIDE If you have followed the instructions and are having difficulty operating the unit, locate the PROBLEM in the left column below. Check the corresponding POSSIBLE CAUSE column to locate and remedy the problem. PROBLEM No power when POWER is on. POSSIBLE CAUSE No DC jack connection at the AC adapter. SOLUTION Insert the DC jack into the DC socket on back of cabinet. No power when plugged The AC outlet may not have Check the outlet with a working power.
TROUBLE SHOOTING GUIDE PROBLEM No sound - If audio is going through TV or VCR. POSSIBLE CAUSE Source Selection on TV or VCR is not correct. SOLUTION Follow directions on page 10 for ‘Video Connection’. Connect the video cable to the Video cable is not connected Singing Machine’s VIDEO OUT properly to the TV. and to the TV VIDEO IN. Source selector on TV is not Using your TV Remote to select VIDEO input. set to VIDEO. No song lyrics appear on screen. Picture is jumping up.
SPECIFICATIONS AUDIO SECTION: OUTPUT POWER (10% THD) OUTPUT IMPEDANCE 2 WATTS + 2 WATTS (RMS) 8 ohms CD PLAYER SECTION: FREQUENCY RESPONSE SIGNAL - TO - NOISE RATIO WOW AND FLUTTER D - A CONVERSION NUMBER OF PROGRAMS SAMPLING SYSTEM 100 Hz - 20KHz 50 dB IMMEASURABLE 1 BIT D/A CONVERTER 19 TRACKS PROGRAM MEMORY 8 TIME OVER SAMPLING MONITOR SECTION 5.5” TV MONITOR NTSC, PAL 2 SYSTEM 220 LINE RESOLUTION MICROPHONE -74 dB 600OHM IMPEDANCE WITH Æ6.
NOTES 20
NOTES 21
NOTES 22
LIMITED WARRANTY and SERVICE THE SINGING MACHINE COMPANY, INC. warrants this product to be free from defects in material and workmanship for a period of Ninety (90) days from date of sale to the original consumer purchaser. Product will be replaced or repaired free of charge if it has proven to be defective within the Ninety (90) day period when said product is returned at customer expense within the warranty period.