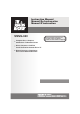
Instruction Manual Manual De Instrucción Manuel D'instruction SMVG-620 Compact Disc + Graphics with Built-In TV Karaoke Center Disco Compacto + Gráficos Con El Central De Karaoke En La TV Disque Compact + Graphiques Avec Centre Karaoké Encastre Please read before using this unit. Lea antes de usar esta unidad. Veuillez lire avant d'utiliser cet appareil.
ENGLISH WARNINGS This CD player is made and tested to meet exacting safety standards. It meets FCC requirements and complies with safety performance standards of the U.S. Department of Health and Human Services. WARNING: TO REDUCE THE RISK OF FIRE OR SHOCK HAZARD, DO NOT EXPOSE THIS PRODUCT TO RAIN OR MOISTURE. CAUTION Warnings: ! This CD player employs a laser light beam.
NOTE: This digital apparatus does not exceed the Class B limits for radio noise emissions from digital apparatus as set out in the Radio Interference Regulations of Industry Canada. These limits are designed to provide reasonable protection against harmful interference in a residential installation. This equipment generates, uses and can radiate radio frequency energy and, if not installed and used in accordance with the instructions, may cause harmful interference to radio communications.
IMPORTANT SAFETY INSTRUCTIONS
Your Compact Disc + Graphics with will provide you with many years of fun and entertainment. It can let you be the “star” as you sing along with your favorite recordings and hear your voice with the music through the system’s speakers. This Karaoke Center is easy to use, yet full of features with a compact design. After just a few simple instructions, you will become an expert.
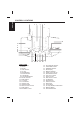
ENGLISH CONTROL LOCATIONS 1 2 3 4 5 6 29 8 9 10 11 12 13 17 16 18 19 21 23 25 20 22 24 FRONT VIEW 1. Camera Lens 2. Handle 3. Monitor 4. CDG Indicator 5. CD Tray 6. Model Number 7. Random Button 8. Loudspeaker 9. PLAY/PAUSE Button 10. Monitor Selector 11. SKIP Buttons 12. Constrast 13. STOP Button 14. ON/OFF LED 15. ON/OFF Button 16. Master Volume Control 17. SKIP Buttons 18. BALANCE Control 19. 20. 21. 22. 23. 24. 25. 26. 27. 28. 29. 30. 31. 32. 33. 34. 35. 36.
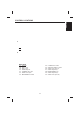
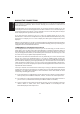
ENGLISH CONTROL LOCATIONS 37 40 REAR VIEW 37. Antenna 38. MIC 1 Jack 39. MIC 2 Jack 40. VIDEO IN Jack 41. CAMERA OUT Jack 42. VIDEO OUT Jack 43. BRIGHTNESS Control 44. 45. 46. 47. 48. 49. 50.
ENGLISH MAKING THE CONNECTIONS CONNECTING POWER You can power the system from a standard AC outlet by using the supplied power cord. CAUTION: The supplied AC power cord has a polarized plug that fits into the wall outlet only one way. If the plug does not fit properly, turn it over and try again. Do not force it. CONNECTING TO YOUR HEADPHONE A headphone jack is provided for using headphones instead of the built-in speaker. (Headphones are sold separately.
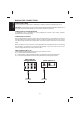
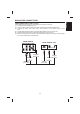
VIDEO CONNECTION (for VCR recording) Please follow the steps below to record CDG lyrics or image on the VCR: (1) Locate the multicolored patch cords. (2) Connect Video Cable (yellow) to the Video Out of the back of the Singing Machine. (3) Connect the other end of the Video Cable (yellow) to the Video Input on your VCR. (4) Plug the white end of the patch cord into the white AUDIO OUT jack on the unit. (5) Plug the red end of the patch cord into the red AUDIO OUT jack on unit.
ENGLISH MAKING THE CONNECTIONS If your television or VCR does not have the required Video Input, you will need an RF Modulator (Radio Frequency Modulator), which connects through your TV Antenna or cable line and serves as Video Input. An RF Modulator can be purchased at almost any consumer electronics retailer. If you are connecting the video from the Singing Machine to either a television or a VCR video input jack, you must specify the source the TV or VCR is to display.
CONNECTING A VIDEO COMPONENT FOR INPUT Please follow the steps below to display CDG lyrics on the Singing Machine’s monitor from another video source: (1) Locate the multicolored patch cords. (2) Connect Video Cable (yellow) to the Video In of the back of the Singing Machine. (3) Connect the other end of the Video Cable (yellow) to the Video Output on another video source such as a VCR. (4) Set the MONITOR Selector to CDG/AUX mode.
ENGLISH MAKING THE CONNECTIONS CONNECTING AN AUDIO COMPONENT FOR INPUT To connect another audio source (such as a Tuner, an AV Receiver or a VCR) so you can sing along with its music, simply connect the Audio Output jacks (Red & White RCA jacks) to the Singing Machine’s AUDIO IN L & R jacks.
D Warning - Tapping or dropping the microphone while it is on can permanently damage your microphone. Resist the urge to swing the microphone around by the cord! PREPARATION ". If CD’s do not This unit is designed to play CD’s bearing the identification logo " conform to the CD standard, they may not play properly. ! Fingerprints and dust should be carefully wiped off with a soft cloth. Wipe in a straight motion from the center of the disc to the outside edge.
ENGLISH CD OR CD+G OPERATION STOP MODE If the STOP button is pressed in the course of playing, the disc will cease to play. (The total number of tracks will be shown on the LED window). SKIP PLAY (FOR BOTH CD AND CDG DISCS) ! During STOP mode, you can skip up or down to your desired track number by pressing the SKIP button( - SKIP ). ! To resume playing the selected song, press PLAY/PAUSE button. SEARCH (FOR AUDIO CD DISC ONLY) When playing any audio CD, press and hold the SKIP button ( -SKIP).
POWER SWITCH After using the unit, turn off the power by pressing the ON/OFF button. CLEANING DISC Cleaning will not normally be necessary. However, should fingerprints, dust or dirt appear, you can wipe them off with a soft, lint - free cloth. Wipe the disc in a straight line from center to edge. You can moisten the disc first with ordinary tap water if necessary. CLEANING THE UNIT To clean the exterior of the unit, simply wipe with a soft clean cloth moistened with plain lukewarm water.
ENGLISH TROUBLE SHOOTING GUIDE If you have followed the instructions and are having difficulty operating the unit, locate the PROBLEM in the left column below. Check the corresponding POSSIBLE CAUSE column to locate and remedy the problem. PROBLEM No power when the unit is on. POSSIBLE CAUSE SOLUTION No power plug connection at Insert the power plug into the AC the AC outlet. outlet. No power when plugged The AC outlet may not have power. in. Volume control is set to minimum.
PROBLEM No sound - If audio is going through TV or VCR. POSSIBLE CAUSE Source Selection on TV or VCR is not correct. SOLUTION Follow directions on page E7 for ‘Video Connection’. Connect the video cable to the Video cable is not connected Singing Machine’s VIDEO OUT properly to the TV. and to the TV VIDEO IN. Source selector on TV is not Using your TV Remote to select VIDEO input. set to VIDEO. No song lyrics appear on screen. Picture is jumping up. No image display on Singing Machine’s monitor.
ENGLISH SPECIFICATIONS AUDIO SECTION: OUTPUT POWER OUTPUT IMPEDANCE 2 WATTS + 2 WATTS (RMS) 8 OHMS CD PLAYER SECTION: FREQUENCY RESPONSE SIGNAL - TO - NOISE RATIO WOW AND FLUTTER D - A CONVERSION NUMBER OF PROGRAMS SAMPLING SYSTEM 100 Hz - 20 kHz (+/-3 dB) 50 dB IMMEASURABLE 1 BIT D/A CONVERTER 20 TRACKS PROGRAM MEMORY 8 TIME OVER SAMPLING MONITOR SECTION RADIO SECTION: AM FREQUENCY RANGE FM FREQUENCY RANGE 5.
In addition to all of the terminology associated with consumer electronics products, a few additional terms are used almost exclusively in karaoke. These terms are meant to familiarize you with the world of Karaoke. The features listed below may not necessarily pertain to the particular model Singing Machine that you have. The following are some brief explanations of karaoke terms: Echo: Echo adds depth and resonance to a singer's voice without affecting the music.
ADVERTENCIAS ADVERTENCIA: El CD Player es producido y probado, en conformidad con los estándares de seguridad. El obedece las especificaciones FCC y está conforme a los estándares de seguridad del Departamento de Salud y Servicios Humanos de los EE.UU. PARA REDUCIR EL RIESGO DE INCENDIOS O DE CHOQUES ELÉCTRICOS, NO EXPONGA ESTE EQUIPO A LA CUIDADO ADVERTENCIAS: ! El CD Player emplea un feje de rayos láser.
NOTA: Este aparato digital no excede los limites de Clase B para las emisiones de ruido de radio del aparato digital como estipulado en las Regulaciones de Interferencia de Radio de Industria Canadá. Estos límites fueran establecidos para proporcionar protección razonable contra la interferencia dañosa en una instalación residencial.
INSTRUCCIONES IMPORTANTES DE SEGURIDAD ESPAÑOL 13. Protección del Cable de Fuerza - Cables de fuerza deben ser posicionados de manera que ellos no sean pisados o prensados por objetos puestos sobre o contra ellos, tomando cuidado especial con los cables, en los conectadores, extensiones y en el punto en que salen del producto. 14. Conector de Interconexión con Protección - El producto es equipado con un conectador con protección de sobrecarga Esto es un recurso de seguridad.
INTRODUCCIÓN Este sistema karaoke fue hecho en un proyecto compacto lleno de recursos fáciles de usar. Después de algunas instrucciones sencillas, UD puede tornarse un experto. Antes de usar su equipo unidad, lea este manual para familiarizarse con todos los recursos disponibles y las secciones del manual, que describen sus operaciones. A seguir vaya para la sección de la operación específica que UD quiere ejecutar.
LOCALIZACIÓN DE CONTROLES 2 3 4 5 6 ESPAÑOL 1 29 8 9 10 11 12 13 17 16 18 19 21 23 25 20 22 24 VISIÓN FRONTAL 1. Lentes de la Cámara 2. Alza 3. Monitor 4. LED de CDG 5. Bandeja del CD 6. Numero del Modelo 7. Botón RANDOM 8. Altavoz 9. Botón PLAY/PAUSE 10. Selector MONITOR 11. Botones de SKIP 12. Contraste 13. Botón STOP 14. Encender/Apagar LED 15. Botón Encender/Apagar 16. Control MASTER VOLUME 17. Botones de SKIP 18. Control BALANCE 19. LED PLAY/PAUSE 20. 21. 22. 23. 24. 25. 26. 27. 28. 29. 30.
ESPAÑOL LOCALIZACIÓN DE CONTROLES 37 43 44 45 38 39 46 40 41 47 48 42 49 50 VISTA TRASERA 37. Antena 38. Conectador MIC 1 39. Conectador MIC 2 40. Toma VIDEO IN 41. Toma CAMERA OUT 42. Toma VIDEO OUT 43. Control de Brillo 44. 45. 46. 47. 48. 49. 50.
HACIENDO LAS CONEXIONES ESPAÑOL CONECTANDO A LA ENERGÍA DE LA RED UD puede alimentar el sistema del tomacorriente normal de CA usando el cable de energía suministrado. CUIDADO: El cable de energía CA tiene un conectador polarizado que se encaja en la toma, de una forma única. Sí el conectador no encaja correctamente, delo vuelta e intente de nuevo. No fuerce. CONECTANDO A SU FONO Existe una conexión para uso de un fono de oído, en vez del altavoz interno. (Fonos de oído, son vendidos separadamente.
CONEXIÓN DE VIDEO (Para Grabación VCR) Siga los pasos abajo, para grabar las letras de las músicas CDG o la imagen en el VCR. (1) Localice los cables de interconexión multicolores. (2) Conecte el cable de video (amarillo) en VIDEO OUT en la trasera de la Singing Machine (función de karaoke). (3) Conecte la otra punta del cable de video (amarillo) a la salida de video de otra fuente tal como VCR.
HACIENDO LAS CONEXIONES ESPAÑOL Sí su televisión o VCR no tiene la entrada de video necesaria, UD necesitará de un Modulador RF, que se conecta a la entrada de la antena o de línea de cable de su TV y sirve como entrada de video. Un modulador de RF puede ser adquirido en cualquier tienda de artículos electrónicos. Sí UD estuviera conectando el video de una Singing Machine en la toma de entrada de video de una TV o VCR, UD debe especificar el origen que la TV o VCR deben exhibir.
CONECTANDO UN COMPONENTE DE VIDEO EN LA ENTRADA Siga los pasos abajo, para exhibir las letras de las músicas CDG en el monitor de la Singing Machine, de otra fuente de video: (1) Localice los cables de interconexión multicolores. (2) Conecte el cable de video (amarillo) en VIDEO IN en la trasera de la Singing Machine (función de karaoke). (3) Conecte la otra punta del cable de video (amarillo) a la salida de video de otra fuente tal como VCR o TV. (4) Ponga el Selector MONITOR, en el modo CDG/AUX.
HACIENDO LAS CONEXIONES ESPAÑOL CONECTANDO UN COMPONENTE DE AUDIO EN LA ENTRADA Para conectar otra fuente de audio (tal como un Sintonizador, Receptor AV o un VCR) de forma que UD pueda acompañar la música, conecte, simplemente, las tomas de Salida de Audio (tomas RCA roja y blanca) de este equipo a las tomas AUDIO IN D y E de la Singing Machine.
OPERACIÓN CD O CD+G D Advertencia - Golpeando o dejando caer el micrófono conectado, puede damnificarlo, permanentemente. Resista à la necesidad de tirar el micrófono por el cable! PREPARACIÓN Esta unidad fue proyectada para reproducir CDs que contengan el logotipo de identificación "ddddd". Sí los CD no están de acuerdo con el estándar CD, ellos no reproducirán adecuadamente. ! Impresiones digitales y polvo deben ser, cuidadosamente, removidos con un paño suave.
OPERACIÓN CD O CD+G SALTE REPRODUCCIÓN (PARA DISCOS CD Y CDG) ! Durante el modo STOP, UD puede saltar hasta el número de trilla deseado, pulsando los botones SKIP( - SKIP ). ! Para continuar a reproducir, presione, de nuevo, el botón PLAY/PAUSE. ? ESPAÑOL MODO STOP Sí el botón STOP es presionado durante la reproducción, el disco interrumpe la reproducción. (El número total de pistas será mostrado en el visor LED.
INTERRUPTOR DE FUERZA Después de utilizar el unidad, desconecte la energía eléctrica, presionando el botón Encender/Apagar. LIMPIEZA DEL DISCO Limpieza no será siempre necesaria. No obstante, si hay impresiones digitales, polvo o suciedad, UD puede limpiarlas, con un paño suave, que no suelte pelusas. Pase el paño con un movimiento del centro del disco para el borde externo. UD puede humedecer primero el paño con agua natural de la llave, sí necesario.
GUÍA DE DIAGNÓSTICO Y ARREGLO DE FALLAS Sí UD ha seguido las instrucciones y está con dificultades en operar la unidad, localice el PROBLEMA en la columna izquierda abajo. Verifique la columna CAUSA PROBABLE para localizar y reparar el problema. ESPAÑOL PROBLEMA CAUSA PROBABLE SOLUCIÓN Sin tensión cuando activado. Conectador CA no está conectado en la toma. Instale el conectador de alimentación en la conexión CA. Sin tensión cuando conectado. Toma CA puede estar sin energía.
GUÍA DE DIAGNÓSTICO Y ARREGLO DE FALLAS Sin sonido (sí el audio estuviera pasando por el sistema de sonido). Sin sonido (sí el audio estuviera pasando por TV o VCR). CAUSA PROBABLE SOLUCIÓN La selección de la fuente no Seleccione AUX IN como entrada está bien configurada en el para su equipo doméstico de estéreofónico. música. Conexión inadecuada al sistema estéreo o amplificador de potencia. Siga las instrucciones en la página S10 para conectar a un sistema estereofónico doméstico.
GUÍA DE DIAGNÓSTICO Y ARREGLO DE FALLAS PROBLEMA CAUSA PROBABLE Volumen del micrófono está ajustado para el mínimo. Ajuste MIC VOLUME al máximo. Vuelve para un nivel confortable. Micrófono está ajustado a apagado. Encienda el Mic con el botón ON/OFF localizado en el propio micrófono. Sin son del mic.
DETALLES TÉCNICOS SECCIÓN DEL CD PLAYER: FRECUENCIA DE RESPUESTA RELACIÓN SEÑAL/RUIDO RUIDO Y SISEO CONVERSIÓN D - A NÚMERO DE LOS PROGRAMAS SISTEMA DE MUESTRA SECCIÓN DEL MONITOR SECCIÓN DE RADIO: FAJA DE FRECUENCIA AM BANDA DE FRECUENCIA FM 2 WATTS + 2 WATTS (RMS) 8 OHMS 100 Hz - 20 kHz (+/-3 dB) 50 dB INMENSURABLE CONVERSOR D/A DE 1 BIT MEMORIA DE PROGRAMA DE 20 PISTAS ANTIALIASING (REDUCCION DE DISTORSION) 8 VECES MONITOR 5.
GLOSARIO DE TÉRMINOS DE KARAOKE DE LA SINGING MACHINE ESPAÑOL Además de toda la terminología asociada a los productos electrónicos de consumo, algunos ítems adicionales son usados casi exclusivamente en karaoke. Estos términos tienen el objetivo de familiarizarle con el mundo del karaoke. Los recursos enumerados abajo pueden no pertenecer, necesariamente, al modelo de Singing Machine que UD tiene.
AVERTISSEMENTS Le lecteur de CD est fabriqué et testé pour répondre à des normes spécifiques de sécurité. Conforme aux exigences FCC et obéit aux normes de sécurité du Département Américain de Santé et Services Humains. AVERTISSEMENT: POUR REDUIRE LE RISQUE D'INCENDIE OU DE CHOC NE PAS EXPOSER CE PRODUIT A LA PLUIE OU HUMIDITE. AVERTISSEMENT AVERTISSEMENTS: ! Le lecteur de CD utilise un RISQUE DE CHOC ELECTRIQUE NE PAS OUVRIR rayon laser.
AVERTISSEMENTS REMARQUE: Cet appareil numérique ne dépasse pas les limites de classe B se rapportant aux émissions de parasites radio provenant d'appareils numériques, selon les restrictions d'Industrie Canada relatives aux interférences radio. Cet appareil génère, utilise et peut émettre des fréquences radio et s'il n'est pas installé et installé selon les instructions, peut nuire aux radiocommunications. Toutefois, rien ne garantit que des parasites ne surviendront pas dans une installation particulière.
13. Protection du fil d'Alimentation - Les fils d'alimentation doivent être placés de manière à ce que l'on ne marche pas dessus ou qu'ils soient pincés par des objets placés sur ou contre eux, en faisant particulièrement attention aux fils branchés aux prises, boîtiers et au point de sortie de l'appareil.
INTRODUCTION Votre pour Disques Compacts+Graphiques avec vision karaoké vous offrira des années de plaisir et de divertissement. Il peut vous transformer en "Star" quand vous accompagnez vos enregistrements favoris et entendez votre voix avec la musique dans les haut-parleurs. Pour faciliter vos consultations, quelques-unes unes des principales caractéristiques du Centre de karaoké sont énumérées ici: Paroles sur l'écran TV - Affiche les paroles au rythme de la musique quand un CD+G est joué.
LOCALISATION DES CONTRÔLES 1 2 3 4 5 6 7 FRANÇAIS SMVG-620 29 8 30 31 32 9 33 34 35 36 10 11 12 13 14 15 17 16 18 19 21 23 25 20 22 24 26 VUE DE FACE 1. Objectif de la Camera 2. Poignée 3. MONITEUR 4. Indicateur CDG 5. Plateau de CD 6. Numéro de Modèle 7. Bouton ALEATOIRE 8. Haut-parleur 9. Bouton LECTURE/ PAUSE 10. Sélecteur du MONITEUR 11. Boutons SAUTER 12. Contraste 13. Bouton ARRET 14. Indicateur Allumer/Eteindre 15. Bouton Allumer/Eteindre 16. Contrôle du Volume Principal 17.
37 43 44 45 38 39 46 40 41 47 48 42 49 50 VUE ARRIÈRE 37. Antenne 38. Prise jack MIC 1 39. Prise jack MIC 2 40. Prise jack de l'ENTREE VIDEO 41. Prise jack CAMERA OUT 42. Prise jack de l'SORTIE VIDEO 43. Contrôle de Luminosité 44. 45. 46. 47. 48. 49. 50.
POUR FAIRE LES CONNECTIONS BRANCHEMENT DE L'ALIMENTATION Vous pouvez brancher le système à une prise AC normale en utilisant le fil d'alimentation fourni. AVERTISSEMENT: Le fil d'alimentation AC fourni possède une prise polarisée qui n'entre dans la prise murale que d'une façon. Si la prise ne rentre pas débranchez et essayez à nouveau. Ne pas forcer. FRANÇAIS CONNEXION DE VOTRE ECOUTEUR Il y a une prise d'écouteurs pour utiliser un écouteur à la place du haut-parleur.
POUR FAIRE LES CONNECTIONS VUE ARRIÈRE DE LA SINGING MACHINE VIDEO IN CAMERA OUT VIDEO OUT L L R R AUDIO OUT AUDIO IN VUE ARRIÈRE DU LA MAGNETOSCOPE R VIDEO IN SORTIE AUDIO GAUCHE (JACKS BLANC) SORTIE AUDIO DROITE (JACKS ROUGE) SORTIE VIDEO (PRISE JACK JAUNE) L AUDIO IN ENTREE AUDIO GAUCHE (JACK BLANC) ENTREE AUDIO DROITE (JACK ROUGE) ENTREE VIDÉO (PRISE JACK JAUNE) F8 FRANÇAIS CONNEXION VIDEO (Pour enregistrement à partir du Magnétoscope) Veuillez suivre les étapes ci-dessous pour affiche
POUR FAIRE LES CONNECTIONS Si votre téléviseur ne possède pas l'Entrée Vidéo nécessaire, vous aurez besoin d'un Modulateur RF (modulateur de Radio Fréquence), qui fait la connexion au travers de l'Antenne TV ou du câble et sert d'Entrée Vidéo. FRANÇAIS Un Modulateur RF peut être acheté chez presque tous les détaillants de matériel électronique.
POUR FAIRE LES CONNECTIONS CONNEXION D'UN APPAREIL VIDÉO D’ENTREE Veuillez suivre les étapes ci-dessous pour afficher les paroles du CDG sur le moniteur de la Singing Machine à partir d'une autre source vidéo: (1) Localisez les fils de connexion multicolores. (2) Connectez le câble vidéo (jaune) à l'ENTREE Vidéo à l'arrière de la Singing Machine. (3) Connectez l'autre extrémité au câble vidéo (jaune) à la Sortie Vidéo d'une autre source vidéo, telle que MAGNETOSCOPE.
POUR FAIRE LES CONNECTIONS CONNEXION D'UN APPAREIL AUDIO D’ENTREE Pour connecter une autre source audio (telle que Tuner, Récepteur AV ou MAGNETOSCOPE) de façon à ce que vous puissiez accompagner cette musique, connectez simplement les prises jack de Sortie Audio (prises jack RCA Rouge et Blanche) aux prises jack ENTREE AUDIO G & D de la Singing Machine.
FONCTIONNEMENT DU CD OU CD+G Avertissement - Si vous frappez ou laissez tomber le micro quand il est utilisé, vous pourrez l'endommager définitivement. Résistez à l'envie de faire tournoyer le micro par le fil! PRÉPARATION ! L'appareil est conçu pour jouer des CD possédant le logo d'identification " ". Si les CD ne sont pas conformes aux normes des CD, ils ne seront pas joués correctement. ! Les empreintes digitales et la poussière doivent être soigneusement nettoyées avec un chiffon doux.
FONCTIONNEMENT DU CD OU CD+G MODE ARRET Si le bouton ARRET est pressé pendant la reproduction, le disque s'arrêtera de jouer. (Le nombre total de pistes est montré dans la fenêtre LED). SAUTER REPRODUCTION (POUR DISQUES CD AUDIO ET CDG) ! En mode ARRET vous pouvez sauter de pistes en avant ou en arrière jusqu'au numéro désiré en appuyant sur les boutons SAUTER ( - SKIP ). ! Pour arrêter de jouer, pressez ceci bouton à nouveau.
SOINS ET ENTRETIEN INTERRUPTEUR D'ALIMENTATION Après avoir utilisé appareil, éteignez en appuyant sur le bouton ALLUMER/ ETEINDRE. NETTOYAGE DU DISQUE Normalement le nettoyage ne sera pas nécessaire. Cependant, si des empreintes digitales, poussière ou saleté apparaissent, vous pouvez les nettoyer avec un chiffon doux sans peluche. Nettoyez en un mouvement droit à partir du centre du disque vers le b o r d e x t e r n e .
GUIDE DE LOCALISATION DE PROBLEMES Si vous avez suivi les instructions et que vous avez des difficultés à faire fonctionner l'appareil, localisez le PROBLEME dans la colonne de gauche ci-dessous. Vérifiez la CAUSE POSSIBLE correspondante dans la colonne de localisation et réglez le problème. PROBLEME CAUSE POSSIBLE SOLUTION Ne s'allume pas quand il Pas de connexion de la prise Insérez la prise d'alimentation est en position ALLUME. d'alimentation à la prise AC dans la prise AC.
GUIDE DE LOCALISATION DE PROBLEMES Pas de son (si l'audio passe par l'appareil stéréo). CAUSE POSSIBLE SOLUTION Le choix de source sur votre Sélectionnez ENTREE AUX stéréo n'est pas placé comme source pour votre appareil correctement. stéréo. Connexion incorrecte à l'appareil stéréo ou au système PA (public). Suivez les instructions page F10 pour connecter à votre appareil stéréo.
FRANÇAIS DETAILS TECHNIQUES SECTION AUDIO: ALIMENTATION DE SORTIE IMPEDANCE DE SORTIE 2 WATTS + 2 WATTS (RMS) 8 OHMS SECTION DU LECTEUR DE CD: REPONSE DE FREQUENCE RAPPORT SIGNAL - BRUIT BRUIT ET CHUINTEMENT D - A CONVERSION NOMBRE DE PROGRAMMES SYSTEME D’ÉCHANTILLONNAGE 100 Hz - 20 kHz (+/-3 dB) 50 dB INCOMMENSURABLE 1-BIT DAC PROGRAMMATION ALEATOIRE A 20 TOURS ANTICRENELAGE 8 FOIS SECTION MONITEUR SECTION RADIO: GAMME DE FRÉQUENCE AM GAMME DE FRÉQUENCE FM MONITEUR TV 5,5” SYSTÈME NTSC RÉSOLUTION DE
GLOSSAIRE DES TERMES DU KARAOKE SINGING MACHINE En plus de la terminologie associée avec les appareils électroniques de consommation, des termes supplémentaires sont utilisés presque exclusivement pour le karaoké. Ces termes servent à vous familiariser avec l'univers du Karaoké. Les caractéristiques énumérées cidessous, ne s'appliquent peut-être pas nécessairement au modèle particulier du Singing Machine que vous avez.
The Singing Machine Company, Inc. 6601 Lyons Road, Bldg. A7, Coconut Creek, FL33073-9902, USA. TEL: (954) 596-1000 FAX: (954) 596-2000 620-0606-ENG-SPA-FRE01 PRINTED IN CHINA IMPRESO EN CHINA IMPRIMÉ EN CHINE VISIT OUR WEBSITE www.singingmachine.com VISITE NUESTRO SITIO INTERNET www.singingmachine.com VISITE NOTRE SITE INTERNET www.singingmachine.