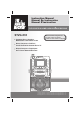
Instruction Manual Manual De Instrucción Manuel D'instruction THE LEADER IN HOME KARAOKE AND BEYOND STVG-535 Compact Disc + Graphics With Built-In TV Karaoke Center Please read before using this unit. Lea antes de usar esta unidad. Veuillez lire avant d'utiliser cet appareil. Disco Compacto + Gráficos Con El Central De Karaoke En La TV Disque Compact + Graphiques Avec Centre Karaoké Encastre Ò The Singing Machine is a registered trademark of The Singing Machine Co., Inc.
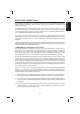
ENGLISH WARNINGS This CD player is made and tested to meet exacting safety standards. It meets FCC requirements and complies with safety performance standards of the U.S. Department of Health and Human Services. WARNING: TO REDUCE THE RISK OF FIRE OR SHOCK HAZARD, DO NOT EXPOSE THIS PRODUCT TO RAIN OR MOISTURE. CAUTION Warnings: ! This CD player employs a laser light beam.
NOTE: This digital apparatus does not exceed the Class B limits for radio noise emissions from digital apparatus as set out in the Radio Interference Regulations of Industry Canada. These limits are designed to provide reasonable protection against harmful interference in a residential installation. This equipment generates, uses and can radiate radio frequency energy and, if not installed and used in accordance with the instructions, may cause harmful interference to radio communications.
ENGLISH IMPORTANT SAFETY INSTRUCTIONS 13. Power-Cord Protection - Power supply cords should be routed so that they are not likely to be walked on or pinched by items placed upon or against them, paying particular attention to cords at plugs, convenience receptacles, and the point where they exit from the product. 14. Protective Attachment Plug - The product is equipped with an attachment plug having overload protection. This is a safety feature.
Your Compact Disc + Graphics with Built-In TV, Karaoke Center will provide you with many years of fun and entertainment. You will be the “star” while singing with your favorite recordings as well as listening to your voice with the music through the system’s speakers. This karaoke center is compact and designed to include many features, yet it is easy to use. After just a few simple instructions, you will become an expert.
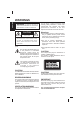
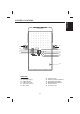
ENGLISH CONTROL LOCATIONS 1 2 3 4 5 6 7 8 9 10 11 12 25 26 27 28 29 13 14 15 30 16 17 18 19 20 21 32 33 22 23 24 34 35 36 31 37 FRONT VIEW 1. REPEAT Indicator 2. PROGRAM Indicator 3. LED Display 4. CDG Indicator 5. PLAY/PAUSE Indicator 6. Model Number 7. STOP Button 8. CD Door 9. CD Door Open Button 10. Camera Lens 11. Monitor 12. Master Volume Control 13. PROGRAM Button 14. 15. 16. 17. 18. 19. 20. 21. 22. 23. 24. 25. 26.
ENGLISH CONTROL LOCATIONS 38 43 39 44 40 41 42 45 46 47 48 49 REAR VIEW 38. MIC Holder 39. AUX OUT Jack (L) 40. VIDEO IN Jack 41. VIDEO OUT Jack 42. AUX OUT Jack (R) 43. MIC Holder 44. 45. 46. 47. 48. 49.
ENGLISH MAKING THE CONNECTIONS CONNECTING POWER You can power the system from a standard AC outlet by using the supplied power cord. CAUTION: The supplied AC power cord has a polarized plug that fits into the wall outlet only one way. If the plug does not fit properly, turn it over and try again. Do not force it. CONNECTING TO YOUR TV The Singing Machine includes a patch cord to provide you the option of either connecting an external audio/sound system and/or video device.
If your television or VCR does not have the required Video Input, you will need an RF Modulator (Radio Frequency Modulator), which connects through your TV Antenna or cable line and serves as Video Input. An RF Modulator can be purchased at almost any consumer electronics retailer. If you are connecting the video from the Singing Machine to either a television or a VCR video input jack, you must specify the source the TV or VCR is to display.
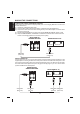
ENGLISH MAKING THE CONNECTIONS CONNECTING A VIDEO COMPONENT FOR INPUT Please follow the steps below to display CDG lyrics on the Singing Machine’s monitor from another video source: (1) Locate the multicolored patch cords. (2) Connect Video Cable (yellow) to the Video In of the back of the Singing Machine. (3) Connect the other end of the Video Cable (yellow) to the Video Output on another video source such as a VCR. (4) Set the FUNCTION SELECT to AUX mode and the MONITOR ON/OFF switch to ON.
CONNECTING AN AUDIO COMPONENT FOR INPUT To connect another audio source (such as a Tuner, an AV Receiver or a VCR) so you can sing along with its music, simply connect the Audio Output jacks (Red & White RCA jacks) to the Singing Machine’s AUX IN L & R jacks.
ENGLISH CD OR CD+G OPERATION PREPARATION ! This unit is designed to play CD’s bearing the identification logo " ". If CD’s do not conform to the CD standard, they may not play properly. ! Fingerprints and dust should be carefully wiped off with a soft cloth. Wipe in a straight motion from the center of the disc to the outside edge. ! Never use chemicals, such as record cleaning sprays, antistatic sprays or fluids, benzene or thinner to clean compact discs.
PLAY/PAUSE MODE ! To start playing, press the PLAY/PAUSE button. The first track [ ] and the PLAY/PAUSE LED will be lit. ! To temporarily stop playing, press the PLAY/PAUSE button. The PLAY/PAUSE LED Indicator will flash. ! To resume play, press this button again. PLEASE NOTE: Pressing pause when a CDG is playing may cause distorted lyrics on the monitor. Any distortion will remain until the whole screen is refreshed during an instrumental break or you stop the song and start it from the beginning.
ENGLISH CASSETTE OPERATION LOADING AND UNLOADING CASSETTES Follow these steps to load and unload cassettes: 1. Press STOP/EJECT button (10). 2. Insert cassette with desired side facing you, tape surface down. Avoid touching tape. 3. Close cassette holder/tape cover. To ensure firm locking of cassette holder/ tape covers, please press the cassette door(s) at the center point (or the maximum right position) until a ‘click’ sound is heard.
PUBLIC ADDRESS - Using a Microphone Public Address (PA) Operation Procedures. 1. Connect the supplied microphone to either one of the MIC input jacks. 2. Press the POWER ON/OFF button to turn the unit on. 3. Switch the FUNCTION SELECT to TAPE. Rotate the MIC VOLUME control to central position. 4. Move the ON/OFF switch located on the microphone to the ON position and speak or sing into the microphone.
ENGLISH CARE AND MAINTENANCE NOTE D Screwdrivers and other metal objects should never be allowed to come in contact with tape heads. These will scratch the sensitive surface causing damage to your tapes. D M a g n e ts o r m a g n e t i z e d o b j e c ts should not be placed near tape heads. POWER SWITCH After using the unit, turn off the power by pressing the ON/OFF button. CLEANING THE UNIT To clean the exterior of the unit, simply wipe with a soft clean cloth moistened with plain lukewarm water.
If you have followed the instructions and are having difficulty operating the unit, locate the PROBLEM in the left column below. Check the corresponding POSSIBLE CAUSE column to locate and remedy the problem. POSSIBLE CAUSE PROBLEM No power when the unit is on. SOLUTION No power plug connection at Insert the power plug into the AC the AC outlet. outlet. No power when plugged Power cord is not connected Connect power cord to machine securely. to machine. in. Volume control is set to minimum.
ENGLISH TROUBLE SHOOTING GUIDE PROBLEM No sound - If audio is going through TV or VCR. CASSETTE Unsteady tape sound. POSSIBLE CAUSE SOLUTION Source Selection on TV or VCR is not correct. Follow directions on page E7 for ‘Video Connection’. Dirty capstan. Clean capstan. Irregular cassette tape winding. Replace tape. Pitch control may be in wrong position. Adjust Pitch control. The erasure prevention tabs Replace tape or cover tab openings with adhesive tape. are broken out. Cannot record.
PROBLEM No image display on Singing Machine’s monitor. POSSIBLE CAUSE SOLUTION The Camera Lens is down. Lift up a Camera Lens. Monitor Selector is not set properly. Set MONITOR Selector to CAMERA mode. Mic volume control. Adjust mic volume to max. Then back it off to a comfortable level. Mic is off. Turn on mic with the ON/OFF switch located on the microphone. No sound from mic.
ENGLISH SPECIFICATIONS AUDIO SECTION: OUTPUT POWER (MAXIMUM) OUTPUT IMPEDANCE 5 WATTS (RMS) 8 OHMS CD PLAYER SECTION: FREQUENCY RESPONSE SIGNAL - TO - NOISE RATIO WOW AND FLUTTER D - A CONVERSION NUMBER OF PROGRAMS SAMPLING SYSTEM 100 Hz - 20 kHz (+/- 3dB) 50 dB IMMEASURABLE 1-BIT DAC 20 STEPS RANDOM ACCESS PROGRAMMING 8 TIMES OVER SAMPLING MONITOR SECTION (WHERE APPLICABLE) CASSETTE DECK SECTION: WOW AND FLUTTER FREQUENCY RESPONSE TAPE SPEED 5.5” TV MONITOR NTSC SYSTEM 220 LINE RESOLUTION 0.
In addition to all of the terminology associated with consumer electronics products, a few additional terms are used almost exclusively in karaoke. These terms are meant to familiarize you with the world of Karaoke. The features listed below may not necessarily pertain to the particular model Singing Machine that you have. The following are some brief explanations of karaoke terms: Echo: Echo adds depth and resonance to a singer's voice without affecting the music.
ADVERTENCIAS ADVERTENCIA: El CD Player es producido y probado, en conformidad con los estándares de seguridad. El obedece las especificaciones FCC y está conforme a los estándares de seguridad del Departamento de Salud y Servicios Humanos de los EE.UU. PARA REDUCIR EL RIESGO DE INCENDIOS O DE CHOQUES ELÉCTRICOS, NO EXPONGA ESTE EQUIPO A LA CUIDADO ADVERTENCIAS: ! El CD Player emplea un feje de rayos láser.
NOTA: Este aparato digital no excede los limites de Clase B para las emisiones de ruido de radio del aparato digital como estipulado en las Regulaciones de Interferencia de Radio de Industria Canadá. Estos límites fueran establecidos para proporcionar protección razonable contra la interferencia dañosa en una instalación residencial.
INSTRUCCIONES IMPORTANTES DE SEGURIDAD ESPAÑOL 13. Protección del Cable de Fuerza - Cables de fuerza deben ser posicionados de manera que ellos no sean pisados o prensados por objetos puestos sobre o contra ellos, tomando cuidado especial con los cables, en los conectadores, extensiones y en el punto en que salen del producto. 14. Conector de Interconexión con Protección - El producto es equipado con un conectador con protección de sobrecarga Esto es un recurso de seguridad.
INTRODUCCIÓN Este aparato de karaoke es compacto y diseñado para incluir muchas funciones, todavía es fácil usar. Después de algunas instrucciones sencillas, UD puede tornarse un experto. Antes de que usted intente usar su unidad, por favor lea este manual completamente para familiarizarse con todas las funciones disponibles y las secciones del manual que describen su funcionamiento. A seguir vaya para la sección de la operación específica que UD quiere ejecutar.
LOCALIZACIÓN DE CONTROLES 1 2 3 4 5 6 7 8 9 ESPAÑOL 10 11 12 25 26 27 28 29 13 14 15 30 16 17 18 19 20 21 32 33 22 23 24 34 35 36 31 37 VISIÓN FRONTAL 1. Indicador REPEAT 2. Indicador PROGRAMA 3. LED 4. Indicador de CDG 5. Indicador del PLAY/ PAUSE 6. Numero del Modelo 7. Botón de STOP 8. Puerta del CD 9. Botón para abrir el gabinete del CD 10. Lentes de la CÁMARA 11. Monitor 12. Control MASTER VOLUME 13. 14. 15. 16. 17. 18. 19. 20. 21. 22. 23. 24. 25. 26.
ESPAÑOL LOCALIZACIÓN DE CONTROLES 38 43 39 44 40 41 42 45 46 47 48 49 VISTA TRASERA 38. Soporte de los Micrófono 39. Toma de Salida Auxiliar (D) 40. Toma VIDEO INPUT 41. Toma VIDEO OUT 42. Toma de Salida Auxiliar (E) 43. Soporte de los Micrófono 44. 45. 46. 47. 48. 49.
HACIENDO LAS CONEXIONES ESPAÑOL CONECTANDO A LA ENERGÍA DE LA RED UD puede alimentar el sistema del tomacorriente normal de CA usando el cable de energía suministrado. CUIDADO: El cable de energía de CA que se incluye tiene una clavija polarizada que entra en el enchufe de la pared sólo de una forma. Si la clavija no entra de manera adecuada, voltéela e intente de nuevo. No la fuerce.
HACIENDO LAS CONEXIONES Un modulador de RF puede ser adquirido en cualquier tienda de artículos electrónicos. Sí UD estuviera conectando el video de una Singing Machine en la toma de entrada de video de una TV o VCR, UD debe especificar el origen que la TV o VCR deben exhibir. El guía de usuario de su TV o VCR pueden le decir como exhibir el señal de video de la toma de entrada de video. Sí UD no tiene el manual de su TV o VCR, sugerimos llamar el departamento de asistencia técnica del fabricante.
ESPAÑOL HACIENDO LAS CONEXIONES CONECTANDO UN COMPONENTE DE VIDEO EN LA ENTRADA Siga los pasos abajo, para exhibir las letras de las músicas CDG en el monitor de la Singing Machine, de otra fuente de video: (1) Localice los cables de interconexión multicolores. (2) Conectar el cable vídeo (amarillo) a la entrada Vídeo en el lado de la Singing Machine. (3) Conecte la otra punta del cable de video (amarillo) a la salida de video de otra fuente tal como VCR o TV.
HACIENDO LAS CONEXIONES VISTA POSTERIOR DE LA SINGING MACHINE OTROS COMPONENTES DE AUDIO AUX OUT IN R L L VIDEO OUT AUDIO OUT R ENTRADA AUXILIAR E (TOMA ROJA) ENTRADA AUXILIAR D (TOMA BLANCA) SALIDA DE AUDIO E (TOMA ROJA) SALIDA DE AUDIO D (TOMA BLANCA) SELECTOR MONITOR ! Para reproducir un CDG, deje el selector MONITOR en el modo CÁMERA, CDG/AUX u OFF. ! Para exhibir su imagen en el monitor de la Singing Machine, deje el selector MONITOR en el modo CÁMARA.
ESPAÑOL OPERACIÓN CD O CD+G PREPARACIÓN ! Esta unidad fue proyectada para reproducir CDs que contengan el logotipo de identificación “ ”. Sí los CD no están de acuerdo con el estándar CD, ellos no reproducirán adecuadamente. ! Impresiones digitales y polvo deben ser, cuidadosamente, removidos con un paño suave. Pase el paño con un movimiento del centro del disco para el borde externo.
MODO PLAY/PAUSE ! Para empezar a tocar, presione el botón PLAY/PAUSE. La primera trilla [ ] y el indicador del LED PLAY PAUSE será visto. ! Para interrumpir la reproducción, presione el botón PLAY/PAUSE de nuevo. El LED PLAY/PAUSE centellea. ! Para continuar a reproducir, presione, de nuevo, el botón. OBSERVE QUE: Presionando PAUSE cuando un CDG está tocando, puede hacer con que letras destorcidas aparezcan en el monitor.
ESPAÑOL OPERACIÓN DE LA UNIDAD DE CINTA CASETE I N S TA L A N D O Y R E M O V I E N D O CASETES Siga esos pasos para colocar y retirar cintas casetes. 1. Presione el botón STOP/EJECT (10). 2. Instale una cinta con el lado deseado en su dirección, superficie de la cinta para abajo. Evite tocar la cinta. 3. Cierre la tapa del casete/tapa de la unidad de cinta.
AMPLIFICACIÓN DE LA POTENCIA – USANDO UN MICRÓFONO Procedimiento de Operación con la Amplificación de Potencia. 1. Conecte el micrófono suministrado a una de las toma (as) de entrada MIC. 2. Presione el botón POWER para encender el aparato. 3. Presione el selector FUNCTION para seleccionar la función “TAPE”. Gire el control de Volumen del MIC para la posición central. 4. Conecte el Micrófono con el selector ON/OFF localizado en el propio micrófono y hable o cante, a través del.
CUIDADOS Y MANTENIMIENTO NOTA D Nunca permita que desarmadores u otros objetos de metal tengan contacto con las cabezas de las caseteras. Esto raspará la superficie sensible dañando así a sus casetes. D No se debe colocar imanes u objetos magnetizados cerca de las cabezas. ESPAÑOL INTERRUPTOR DE ENCENDIDO / APAGADO Después de usar la unidad unidad, apáguela al presionar el interruptor de Encender/ Apagar.
GUÍA DE DIAGNÓSTICO Y ARREGLO DE FALLAS Sí UD ha seguido las instrucciones y está con dificultades en operar la unidad, localice el PROBLEMA en la columna izquierda abajo. Verifique la columna CAUSA PROBABLE para localizar y reparar el problema. CAUSA PROBABLE SOLUCIÓN Sin tensión cuando activado. Conectador CA no está conectado en la toma. Instale el conectador de alimentación en la conexión CA. Sin tensión cuando conectado. El cordón de suministro de energía no es conectado a su Singing Machine.
GUÍA DE DIAGNÓSTICO Y ARREGLO DE FALLAS ESPAÑOL PROBLEMA Ningún sonido - cuando el audio es conectado a un sistema estéreo de casa. Sin sonido - sí el audio estuviera pasando por TV o VCR. CINTA CASETE Sonido de la cinta inestable. No se puede grabar. Sonido de la cinta grabada está destorcido. CAUSA PROBABLE SOLUCIÓN La selección de la fuente no Seleccione AUX IN como entrada está bien configurada en el para su equipo doméstico de estéreofónico. música.
GUÍA DE DIAGNÓSTICO Y ARREGLO DE FALLAS La letra de la música no aparee en la pantalla. Imagen saltando. Ninguna imagen visualizada en el monitor de la Singing Machine. CAUSA PROBABLE SOLUCIÓN Selector de Entrada en la TV no está en video. Use el control remoto de la TV para seleccionar la entrada de video. Un CDG es colocado, pero el indicador de CDG no se enciende. Verifique si el disco esta limpio. (Vea las instrucciones de limpieza, en la página S15.
DETALLES TÉCNICOS ESPAÑOL SECCIÓN DE AUDIO: POTENCIA DE SALIDA (MÁXIMA) IMPEDANCIA DE SALIDA SECCIÓN DEL CD PLAYER: FRECUENCIA DE RESPUESTA RELACIÓN SEÑAL/RUIDO RUIDO Y SISEO CONVERSIÓN D - A NÚMERO DE LOS PROGRAMAS SISTEMA DE MUESTRA SECCIÓN DEL MONITOR (CUANDO APLICABLE) CASETE DECK SECTION: RUIDO Y SISEO RESPUESTA DE FRECUENCIA VELOCIDAD DE LA CINTA 5 WATTS (RMS) 8 OHMS 100 Hz - 20 kHz (+/- 3dB) 50 dB INMENSURABLE CONVERSOR D/A DE 1 BIT MEMORIA DE PROGRAMA DE 20 PISTAS ANTIALIASING (REDUCCION DE DI
GLOSARIO DE TÉRMINOS DE KARAOKE DE LA SINGING MACHINE Control ECHO: El eco da profundidad y resonancia a la voz del cantante, sin afectar la música. El eco es producido por una realimentación controlada de la voz del cantor. Grabación Múltiplex: Nuestras grabaciones múltiplex tienen 2 copias de la misma canción. Una versión es una grabación estereofónica de la canción sin la voz del cantor.
AVERTISSEMENTS Le lecteur de CD est fabriqué et testé pour répondre à des normes spécifiques de sécurité. Conforme aux exigences FCC et obéit aux normes de sécurité du Département Américain de Santé et Services Humains. AVERTISSEMENT: POUR REDUIRE LE RISQUE D'INCENDIE OU DE CHOC NE PAS EXPOSER CE PRODUIT A LA PLUIE OU HUMIDITE. AVERTISSEMENT AVERTISSEMENTS: ! Le lecteur de CD utilise un RISQUE DE CHOC ELECTRIQUE NE PAS OUVRIR rayon laser.
AVERTISSEMENTS REMARQUE: Cet appareil numérique ne dépasse pas les limites de classe B se rapportant aux émissions de parasites radio provenant d'appareils numériques, selon les restrictions d'Industrie Canada relatives aux interférences radio. Cet appareil génère, utilise et peut émettre des fréquences radio et s'il n'est pas installé et installé selon les instructions, peut nuire aux radiocommunications. Toutefois, rien ne garantit que des parasites ne surviendront pas dans une installation particulière.
IMPORTANTES INSTRUCTIONS DE SECURITE 13. Protection du fil d'Alimentation - Les fils d'alimentation doivent être placés de manière à ce que l'on ne marche pas dessus ou qu'ils soient pincés par des objets placés sur ou contre eux, en faisant particulièrement attention aux fils branchés aux prises, boîtiers et au point de sortie de l'appareil. FRANÇAIS 14. Prise Accessoire de Protection - Le produit est équipé d'une prise accessoire avec protection de surcharge. C'est un dispositif de sécurité.
INTRODUCTION Votre pour Disques Compacts + Graphiques avec vi sion karao vous offrira des années de plaisir et de divertissement. Vous serez la “star” quand vous chanterez en vous accompagnant sur vos enregistrements préférés ainsi que lorsque vous entendrez votre voix dans les haut-parleurs.
LOCALISATION DES CONTROLES 1 2 3 4 5 6 7 8 9 10 11 12 25 26 27 28 29 FRANÇAIS 13 14 15 30 16 17 18 19 20 21 32 33 22 23 24 34 35 36 31 37 VUE DE FACE 1. Indicateur REPEAT 2. Indicateur PROGRAMME 3. Affichage Lumineux LED 4. Indicateur du CDG 5. Indicateur LECTURE/ PAUSE 6. Numéro de Modèle 7. Bouton ARRET 8. Porte du CD 9. Bouton d'OUVERTURE de la porte du CD 10. Lentes de la CÁMARA 11. Moniteur 12. Contrôle de VOLUME PRINCIPAL 13. B outon PROGRAMME 14. 15. 16. 17. 18. 19. 20. 21. 22. 23. 24.
38 43 39 44 40 41 42 45 46 47 48 49 VUE ARRIERE 38. Support de Micro 39. Jack de sortie auxiliaires (Gauche) 40. Prises jack ENTREE VIDEO 41. Prises jack SORTIE VIDEO 42. Jack de sortie auxiliaires (Droite) 43. Support de Micro 44. 45. 46. 47. 48. 49.
POUR FAIRE LES CONNECTIONS BRANCHEMENT DE L'ALIMENTATION Vous pouvez brancher le système à une prise AC normale en utilisant le fil d'alimentation fourni. AVERTISSEMENT: Le cordon d'alimentation fourni a une fiche polarisée qui n’entre dans la prise de courant murale que dans un seul sens. Si vous ne parvenez pas à introduire la fiche dans la prise, essayer dans l'autre sens. Ne pas la forcer. FRANÇAIS BRANCHEZ - LE SUR VOTRE T.V.
LOCALISATION DES CONTRÔLES Si votre téléviseur ne possèdent pas l'Entrée Vidéo nécessaire, vous aurez besoin d'un Modulateur RF (modulateur de Radio Fréquence), qui fait la connexion au travers de l'Antenne TV ou du câble et sert d'Entrée Vidéo. Un Modulateur RF peut être acheté chez presque tous les détaillants de matériel électronique.
POUR FAIRE LES CONNECTIONS CONNEXION D'UN APPAREIL VIDEO D’ENTREE Veuillez suivre les étapes ci - dessous pour afficher les paroles du CDG sur le moniteur de la Singing Machine à partir d'une autre source vidéo: (1) Localisez les fils de connexion multicolores. (2) Connectez le câble vidéo (jaune) à l'ENTREE Vidéo située sur le côté de la Singing Machine. (3) Connectez l'autre extrémité au câble vidéo (jaune) à la Sortie Vidéo d'une autre source vidéo, telle que MAGNETOSCOPE.
POUR FAIRE LES CONNECTIONS CONNEXION D'UN APPAREIL AUDIO D’ENTREE Pour connecter une autre source audio (telle que Tuner, Récepteur AV ou MAGNETOSCOPE) de façon à ce que vous puissiez accompagner cette musique, connectez simplement les prises jack de Sortie Audio (prises jack RCA Rouge et Blanche) aux prises jack ENTREE AUX G & D de la Singing Machine.
FRANÇAIS FONCTIONNEMENT DU CD OU CD+G PREPARATION ! L'appareil est conçu pour jouer des CD possédant le logo d'identification " ". Si les CD ne sont pas conformes aux normes des CD, ils ne seront pas joués correctement. ! Les empreintes digitales et la poussière doivent être soigneusement nettoyées avec un chiffon doux. Nettoyez en un mouvement droit à partir du centre du disque vers le bord externe.
FONCTIONNEMENT DU CD OU CD+G MODE LECTURE/PAUSE ! Pour commencer à jouer, pressez le bouton LECTURE/PAUSE. La première piste [ ] et l'indicateur LED REPRODUCTION/PAUSE seront affichés. ! Pour arrêter de jouer momentanément pressez le bouton LECTURE/PAUSE à nouveau. L'indicateur LED LECTURE/PAUSE clignotera. ! Pour arrêter de jouer, pressez le bouton à nouveau. Si vous pressez pause quand un CDG joue, les paroles sur le moniteur pourront être distordues.
FRANÇAIS FONCTIONNEMENT DE LA CASSETTE CHARGEMENT ET DÉCHARGEMENT DE CASSETTES Suivez ces étapes pour charger et décharger des cassettes. 1. Pressez le bouton ARRET/EJECTION (10). 2. Insérez une bande avec le côté désiré face à vous, la surface de la bande vers le bas. Eviter de toucher la bande. 3. F e r m e z l e s u p p o r t d e c a s s e t t e / couvercle du lecteur.
ACCOMPAGNEMENT - BANDE 1. S u i v e z l e s i n s t r u c t i o n s p o u r l a REPRODUCTION. 2. S u i v e z l e s i n s t r u c t i o n s p o u r MICRO/ECHO/PITCH. 3. Réglez les contrôles de VOLUME PRINCIPAL (1), ECHO (8), PITCH (3). Votre voix sera mixée avec la lecture et sera entendue dans les haut - parleurs. 4. Avec des cassettes Singing Machine ou similaires multiplex, vous pouvez chanter en duo accompagné par l'artiste enregistré et musique de fond.
SOINS ET ENTRETIEN endommager la finition ou l'appareil. Faire attention à ne pas renverser de liquide dans la platine. ALIMENTATION Après avoir utilisé le appareil, mettre l'appareil hors tension en appuyant sur la touche Allumer/Eteindre. REMARQUE D Ne jamais toucher les têtes de la platine à cassettes avec un tournevis ou d'autres objets en métal, parce qu'ils vont rayer la surface sensible, en endommageant ensuite vos cassettes.
GUIDE DE LOCALISATION DE PROBLEMES Si vous avez suivi les instructions et que vous avez des difficultés à faire fonctionner l'appareil, localisez le PROBLEME dans la colonne de gauche ci - dessous. Vérifiez la CAUSE POSSIBLE correspondante dans la colonne de localisation et réglez le problème. PROBLEME CAUSE POSSIBLE SOLUTION Ne s'allume pas quand il Pas de connexion de la prise Insérez la prise d'alimentation est en position ALLUME. d'alimentation à la prise AC. dans la prise AC.
GUIDE DE LOCALISATION DE PROBLEMES PROBLEME FRANÇAIS Pas de son - quand l’audio est connecté à un appareil stéréo domestique. CASSETTE Son de la bande instable. CAUSE POSSIBLE SOLUTION Le choix de source sur votre Sélectionnez ENTREE AUX stéréo n'est pas placé comme source pour votre appareil correctement. stéréo. Connexion incorrecte à l'appareil stéréo ou au système PA (public). Suivez les instructions page F9 pour connecter à votre appareil stéréo. Cabestan sale. Nettoyage du cabestan.
GUIDE DE LOCALISATION DE PROBLEMES CAUSE POSSIBLE Tête sale. Le son de la bande enregistrée est distordu. Bande cassette endommagée. L'image saute. SOLUTION Nettoyage du cabestan. Remplacez la bande. Le BALAYAGE VERTICAL Réglez les contrôles de n'est pas réglé correctement. BALAYAGE VERTICAL. L'objectif de la caméra est Pas d'image affichée sur vers le bas. le moniteur de la Le sélecteur du Moniteur Singing Machine. n'est pas positionné correctement. Levez l'objectif de la caméra.
DETAILS TECHNIQUES SECTION AUDIO: ALIMENTATION DE SORTIE (MAXIMUM) IMPEDANCE DE SORTIE FRANÇAIS SECTION DU LECTEUR DE CD: REPONSE DE FREQUENCE RAPPORT SIGNAL - BRUIT BRUIT ET CHUINTEMENT D - A CONVERSION NOMBRE DE PROGRAMMES SYSTEME D’ECHANTILLONNAGE SECTION MONITEUR (QUAND C'EST LE CAS) SECTION DU LECTEUR DE CASSETTE: BRUIT ET CHUINTEMENT REPONSE DE FREQUENCE VITESSE DE LA BANDE 5 WATTS (RMS) 8 OHMS 100 Hz - 20 kHz (+/- 3 dB) 50 dB INCOMMENSURABLE 1-BIT DAC PROGRAMMATION ALEATOIRE A 20 TOURS ANTICRENEL
GLOSSAIRE DES TERMES DU KARAOKE SINGING MACHINE En plus de la terminologie associée avec les appareils électroniques de consommation, des termes supplémentaires sont utilisés presque exclusivement pour le karaoké. Ces termes servent à vous familiariser avec l'univers du Karaoké. Les caractéristiques énumérées cidessous, ne s'appliquent peut - être pas nécessairement au modèle particulier du Singing Machine que vous avez.
The Singing Machine Company, Inc. 6601 Lyons Road, Bldg. A7, Coconut Creek, FL33073-9902, USA. TEL: (954) 596-1000 FAX: (954) 596-2000 535-0705-ENG-SPA-FRE01 PRINTED IN CHINA IMPRESO EN CHINA IMPRIMÉ EN CHINE VISIT OUR WEBSITE www.singingmachine.com VISITE NUESTRO SITIO INTERNET www.singingmachine.com VISITE NOTRE SITE INTERNET www.singingmachine.