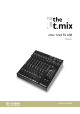
xmix 1202 FX USB mixer user manual
Musikhaus Thomann Thomann GmbH Hans-Thomann-Straße 1 96138 Burgebrach Germany Telephone: +49 (0) 9546 9223-0 E-mail: info@thomann.de Internet: www.thomann.de 11.01.
Table of contents Table of contents 1 General information.............................................................................................................. 1.1 Further information........................................................................................................ 1.2 Notational conventions................................................................................................. 1.3 Symbols and signal words..............................................................
General information 1 General information This manual contains important instructions for the safe operation of the unit. Read and follow the safety instructions and all other instructions. Keep the manual for future reference. Make sure that it is available to all those using the device. If you sell the unit please make sure that the buyer also receives this manual. Our products are subject to a process of continuous development. Thus, they are subject to change. 1.
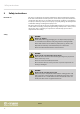
General information Signal word Meaning DANGER! This combination of symbol and signal word indicates an immediate dangerous situation that will result in death or serious injury if it is not avoided. CAUTION! This combination of symbol and signal word indicates a possible dangerous situation that can result in minor injury if it is not avoided.
Safety instructions 2 Safety instructions Intended use This device is intended to be used for amplification, mixing and playback of signals from musical instruments and microphones. Use the device only as described in this user manual. Any other use or use under other operating conditions is considered to be improper and may result in personal injury or property damage. No liability will be assumed for damages resulting from improper use.
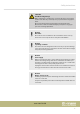
Safety instructions CAUTION! Possible hearing damage With loudspeakers or headphones connected, the device can produce volume levels that may cause temporary or permanent hearing impair‐ ment. Do not operate the device permanently at a high volume level. Decrease the volume level immediately if you experience ringing in your ears or hearing impairment. NOTICE! Risk of fire Do not block areas of ventilation. Do not install the device near any direct heat source. Keep the device away from naked flames.
Features 3 Features n n n n n n n n n n n n n n 10-channel mixer with built-in FX processor 6 mono channels (MIC, line) with low cut 3-band EQ and pan control 2 stereo channels with 2-band EQ and balance control Control room output L/R (1/4" jack) Additional input via RCA (stereo in / rec out) 1 × AUX control per channel, PRE/POST selectable PFL switch per channel Master output L/R via 2 × XLR and 2 × 1/4" phone socket Separately controllable headphones output (1/4" phone socket, stereo) Headphones outpu
Installation and starting up 4 Installation and starting up Unpack and carefully check that there is no transportation damage before using the unit. Keep the equipment packaging. To fully protect the device against vibration, dust and moisture during transportation or storage use the original packaging or your own packaging material suitable for transport or storage, respectively.
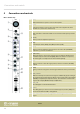
Connections and controls 5 Connections and controls Mono channel strip 1 [MIC] Balanced XLR mono input to connect a microphone. 2 [LINE] 1/4" phone input to connect a line level audio source (keyboards, drum modules etc., balanced or unbalanced). 3 [80 Hz HPF] High pass filter to attenuate rumble noise and other low frequency interfer‐ ence. 4 [GAIN] Rotary control to adjust the input level. 5 [EQ] 3-band EQ for treble [HIGH], mids [MID] and bass [LOW].
Connections and controls Stereo channel strip 14,16 [STEREO IN] RCA sockets for connecting stereo sources. 15,17 [REC OUT] Line outputs with RCA sockets for connecting recording devices. 18,19 [L] 1/4" phone input to connect the left signal of a stereo line level audio source (keyboards, drum modules etc.). With mono signals in the REC OUT channel, use this input with the [R]socket unused so the signal is present at both sum channels.
Connections and controls 32 [PEAK] The LED lights up on channel overload. If this happens in the STEREO IN channel press the [PAD]switch. When overload occurs in the REC OUT channel reduce the output level of the signal source connected here. 33 The channel fader sets the strength of the channel signal in the overall signal.
Connections and controls Effects section, AUX 34 [PARAMETER] Rotary control to set the main parameter of the currently selected effect. 35 [FX TO AUX] Rotary control to adjust the effects portion present at the output [AUX SEND] . 36 [FX TO MIX] Rotary control to adjust the effects portion in the overall signal. 37 [AUX SEND] Rotary control to adjust the overall level at the [AUX SEND] output. 38 [FX SEND] Rotary control to adjust the overall level at the [FX SEND] output.
Connections and controls Master section 42 [AUX SEND] At this line level output the signal set with the [AUX] channel controls is present, maybe to create a monitor mix. 43 [FX SEND] At this line level output the signal set with the [FX] channel controls is present, maybe to be sent to an external effects device. 44 [PHONES] Stereo headphones output. 45 [USB] USB port for feeding in digital audio signals or for digital output of the sum signal, unaffected by the master faders.
Connections and controls 49 [+48V] LED This LED is lit when the phantom power is on. 50 [+48V] switch When this switch is in ON position, a phantom voltage of 48 V is present at the XLR sockets in the mono channels for using condenser mics. If no condenser mics are used, the switch should be in the OFF position. The phantom voltage must not be switched on if an unbalanced XLR cable is connected to one of the MIC inputs. 51 [POWER] This LED shows that the unit is turned on.
Connections and controls Rear panel 56.57 [MAIN OUTPUTS] Balanced 1/4" phone outputs for connecting power amplifiers, effects or recording devices. 58.59 [MAIN OUTPUTS] Balanced XLR outputs for connecting power amplifiers, effects or recording devices. 60 [POWER] Mains switch to turn the device on or off. 61 IEC chassis plug for mains connection with fuse holder.
Connections and controls Connection pattern – PC home recording xmix 1202 FX USB 17
Technical specifications 6 Technical specifications Max. output level (1% THD @ 1 kHz) MAIN OUTPUT XLR: +26 dBu ± 1 dBu 1/4" phone socket, balanced: +26 dBu ± 1 dBu Max. output level (1% THD @ 1 kHz) MAIN OUTPUT XLR: +21 dBu ± 1 dBu 1/4" phone socket, balanced: +26 dBu ± 1 dBu Headphones output 1/4" phone socket (stereo) 150 mW ± 5 mW @ 32 Ω Distortion (THD + N) <0.025% @ +14 dBu ± 0.
Technical specifications Common mode rejection 63 dB ± 3 dB @ 1 kHz Phantom voltage 48 V ± 2 V Operating supply voltage 100 – 240 V Fuse 5 mm × 20 mm, 1.6 A, 250 V, slow-blow Power consumption 40 W Dimensions (W × H × D) 315 mm× 100 mm× 340 mm Weight 4.
Plug and connection assignment 7 Plug and connection assignment Introduction This chapter will help you select the right cables and plugs to connect your valuable equipment in such a way that a perfect sound experience is ensured.
Plug and connection assignment XLR plug (balanced) 1 Ground, shielding 2 Signal (in phase, +) 3 Signal (out of phase, –) 1 Ground, shielding 2 Signal 3 Bridged to pin 1 XLR plug (unbalanced) RCA connection Drawing and table indicate the pin assignment of an RCA plug.
Protecting the environment 8 Protecting the environment Disposal of the packaging material For the transport and protective packaging, environmentally friendly materials have been chosen that can be supplied to normal recycling. Ensure that plastic bags, packaging, etc. are properly disposed of. Do not just dispose of these materials with your normal household waste, but make sure that they are collected for recycling. Please follow the notes and markings on the packaging.
Musikhaus Thomann · Hans-Thomann-Straße 1 · 96138 Burgebrach · Germany · www.thomann.