
Use and Care Guide
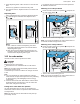
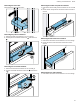

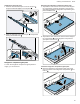
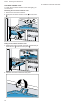

Table Of Contents
- Fridge-freezer
- en-us
- Table of contents
- 1 Safety
- 2 Preventing material damage
- 3 Environmental protection and energy-saving
- 4 Installation and connection
- 5 Familiarizing yourself with your appliance
- 6 Features
- 7 Basic Operation
- 8 Additional functions
- 9 Alarm
- 10 Home Connect™
- 10.1 Connecting the appliance to a WLAN home network (Wi-Fi) with WPS function
- 10.2 Connecting the appliance to a WLAN home network (Wi-Fi) without WPS function
- 10.3 Connecting the appliance to the Home Connect™ app
- 10.4 Checking the signal strength
- 10.5 Installing updates for the Home Connect software
- 10.6 Resetting the Home Connect™ settings
- 10.7 Remote diagnostics
- 10.8 Data Protection
- 11 Refrigerator compartment
- 12 Cool-fresh compartment
- 13 Freezer compartment
- 14 Water system
- 15 Defrosting
- 16 Cleaning and maintenance
- 16.1 Preparing the appliance for cleaning
- 16.2 Cleaning the appliance
- 16.3 Removing the fittings
- 16.3.1 Removing the shelf
- 16.3.2 Removing the fixed shelf
- 16.3.3 Removing the door racks
- 16.3.4 Removing the pull-out containers
- 16.3.5 Removing the cool-fresh container
- 16.3.6 Removing the frozen food pull-out container
- 16.3.7 Removing the flat frozen food container
- 16.3.8 Removing the ice cube container
- 16.3.9 Removing the frozen-food carrying container
- 16.4 Removing the appliance components
- 17 Eliminating faults
- 18 Storage and disposal
- 19 Customer service
- 20 Technical specifications
- fr-ca
- Table des matières
- 1 Sécurité
- 2 Prévenir les bris matériels
- 3 Protection de l'environnement et économies
- 4 Installation et branchement
- 5 Description de l'appareil
- 6 Équipement
- 7 Opération de base
- 8 Fonctions additionnelles
- 9 Alarme
- 10 Home Connect™
- 10.1 Connecter l'appareil au réseau domestique WLAN (Wi-Fi) avec la fonction WPS
- 10.2 Connecter l’appareil au réseau domestique WLAN (Wi-Fi) sans la fonction WPS
- 10.3 Connecter l'appareil à l'appli Home Connect™
- 10.4 Contrôler l’intensité du signal
- 10.5 Installer une mise à jour du logiciel Home Connect
- 10.6 Réinitialisez les réglages Home Connect™
- 10.7 Diagnostic à distance
- 10.8 Protection des données
- 11 Compartiment réfrigération
- 12 Compartiment fraîcheur
- 13 Compartiment congélation
- 14 Système hydraulique
- 15 Dégivrer
- 16 Nettoyage et entretien
- 16.1 Préparer l'appareil pour le nettoyage
- 16.2 Nettoyer l'appareil
- 16.3 Retirer les pièces d’équipement
- 16.3.1 Retirer la clayette
- 16.3.2 Retirer la clayette fixée
- 16.3.3 Retirer le compartiment de contre-porte
- 16.3.4 Retirer le bac tiroir
- 16.3.5 Retirer le bac fraîcheur
- 16.3.6 Retirer le bac tiroir à aliments congelés
- 16.3.7 Retirer le bac à produits congelés plat
- 16.3.8 Retirer la réserve à glaçons
- 16.3.9 Retirer le bac de support pour aliments congelés
- 16.4 Démonter les pièces de l'appareil
- 17 Dépannage
- 18 Entreposage et mise au rebut
- 19 Service à la clientèle
- 20 Données techniques
- es-mx
- Tabla de contenidos
- 1 Seguridad
- 2 Evitar daños materiales
- 3 Protección del medio ambiente y ahorro
- 4 Instalación y conexión
- 5 Familiarizándose con el aparato
- 6 Equipamiento
- 6.1 Bandeja
- 6.2 Bandeja fija
- 6.3 Cajón deslizante
- 6.4 Cajón fresco
- 6.5 Separador de compartimientos
- 6.6 Recipiente plano para productos congelados
- 6.7 Cajón deslizante de productos congelados
- 6.8 Recipiente para transportar productos congelados
- 6.9 Estantes de la puerta para botellas
- 6.10 Depósito para cubitos de hielo
- 6.11 Accesorios
- 7 Manejo básico
- 8 Funciones adicionales
- 9 Alarma
- 10 Home Connect™
- 10.1 Conectar el aparato a la red doméstica WLAN (Wi-Fi) con la función WPS
- 10.2 Conectar el aparato a la red doméstica WLAN (Wi-Fi) sin la función WPS
- 10.3 Conectar el aparato con la aplicación Home Connect™
- 10.4 Verificar la intensidad de la señal
- 10.5 Instalar la actualización del software de Home Connect
- 10.6 Restablecer los ajustes de Home Connect™
- 10.7 Diagnóstico remoto
- 10.8 Protección de datos
- 11 Compartimiento de refrigeración
- 12 Compartimiento fresco
- 13 Congelador
- 14 Sistema de agua
- 15 Descongelación
- 16 Limpieza y cuidados
- 16.1 Preparar el aparato para su limpieza
- 16.2 Limpiar el aparato
- 16.3 Retirar elementos del aparato
- 16.3.1 Retirar las bandejas
- 16.3.2 Retirar las bandejas fijas
- 16.3.3 Retirar el botellero de puerta
- 16.3.4 Retirar el cajón deslizante
- 16.3.5 Retirar el cajón fresco
- 16.3.6 Retirar el cajón deslizante de productos congelados
- 16.3.7 Retirar el compartimiento de congelación plano
- 16.3.8 Extraer el depósito para cubitos de hielo
- 16.3.9 Extraer el recipiente para transportar productos congelados
- 16.4 Desmontar los componentes del aparato
- 17 Solucionar pequeñas averías
- 18 Almacenamiento y eliminación
- 19 Servicio de atención al cliente
- 20 Datos técnicos

en-us Defrosting
22
Defrosting
15 Defrosting
Defrosting
15.1 Defrosting in the refrigerator
compartment
The refrigerator compartment in your appliance defrosts
automatically.
15.2 Defrosting in the cool-fresh com-
partment
The cool-fresh compartment in your appliance defrosts au-
tomatically.
15.3 Defrosting in the freezer compart-
ment
The fully automatic NoFrost system ensures that the
freezer compartment remains frost-free. Defrosting is not
required.
Cleaning and maintenance
16 Cleaning and maintenance
Cleaning and maintenance
To keep your appliance working efficiently for a long time,
it is important to clean and maintain it carefully.
Customer Service must clean inaccessible points. Clean-
ing by Customer Service can give rise to costs.
16.1 Preparing the appliance for
cleaning
1. Switch off the appliance. →
Page14
2. Disconnect the appliance from the power supply.
Unplug the appliance from the power source or switch
off the circuit breaker in the fuse box.
3. Take out all of the food and store it in a cool place.
Place ice packs (if available) onto the food.
4. Remove all fittings from the appliance. →
Page22
5. Remove the following components from the appliance:
– →
"Removing the telescopic rails", Page24
– →
"Removing the refrigerator compartment glass
plate", Page25
– →
"Removing the cool-fresh container cover",
Page26
16.2 Cleaning the appliance
WARNING
Risk of electric shock!
Moisture intrusion may cause an electric shock.
▶
Do not use any steam cleaners or high-pressure clean-
ers to clean the appliance.
NOTICE:
Unsuitable cleaning agents may damage the surfaces of
the appliance.
▶
Do not use hard scouring pads or cleaning sponges.
▶
Do not use strong or abrasive cleaning agents.
▶
Do not use cleaning agents with a high alcohol content.
If you clean fittings and accessories in the dishwasher, this
may cause them to become deformed or discolor.
▶
Never clean fittings and accessories in the dishwasher.
1. Prepare the appliance for cleaning. →
Page22
2. Clean the appliance, the fittings and the door seals with
a dish cloth, lukewarm water and a little pH-neutral
washing-up liquid.
3. Dry thoroughly with a soft, dry cloth.
4. Insert the fittings.
5. Connect the appliance to the electricity supply.
6. Switch on the appliance. →
Page14
7. Put the food into the appliance.
16.3 Removing the fittings
If you want to clean the fittings thoroughly, remove these
from your appliance.
Removing the shelf
▶
Lift the shelf and remove it .
Removing the fixed shelf
1. Pull out the pull-out container.
2. Lift the fixed shelf at the front and remove it .