
Instructions for Use
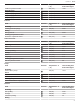
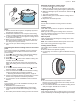
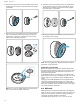

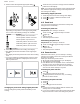
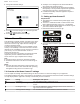

Table Of Contents
- Freedom® Induction cooktop
- en-us
- Table of contents
- 1 IMPORTANT SAFETY INSTRUCTIONS
- 2 Preventing material damage
- 3 Environmental protection and energy-saving
- 4 Induction cooking
- 5 Familiarizing yourself with your appliance
- 6 Operation
- 6.1 First time use
- 6.2 Turning the cooktop on or off
- 6.3 Cooking zone settings
- 6.4 Recommended cooking settings
- 6.5 Kitchen timer
- 6.6 Stopwatch
- 6.7 PowerBoost®
- 6.8 PanBoost™
- 6.9 Keep warm
- 6.10 Transfer function
- 6.11 Cooking sensor mode
- 6.11.1 Suitable cookware for the cooking sensor function
- 6.11.2 Types of cooking processes with the cooking sensor function
- 6.11.3 Setting the boiling point
- 6.11.4 Setting the cooking sensor function
- 6.11.5 Changing the temperature for the cooking sensor function
- 6.11.6 Turning the cooking sensor function off
- 6.11.7 Cooking charts for the cooking sensor function
- 6.12 Wireless cooking sensor
- 6.13 MyZone®
- 6.14 TeppanyakiPro™ mode
- 6.15 Panel lock
- 6.16 Pause function
- 6.17 Basic settings
- 7 Home Connect™
- 8 Cooktop - Hood Sync
- 9 Cleaning and maintenance
- 10 Troubleshooting
- 11 Disposal
- 12 FAQs
- 13 Customer service
- 14 STATEMENT OF LIMITED PRODUCT WARRANTY

en-us Operation
22
Food Function Temperature °F
(°C)
Total cooking time
from sound signal
Compote 212 (100) 15-25
Deep-fat frying
Deep-fat frying jam-filled doughnuts 320 (160) 5-10
Deep-fat frying ring doughnuts 320 (160) 5-10
Deep-fat frying buñuelos 320 (160) 320 (160)
Frozen products
Food Function Temperature °F
(°C)
Total cooking time
from sound signal
Keeping warm, heating
Vegetables in cream sauce 160 (70) 160 (70)
Boiling
Green beans, frozen 212 (100) 15-30
Deep-fat frying
Deep-fat frying French fries 355 (180) 4-8
Miscellaneous
Food Function Temperature °F
(°C)
Total cooking time
from sound signal
Keeping warm, heating
Heating goulash soup 160 (70) 10-20
Heating mulled wine 160 (70) 5-15
Poaching
Heating milk 185 (85) 3-10
6.12 Wireless cooking sensor
Before you use the cooking functions for the first time, es-
tablish the connection between the wireless cooking sen-
sor and the control panel.
Preparing and maintaining the wireless cooking
sensor
This section provides you with the following information:
¡ Attaching the silicone patch
¡ Using the wireless cooking sensor
¡ Cleaning
¡ Replacing the battery
You can retroactively purchase the silicone patch and
cooking sensor from specialist retailers, our technical cus-
tomer service or our official website. When doing so, quote
the relevant reference number:
00577921 Set of 5 silicone patches
TCOOK-
SENSW
Cooking sensor and set of 5 silicone
patches
Attaching the silicone patch
The silicone patch secures the cooking sensor to the
cookware. If you are using an item of cookware with the
cooking functions for the first time, attach the silicone
patch to the cookware. Note:
1. The part of the pan to which the patch is to be adhered
must be free of grease. Clean the cookware, dry it thor-
oughly and wipe the area where the patch is to be ad-
hered using alcohol, for example.
2. Remove the protective film from the silicone patch. Ad-
here the silicone patch in the correct place on the out-
side of the pan using the supplied template as a guide.
3. Press down all over the surface of the silicone patch, in-
cluding in the center.
The adhesive requires 1 hour to fully cure. Do not use
or clean the cookware during this time.
Notes
¡ The cookware with the silicone patch must not be left to
soak for long periods in soapy water.
¡ If the silicone patch comes loose, use a new one.
Attaching the wireless cooking sensor
Place the cooking sensor squarely onto the silicone patch.