P/N 9000039271 (8408)
Congratulations and Thank You from Thermador ! Thank you for selecting a Thermador dishwasher. You have joined the many consumers who demand quiet and superior performance from their dishwashers. This manual was written with your safety and convenience in mind, and the information contained herein is very important. We highly recommend that you read this manual before you use your dishwasher for the first time.
Important Safety Instructions WARNING • Under certain conditions, hydrogen gas may be produced in a hot water system that has not been used for two weeks or more. Hydrogen gas is explosive. Before using a dishwasher that is connected to a hot water system that has been unused for two weeks or longer, turn on all hot water faucets and let the water flow from each for several minutes. This will release any accumulated hydrogen gas.
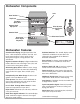
Dishwasher Components Door Gasket Vent Top Rack Top Rack Spray Arm Bottom Rack Spray Arm Filter System (in dishwasher floor) Bottom Rack Detergent/ Rinse Agent Dispenser Silverware Basket Model/Serial Number Label Dishwasher Features Condensation Drying: A high temperature final rinse, a low temperature stainless steel tub, and the sheeting action of a rinse agent result in drying that is hygienic, energy efficient, and economical.
Dishwasher Features Dishware Materials (continued) Knife Rack: Designed to securely hold fine cutlery and silverware. Automatic Height-Adjustable Top Rack: Lower the top rack to accommodate large items in the top rack, or raise the top rack to make room for larger items in the bottom rack. Top Rack and Bottom Rack Flip Tines: Tines that fold down allow loading versatility. PowerBoost: Reduces the time to complete the wash cycle by preheating.
Preparing and Loading the Dishware Preparing the Dishware Do not pre-wash items having loosely-attached soiling. Remove large food particles, bones, seeds, toothpicks, and excessive grease. Items having burned-on or hard, stuck-on soiling may require soaking and hand-scouring. Loading the Dishwasher CAUTION DISHWASHER DAMAGE: Loading the dishwasher with objects such as paper products, plastic bags, packing materials, or anything other than normal dishware and kitchenware could damage the dishwasher.
Preparing and Loading the Dishware (continued) Top Rack Features Knife Rack The knife rack is an extra shelf for knives and other large utensils. It is assembled onto an edge of the upper rack. Figure 8 shows the top rack load pattern for 12 place settings. Figure 8 Figure 5 Place knives with sharp sides down, see Fig. 5. (AHAM DW-1 12 Place Setting) NOTE: When pushing the top rack into the dishwasher, push it until it stops against the back of the tub.
Preparing and Loading the Dishware To assemble: Slide the Rack Attachment in, Figure 11, keeping the longest tines on the inside of the top basket wire (a) and on the outside of the lower basket wire (b), see Fig. 10. The short tines will snap into place, see Figure 12. Figure 11 Figure 10 a b Rear corner view of Rack Inset (continued) Glass Rack Assembly The glass rack adds an additional section in which to place your tall glasses, cups and vases.
Preparing and Loading the Dishware (continued) Loading the Bottom Rack NOTE: Keep the vent on the tub’s right side clear by placing tall items such as plastic cutting boards and tall baking sheets on the bottom rack's left side, center, or back. Place large items in the bottom rack. Load pots and pans upside-down. Figure 15 shows a typical mixed load in the bottom rack. Figure 15 top rack spray outlet and turn the sprinkler clockwise to lock it into position as shown in Figure 18.
Loading the Silverware Basket CAUTION To split the Flexible Silverware Basket: INJURY HAZARD: Knives and other sharp utensils placed with their sharp edges or points up in the silverware baskets, can cause serious injuries. Whenever possible, do not load knives and other sharp utensils with their handles down. Do not allow children to handle or play near knives and sharp utensils. 1. Grasp the basket and slide the two halves in opposite directions as shown in Figure 21a.
Operating the Dishwasher Dishwasher Control, Buttons and Display Before you begin Selecting a Wash Cycle Using the Touch Pad Controls After adding detergent and rinse agent as explained in the Adding Detergent and Rinse Agent section of this manual, turn the dishwasher on by pressing the ON/OFF button. The display will indicate the default cycle, “Auto Wash”. Your new dishwasher is equipped with the latest control technology featuring CLEARTOUCH™ activation.
Operating the Dishwasher Selecting Dishwasher Options The factory default settings for all options should provide good results. Options Selections You can access the available options in the Options Step Down Menu as follows: Delay Start This option allows you to delay the start of the selected cycle for up to 24 hours in 30 minute increments. NOTE:In the Options Step Down Menu you can return to the main menu at any time by pressing the START button. 1.
Operating the Dishwasher End Signal The dishwasher emits a tone (five times) to let you know that your dishes are clean and dry. You can change the tone volume or you can disable it. NOTE: In the Options Step Down Menu you can return to the main menu at any time by pressing the START button. 1. Open the dishwasher door far enough to expose the control panel. 2. Press the ON/OFF button. 3. Press the MENU/OK button four times to display the current End Signal setting 4.
Operating the Dishwasher Standard Programs The wash cycles available in this hidden menu are special wash cycles that may be used to solve special needs in the field. NOTE: In the Options Step Down Menu you can return to the main menu at any time by pressing the START button. 1. Open the dishwasher door far enough to expose the control panel. 2. Press the ON/OFF button. 3. Press the MENU/OK button seven times to display the screen “STANDARD PROGRAMS”. 4.
Operating the Dishwasher (continued) Canceling a Cycle Adding Detergent and Rinse Agent Detergent Open the dishwasher door far enough to expose the control panel. The display will show: · “Cancel Program”. · “Close the door”. · the remaining cycle time. · the selected cycle. · the cycle phase. Press the – button. The display will show “To drain - close the door”. DISHWASHER DAMAGE: Using hand dishwashing products in your dishwasher could damage your dishwasher.
Adding Detergent and Rinse Agent (continued) Rinse Agent Filling the Rinse Agent Dispenser Always use a liquid rinse agent, even if your detergent contains a rinse agent or drying additive, to achieve proper drying and proper maintenance of your dishware and dishwasher. (Lowered Position) 1. Press the blue release button as shown in Figure 25 and lift the cover. Figure 25 The control display will indicate “Refill Rinse Agent” when the cup needs filling.
Adding Detergent and Rinse Agent (continued) Care and Maintenance Filling the Detergent Dispenser Maintenance Tasks (Raised Position) Certain areas of your dishwasher require occasional maintenance. The maintenance tasks are easy to perform and will ensure continued superior performance from your dishwasher. 1. Open the dishwasher door approximately halfway to a 45° angle. NOTE: The detergent dispenser cover must be open for the detergent dispenser to be placed in the raised position. 2.
Care and Maintenance (continued) Check/Clean the Spray Arm Nozzles Occasionally check the spray arms to ensure that the spray nozzles are not obstructed. You must remove the spray arms to check them. To remove the top spray arm: 1. Remove the empty top rack from the dishwasher. 2. Turn the rack upside-down. The top spray arm is held in position by a locking nut as shown in Figure 30a. Turn the locking nut counterclockwise 1/8 turn and remove it, as shown in Figure 30b to release the spray arm.
Care and Maintenance (continued) Check/Clean the Filter System This dishwasher has a filter system that consists of a Large Object Trap/Cylinder Filter assembly and a Fine Filter. Select models have an additional Micro Filter. The filter system is located on the inside of your dishwasher under the lower rack and is easily accessible. During normal use, the filter system is self-cleaning. You should occasionally inspect it for foreign objects and clean it when necessary.
Care and Maintenance (continued) Cleaning the Exterior Door Panel CAUTION POSSIBLE DISHWASHER DAMAGE: Harsh chemicals, abrasive cleaners, scouring pads (metal or plastic), or abrasive cloths/ paper towels can damage the dishwasher exterior door. Do not use harsh chemicals, abrasive cleaners, scouring pads (metal or plastic), or abrasive cloths/paper towels to clean the dishwasher’s exterior door panel. Colored Doors Use only a soft cloth that is lightly dampened with soapy water.
Self Help Dishwashers may occasionally exhibit problems that are unrelated to a malfunction of the dishwasher itself. The following information may help you with a dishwasher problem without your having to call a repair person. Dishes do not dry The rinse agent dispenser may be empty. Check the rinse agent dispenser and refill it if necessary. Dishware drying can be accelerated and enhanced by opening the dishwasher door slightly and propping it open with the top rack.
Cycle Duration/Water Usage Information NOTE: Cycle duration and water consumption depend largely upon household water temperature and wash load, factors over which the manufacturer has no control. Therefore, the times and quantities in this chart are approximate. Cycle Cycle Time (in minutes) Cycle Time with PowerBoost Wash Temp (Fahrenheit) Rinse Temp (Fahrenheit) Auto Super Wash 104-133 90 151 - 160 156 X 6.5 - 8.8 Auto Wash 94-107 72 122 - 135 156 X 3.6 - 7.
Customer Service Your Thermador dishwasher requires no special care other than that described in the Care and Maintenance section. If you are having a problem with your dishwasher, before calling for service please refer to the Self Help section. If service is necessary, contact your dealer or installer or an authorized service center. Do not attempt to repair the appliance yourself. Any work performed by unauthorized personnel may void the warranty.
Statement of Warranties - Thermador Dishwashers The warranties provided by BSH Home Appliances (“Thermador ”) in this Statement of Warranties apply only to Thermador Dishwashers sold to the first using purchaser by Thermador or its authorized dealers, retailers, or service centers in the United States or Canada. The Warranties provided herein are not transferrable. TO OBTAIN WARRANTY SERVICE, CONTACT THE NEAREST THERMADOR AUTHORIZED SERVICE CENTER OR CALL 1-800-735-4328 OR WRITE BSH HOME APPLIANCES CORP.
Notes 24
Notes 25
Thermador reserves the right to change specifications or design without notice. Some models are certified for use in Canada. Thermador is not responsible for products which are transported from the United States for use in Canada. Check with your local Canadian distributor or dealer. For the most up to date critical installation dimensions by fax, use your fax handset and call 775/833-3600. Use code #8030.