
User's Manual


20
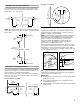
Lower Leveling Legs
NOTE: All four leveling legs must contact the floor to support and
stabilize the full weight of refrigerator. Rollers are for moving
refrigerator and not for permanent support.
Use a ⁵⁄₁₆" socket wrench to turn the leveling bolts clockwise to
lower the 4 leveling legs until refrigerator weight is supported by
leveling legs. The rollers should be off the floor. To avoid cabinet
damage, do not apply more than 50 inch-pounds (58 cm - kg) of
torque to the leveling legs.
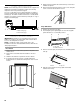
Install Custom Panels
IMPORTANT: Thermador is not responsible for the removal or
addition of molding or decorative panels that would not allow
access to the refrigerator for service.
NOTE: To install full-overlay custom panels, refer to the
installation instructions included with the Trimless Trim Kit. See
“Design Specifications.”
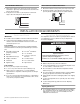
Door Panels
1. Remove all tape and door bracing from the refrigerator and
freezer doors.
2. Remove the screws that attach the handles to the door
frame.
3. Slide the decorative door panels into the door frames.
4. If needed, route the door panels or install a filler panel
between the doors and the decorative panels. See “Custom
Panels.”
5. Replace the door handles. Be sure that the top of both door
handles are aligned.
6. Remove the protective skin from the screw covers. Snap the
screw covers into the handle trim section.
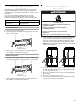
Top Grille Panel
1. Grasp both ends of the top grille.
2. Push straight up, then pull straight out. Place the top grille
panel-side down on a soft working surface.
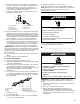
3. Remove one end cap by loosening the nuts and sliding off the
end cap.
4. Slide the custom panel into the top grille channel and
reattach the end cap.
A. Rear leveling legs
B. Front leveling legs
A. Panels
A B
A
B
AA
A. Top grille
B. Cabinet side trim
A. Bottom rail
B. Nuts
C. End cap
D. Top rail
A. Panel
B BA
C
B
A
D
A