
Use and Care Manuals
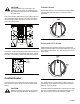

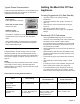
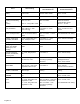
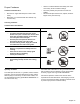
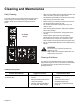
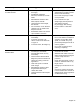
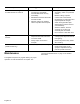
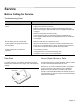
Table Of Contents
- USE AND CARE MANUAL
- About This Manual
- Safety
- Getting Started
- Before Using the Appliance for the First Time
- Parts and Accessories Included
- 1. Left front surface burner (10,000 BTUs)
- 2. Left rear surface burner (10,000 BTUs)
- 3. Right rear surface burner (8,000 BTUs)
- 4. Right front surface burner (16,000 BTUs)
- 5. Grate bridge
- 6. Burner "On" Indicator Lights
- 7. Serial Number/Data Plate location (right front underneath)
- 1. Left front surface burner (8,000 BTUs) - XLO feature on SGSX model only
- 2. Left rear surface burner (10,000 BTUs)
- 3. Center surface burner (16,000 BTUs) - XLO feature on SGSX model only
- 4. Right rear surface burner (8,000 BTUs)
- 5. Right front surface burner (10,000 BTUs)
- 6. Burner "On" Indicator Lights - “light ring” feature on XLO model only
- 7. Serial Number/Data Plate Location (right front underneath)
- 1. Left front surface burner (9,100 BTUs) - XLO feature on SGSX model only
- 2. Left rear surface burner (12,000 BTUs)
- 3. Center surface burner (16,000 BTUs - SGS model) Center surface burner (18,000 BTUs - SGSX model) - XLO feature on SGSX model only
- 4. Right rear surface burner (9,100 BTUs)
- 5. Right front surface burner (12,000 BTUs)
- 6. Burner "On" Indicator Lights - “light ring” feature on XLO model only
- 7. Serial Number/Data Plate Location (right front underneath)
- Control Knobs
- Operation
- Cleaning and Maintenance
- Service
- À propos de ce manuel
- Sécurité
- Mise en route
- Avant la première utilisation de l'appareil
- Pièces et accessoires inclus
- 1. Brûleur avant gauche (10 000 BTU)
- 2. Brûleur arrière gauche (10 000 BTU)
- 3. Brûleur arrière droit (8 000 BTU)
- 4. Brûleur avant droit (16 000 BTU)
- 5. Grille pont
- 6. Voyants lumineux « On » Brûleur en marche
- 7. Emplacement numéro de série/plaque signalétique (dessous avant droit)
- 1. Brûleur avant gauche (8 000 BTU) - Fonction XLO sur modèle SGSX seulement
- 2. Brûleur arrière gauche (10 000 BTU)
- 3. Brûleur central (16 000 BTU) - Fonction XLO sur modèle SGSX seulement
- 4. Brûleur arrière droit (8 000 BTU)
- 5. Brûleur avant droit (10 000 BTU)
- 6. Voyants lumineux « On » Brûleur en marche - Fonction « anneau lumineux » sur modèle XLO seulement
- 7. Emplacement numéro de série/plaque signalétique (dessous avant droit)
- 1. Brûleur avant gauche (9 100 BTU) - Fonction XLO sur modèle SGSX seulement
- 2. Brûleur arrière gauche (12 000 BTU)
- 3. Brûleur central (16 000 BTU - modèle SGS) Brûleur central (18 000 BTU - modèle SGSX) - Fonction XLO sur modèle SGSX seulement
- 4. Brûleur arrière droit (9 100 BTU)
- 5. Brûleur avant droit (12 000 BTU)
- 6. Voyants lumineux « On » Brûleur en marche - Fonction « anneau lumineux » sur modèle XLO seulement
- 7. Emplacement numéro de série/plaque signalétique (dessous avant droit)
- Boutons de réglage
- Fonctionnement
- Nettoyage et entretien
- Dépannage
- Acerca de este manual
- Seguridad
- Comienzo
- Antes de usar el electrodoméstico por primera vez
- Piezas y accesorios incluidos
- 1. Hornilla de superficie delantera izquierda (10,000 BTU)
- 2. Hornilla de superficie trasera izquierda (10,000 BTU)
- 3. Hornilla de superficie trasera derecha (8,000 BTU)
- 4. Hornilla de superficie delantera derecha (16,000 BTU)
- 5. Puente de la rejilla
- 6. Indicadores luminosos de "encendido" de la hornilla
- 7. Ubicación del número de serie/placa de datos (debajo de la parte delantera derecha)
- 1. Hornilla de superficie delantera izquierda (8,000 BTU) - Función XLO únicamente en modelo SGSX
- 2. Hornilla de superficie trasera izquierda (10,000 BTU)
- 3. Hornilla de superficie central (16,000 BTU) - Función XLO únicamente en modelo SGSX
- 4. Hornilla de superficie trasera derecha (8,000 BTU)
- 5. Hornilla de superficie delantera derecha (10,000 BTU)
- 6. Indicadores luminosos de "encendido" de la hornilla - Función de “anillo luminoso” únicamente en modelo XLO
- 7. Ubicación del número de serie/placa de datos (debajo de la parte delantera derecha)
- 1. Hornilla de superficie delantera izquierda (9,100 BTU) - Función XLO únicamente en modelo SGSX
- 2. Hornilla de superficie trasera izquierda (12,000 BTU)
- 3. Hornilla de superficie central (16,000 BTU - modelo SGS) Hornilla de superficie central (18,000 BTU - modelo SGSX) - Función XLO únicamente en modelo SGSX
- 4. Hornilla de superficie trasera derecha (9,100 BTU)
- 5. Hornilla de superficie delantera derecha (12,000 BTU)
- 6. Indicadores luminosos de "encendido" de la hornilla - Función de “anillo luminoso” únicamente en modelo XLO
- 7. Ubicación del número de serie/placa de datos (debajo de la parte delantera derecha)
- Perillas de control
- Operación
- Limpieza y mantenimiento
- Servicio técnico

English 15
Burner Cap
Porcelain Enamel
• Hot sudsy water; rinse and dry
thoroughly.
• Nonabrasive Cleansers:
Ammonia, Fantastic®, Formula
409®.
• Mild Abrasive Cleansers: Bon
Ami®, Ajax®, Comet®.
• Liquid cleaners: Kleen King®,
Soft Scrub®.
• For food stains, use an abrasive
cleanser such as, Zud® or Bar
Keepers Friend®.
• Reassemble. Make sure that the
cap is seated on the base.
• Acidic and sugar-laden spills
deteriorate the porcelain enamel.
Remove soil immediately.
• Do not use wet sponge or towel
on hot porcelain.
• Do not soak burner caps.
• Always apply minimal pressure
with abrasive cleaners.
• Dry thoroughly after cleaning.
• Do NOT clean in a self-clean
oven.
Control Knobs and Grommets • Hot sudsy water; rinse and dry
immediately.
• To remove grommets, see
“Burner Control Knob Removal”
on page 10.
• To remove knobs, lift straight up.
• Do not soak knobs or grommets.
• Do not use abrasive scrubbers or
cleansers, such as Bon Ami®,
Ajax®, or Comet®. They may
permanently damage the finish or
remove graphics.
• Do not pull on grommet when
removing or replacing.
Exterior Finish
Stainless Steel
• Nonabrasive Cleaners: Hot water
and detergent, Fantastic®,
Formula 409®. Rinse and dry
immediately.
• Cleaner Polish: Stainless Steel
Magic® to protect the finish from
staining and pitting; enhances
appearance.
• Hard water spots: Household
white vinegar.
• Mild Abrasive Cleaners: Kleen
King Stainless Steel liquid
cleaner, Bon Ami®.
• Heat discoloration: Bar Keepers
Friend®.
• Do not use steel wool pads. They
will scratch the surface.
• Stainless steel resists most food
stains and pit marks providing the
surface is kept clean and
protected.
• Never allow food stains or salt to
remain on stainless steel for any
length of time.
• Rub lightly in the direction of the
grain.
• Chlorine or chlorine compounds
in some cleaners are corrosive to
stainless steel. Check ingredients
on label before using.
Cooktop Part / Material Suggested Cleaners Important Reminders