
Use and Care Manuals


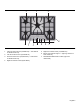


Table Of Contents
- USE AND CARE MANUAL
- About This Manual
- Safety
- Getting Started
- Before Using the Appliance for the First Time
- Parts and Accessories Included
- 1. Left front surface burner (10,000 BTUs)
- 2. Left rear surface burner (10,000 BTUs)
- 3. Right rear surface burner (8,000 BTUs)
- 4. Right front surface burner (16,000 BTUs)
- 5. Grate bridge
- 6. Burner "On" Indicator Lights
- 7. Serial Number/Data Plate location (right front underneath)
- 1. Left front surface burner (8,000 BTUs) - XLO feature on SGSX model only
- 2. Left rear surface burner (10,000 BTUs)
- 3. Center surface burner (16,000 BTUs) - XLO feature on SGSX model only
- 4. Right rear surface burner (8,000 BTUs)
- 5. Right front surface burner (10,000 BTUs)
- 6. Burner "On" Indicator Lights - “light ring” feature on XLO model only
- 7. Serial Number/Data Plate Location (right front underneath)
- 1. Left front surface burner (9,100 BTUs) - XLO feature on SGSX model only
- 2. Left rear surface burner (12,000 BTUs)
- 3. Center surface burner (16,000 BTUs - SGS model) Center surface burner (18,000 BTUs - SGSX model) - XLO feature on SGSX model only
- 4. Right rear surface burner (9,100 BTUs)
- 5. Right front surface burner (12,000 BTUs)
- 6. Burner "On" Indicator Lights - “light ring” feature on XLO model only
- 7. Serial Number/Data Plate Location (right front underneath)
- Control Knobs
- Operation
- Cleaning and Maintenance
- Service
- À propos de ce manuel
- Sécurité
- Mise en route
- Avant la première utilisation de l'appareil
- Pièces et accessoires inclus
- 1. Brûleur avant gauche (10 000 BTU)
- 2. Brûleur arrière gauche (10 000 BTU)
- 3. Brûleur arrière droit (8 000 BTU)
- 4. Brûleur avant droit (16 000 BTU)
- 5. Grille pont
- 6. Voyants lumineux « On » Brûleur en marche
- 7. Emplacement numéro de série/plaque signalétique (dessous avant droit)
- 1. Brûleur avant gauche (8 000 BTU) - Fonction XLO sur modèle SGSX seulement
- 2. Brûleur arrière gauche (10 000 BTU)
- 3. Brûleur central (16 000 BTU) - Fonction XLO sur modèle SGSX seulement
- 4. Brûleur arrière droit (8 000 BTU)
- 5. Brûleur avant droit (10 000 BTU)
- 6. Voyants lumineux « On » Brûleur en marche - Fonction « anneau lumineux » sur modèle XLO seulement
- 7. Emplacement numéro de série/plaque signalétique (dessous avant droit)
- 1. Brûleur avant gauche (9 100 BTU) - Fonction XLO sur modèle SGSX seulement
- 2. Brûleur arrière gauche (12 000 BTU)
- 3. Brûleur central (16 000 BTU - modèle SGS) Brûleur central (18 000 BTU - modèle SGSX) - Fonction XLO sur modèle SGSX seulement
- 4. Brûleur arrière droit (9 100 BTU)
- 5. Brûleur avant droit (12 000 BTU)
- 6. Voyants lumineux « On » Brûleur en marche - Fonction « anneau lumineux » sur modèle XLO seulement
- 7. Emplacement numéro de série/plaque signalétique (dessous avant droit)
- Boutons de réglage
- Fonctionnement
- Nettoyage et entretien
- Dépannage
- Acerca de este manual
- Seguridad
- Comienzo
- Antes de usar el electrodoméstico por primera vez
- Piezas y accesorios incluidos
- 1. Hornilla de superficie delantera izquierda (10,000 BTU)
- 2. Hornilla de superficie trasera izquierda (10,000 BTU)
- 3. Hornilla de superficie trasera derecha (8,000 BTU)
- 4. Hornilla de superficie delantera derecha (16,000 BTU)
- 5. Puente de la rejilla
- 6. Indicadores luminosos de "encendido" de la hornilla
- 7. Ubicación del número de serie/placa de datos (debajo de la parte delantera derecha)
- 1. Hornilla de superficie delantera izquierda (8,000 BTU) - Función XLO únicamente en modelo SGSX
- 2. Hornilla de superficie trasera izquierda (10,000 BTU)
- 3. Hornilla de superficie central (16,000 BTU) - Función XLO únicamente en modelo SGSX
- 4. Hornilla de superficie trasera derecha (8,000 BTU)
- 5. Hornilla de superficie delantera derecha (10,000 BTU)
- 6. Indicadores luminosos de "encendido" de la hornilla - Función de “anillo luminoso” únicamente en modelo XLO
- 7. Ubicación del número de serie/placa de datos (debajo de la parte delantera derecha)
- 1. Hornilla de superficie delantera izquierda (9,100 BTU) - Función XLO únicamente en modelo SGSX
- 2. Hornilla de superficie trasera izquierda (12,000 BTU)
- 3. Hornilla de superficie central (16,000 BTU - modelo SGS) Hornilla de superficie central (18,000 BTU - modelo SGSX) - Función XLO únicamente en modelo SGSX
- 4. Hornilla de superficie trasera derecha (9,100 BTU)
- 5. Hornilla de superficie delantera derecha (12,000 BTU)
- 6. Indicadores luminosos de "encendido" de la hornilla - Función de “anillo luminoso” únicamente en modelo XLO
- 7. Ubicación del número de serie/placa de datos (debajo de la parte delantera derecha)
- Perillas de control
- Operación
- Limpieza y mantenimiento
- Servicio técnico

English 6
1. Left front surface burner (9,100 BTUs) — XLO feature
on SGSX model only
2. Left rear surface burner (12,000 BTUs)
3. Center surface burner (16,000 BTUs — SGS model)
Center surface burner (18,000 BTUs — SGSX model)
— XLO feature on SGSX model only
4. Right rear surface burner (9,100 BTUs)
5. Right front surface burner (12,000 BTUs)
6. Burner "On" Indicator Lights — “light ring” feature on
XLO model only
7. Serial Number/Data Plate Location (right front
underneath)
Sealed STAR™ Burners
Your new cooktop has sealed STAR™ gas burners. There
are no burner parts under the cooktop to clean,
disassemble or adjust. Your cooktop has three different
burner sizes; small, medium and large. Match the
corresponding letters on the burner cap and burner base.
See “Burners Caps” on page 7.
STAR™ Burner Caps
The burner cap is porcelainized steel. The burner caps
must be properly placed for the cooktop to function
properly. If the burner cap is not properly placed, one or
more of the following problems may occur:
• Burner flames are too high.
• Flames shoot out of burners.
• Burners do not ignite.
• Burner flames light unevenly.
• Burner emits gas odor.
WARNING:
To prevent flare-ups and avoid creation of
harmful by-products, do not use the cooktop
without all burner caps and all burner grates
properly positioned.
WARNING:
To prevent burns, do not touch burner caps or
grates while hot. Turn the cooktop off and allow
the burners to cool.
Placing Burner Caps
Each cap has a letter (B, D, or F) cast in the underside of
the cap that corresponds to a letter (B, D, or F) cast in the
burner base that is attached to the appliance.
• Place each burner cap on its correct burner base per
its corresponding letter designation.
• Place burner cap gently on top of base so that the
prongs of the burner base fit snugly into the groove of
the burner cap.
Figure 3: Model SGS365FS/SGSX365FS
2
3
4
7
5
54
3
21
1
6