
Installation instructions
ManualsBrandsThermador ManualsCooking Appliances30 Inch Double Smart Electric Wall Oven with 9.2 cu. ft. Total Capacity, True Convection Upper Cavity, Convection Lower Cavity, Self Clean, Convection Multi-Rack Mode, Third Element Convection, SoftClose® Hinges, Full Access® Rack, and STAR-K Certified
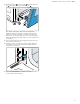
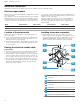
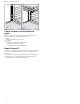

Table Of Contents
- Oven
- en-us
- fr-ca
- Table des matières
- IMPORTANTES CONSIGNES DE SÉCURITÉ
- Définitions des termes de sécurité
- Informations générales
- Utilisation prévue
- Restriction sur le groupe d'utilisateurs
- Consignes générales de sécurité
- Manipulation sécuritaire des appareils
- Codes et normes de sécurité
- Sécurité électrique
- Mises en garde conformément à la proposition 65 de l'État de Californie
- Transport
- Avant de commencer
- Élimination de l'emballage
- Exigences d'installation
- Dimensions pour les fours simples de 30 po
- Dimensions du four double de 30 po
- Avant l'installation
- Installation des fours dans l'armoire
- Raccordement électrique
- Opération d’essai
- Support à la clientèle
- es-mx
- Tabla de contenidos
- INSTRUCCIONES DE SEGURIDAD IMPORTANTES
- Antes de empezar
- Eliminación del embalaje
- Requisitos de instalación
- Medidas para hornos individuales de 30"
- Medidas para el horno doble de 30"
- Antes de la instalación
- Instalación de los hornos en el gabinete
- Conexión eléctrica
- Comprobación del funcionamiento
- Soporte de asistencia técnica

Installing the ovens into the cabinet en-us
13
3. Slide the hinges into the slots as far as they will
go and lower the door straight down .
The angle of the door may need to be adjusted
slightly to allow the hinges to engage properly and
the door to lower into place. The door should lower
about 3/4" (2cm) and stop. If it does not, the hinges
have not engaged properly and the door could fall if it
is released.
4. Once both hinges are fully engaged, gently open the
door until it is fully open.
5. Push the levers on both the hinges up and forward
until they are locked into the slot and flush with the
front of the oven body.
6. Close and open the door slowly to be sure it is cor-
rectly and securely in place.