
Installation instructions
ManualsBrandsThermador ManualsCooking Appliances30 Inch Double Smart Electric Wall Oven with 9.2 cu. ft. Total Capacity, True Convection Upper Cavity, Convection Lower Cavity, Self Clean, Convection Multi-Rack Mode, Third Element Convection, SoftClose® Hinges, Full Access® Rack, and STAR-K Certified
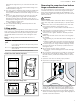
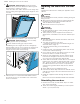
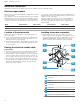
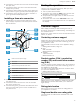
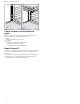
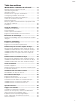

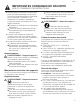
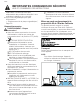
Table Of Contents
- Oven
- en-us
- fr-ca
- Table des matières
- IMPORTANTES CONSIGNES DE SÉCURITÉ
- Définitions des termes de sécurité
- Informations générales
- Utilisation prévue
- Restriction sur le groupe d'utilisateurs
- Consignes générales de sécurité
- Manipulation sécuritaire des appareils
- Codes et normes de sécurité
- Sécurité électrique
- Mises en garde conformément à la proposition 65 de l'État de Californie
- Transport
- Avant de commencer
- Élimination de l'emballage
- Exigences d'installation
- Dimensions pour les fours simples de 30 po
- Dimensions du four double de 30 po
- Avant l'installation
- Installation des fours dans l'armoire
- Raccordement électrique
- Opération d’essai
- Support à la clientèle
- es-mx
- Tabla de contenidos
- INSTRUCCIONES DE SEGURIDAD IMPORTANTES
- Antes de empezar
- Eliminación del embalaje
- Requisitos de instalación
- Medidas para hornos individuales de 30"
- Medidas para el horno doble de 30"
- Antes de la instalación
- Instalación de los hornos en el gabinete
- Conexión eléctrica
- Comprobación del funcionamiento
- Soporte de asistencia técnica

en-us Electrical connection
14
Electrical connection
Electrical connection
Electrical connection
Read these instructions to safely connect your appliance to the electrical supply.
Electrical requirements
Make sure your electrical installation supports the follow-
ing requirements.
This appliance must be supplied with the proper voltage
and frequency and connected to an individual, properly
grounded branch circuit, protected by a circuit breaker
or fuse. To know the circuit breaker or fuse required by
your model, see the rating plate to find the wattage con-
sumption and refer to the ratings table to get the circuit
breaker or fuse amperage.
All oven models on the front cover of this Installation
Guide are dual rated, designed to be connected to ei-
ther 208V or 240VAC, 60Hz, 4-wire, single-phase
power supply.
Model Circuit required Watts @ 240V Circuit required Watts @ 208V
ME301YP 30A 6400 30A 4800
ME302YP 40A 8500 40A 6500
Location of the power outlet
Before you install the appliance, check the location of
the power outlet.
¡ If the electrical supply is located in the cabinet open-
ing, the electrical connection must be made prior to
placing the oven in the opening.
¡ If the electrical supply is in an adjacent cabinet, elec-
trical connection can be made after placing the oven
in the opening.
Routing the electrical conduit cable
Requirements
¡ A hole in the cabinet has been prepared to route the
electric conduit from the oven to the junction box.
¡ Serviceability must be maintained. Do not shorten the
electric conduit cable. Route the electric conduit ca-
ble in a way to permit temporary removal of the oven.
▶
The electrical conduit cable swivels where it is con-
nected at the oven. Rotate the electric conduit cable
upward or downward and direct it through the pre-
pared hole in the cabinet.
Installing a four-wire connection
1. IMPORTANT: Use the four-wire cable from home
power supply in the U.S. where local codes do not al-
low grounding through neutral, New Branch circuit in-
stallations (1996 NEC), mobile homes and recre-
ational vehicles, new construction and in Canada.
1
2
3
6
8
7
9
4
5
1
Cable from home power supply
2
Black wires
3
Red wires
4
4-wire flexible conduit from oven
5
Junction box
6
White wires
7
UL listed wire connectors
8
Green (or bare) ground wire
9
UL listed or CSA approved conduit connector