
User Guide
ManualsBrandsThermador ManualsCooking Appliances30 Inch Double Smart Electric Wall Oven with 9.2 cu. ft. Total Capacity, True Convection Upper Cavity, Convection Lower Cavity, Self Clean, Convection Multi-Rack Mode, Third Element Convection, SoftClose® Hinges, Full Access® Rack, and STAR-K Certified


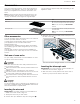


Table Of Contents
- Oven
- en-us
- Table of contents
- IMPORTANT SAFETY INSTRUCTIONS
- Preventing material damage
- Environmental protection and energy-saving
- Familiarizing yourself with your appliance
- Accessories
- Before using for the first time
- Basic Operation
- Timer functions
- Basic settings
- Home Connect®
- Getting the most out of your appliance
- Cleaning and maintenance
- Eliminating faults
- Disposal
- Cooking charts
- Customer support
- STATEMENT OF LIMITED PRODUCT WARRANTY
- fr-ca
- Table des matières
- IMPORTANTES CONSIGNES DE SÉCURITÉ
- Prévenir les bris matériels
- Protection de l'environnement et économies
- Description de l'appareil
- Accessoires
- Avant d'utiliser pour la première fois
- Opération de base
- Fonctions de minuterie
- Réglages de base
- Home Connect®
- Tirer le meilleur parti de l’électroménager
- Positions des grilles
- Obtenir les meilleurs résultats
- Conseils généraux pour les modes de chauffage
- Comment utiliser le mode de cuisson
- Comment utiliser le mode de cuisson par convection
- Comment utiliser le mode de convection multi-grille/vraie convection
- Comment utiliser le mode pizza
- Comment utiliser le mode de rôtissage
- Comment utiliser le mode de rôtissage par convection
- Comment utiliser le mode gril
- Comment utiliser le mode de cuisson au gril par convection
- Comment utiliser le mode de fermentation
- Comment utiliser le mode maintenir au chaud
- Nettoyage et entretien
- Dépannage
- Élimination
- Tableaux de cuisson
- Support à la clientèle
- ÉNONCÉ DE LA GARANTIE LIMITÉE

en-us Before using for the first time
16
2. Tilt the front of the rack up about 3/4'' (2cm) and
finish pushing the rack all the way back .
Note:Avoid striking the oven light cover glass when
pushing the rack into position.
a The back of the telescopic rack drops in to place.
3. Pull the rack forward to engage the bottom of the
rack onto the rear of the rack position guide.
4. Lower the front of the rack to finish seating it on the
rack guide. The rack should feel stable when properly
seated.
5. Slide the movable part of the telescopic rack in and
out a few times to make sure it is able to move freely
and that the non-moving part of the telescopic rack is
securely anchored.
Removing a telescopic rack
1. Lift the front of the telescopic rack assembly about 1/
2'' (1cm) and push the rack to the rear about
3/4'' (2cm).
a The rack can disengage from the rack position guide.
2. Lift the rear of the telescopic rack assembly so it
clears the rack position guide and gently pull the rack
from the oven.
Note:Do not pull the rack unevenly, this will cause it
to bind during removal, catching on the oven walls.
Before using for the first time
Before using for the first time
Before using for the first time
Carry out these steps before using your appliance.
¡ The appliance must be properly installed by a quali-
fied service provider before use.
¡ Read and understand all "safety precautions"
→Page4 and information in the Use and Care Guide
prior to operating.
¡ Download the HomeConnect® app to remotely con-
trol your appliance, get cooking inspiration, and ac-
cess service tips and support.
¡ This Use and Care Guide covers several models. Not
all features are available to all models.
Cleaning the appliance before using it
for the first time
Clean the oven cavity and accessories before using the
appliance to prepare food for the first time.
1. Remove all packaging materials from the oven cavity.
For double ovens, check both oven cavities.
2. Before heating the appliance, wipe the smooth sur-
faces in the oven cavity with a soft, damp cloth.
3. Keep the room ventilated while the appliance is heat-
ing.
4. Set the heating mode and temperature.
Heating mode Convection bake
Temperature maximum
Duration 1hour
5. Switch off the appliance after the specified cooking
time.
6. Wait until the oven cavity has cooled down.
7. Clean the smooth surfaces with soapy water and a
dish cloth.
8. Clean the accessories using soapy water and a dish
cloth or soft brush.
a There may be a slight odor during first uses. This is
normal and will disappear.
Setting the clock
The oven includes time functions that require the current
time to be set.
Tip:Activate HomeConnect® to set and maintain the
clock automatically.
→"HomeConnect® ", Page21
Setting the clock
Requirement:The oven is in standby mode.
1. Press CLOCK.
a The display shows "SET CLOCK".
2. Press ENTER.
3. Use the numeric keypad to enter the desired time.
The numbers fill in from right to left. To enter 10:45,
type 1, 0, 4, 5.
4. Press ENTER.
Pairing your oven with HomeCon-
nect®
In order to utilize the full feature potential of the appli-
ance, download the HomeConnect® app on a smart
device and pair the appliance to the home's Wi-Fi de-
vice.
▶
For step-by-step instructions, see
→"HomeConnect® ", Page21.