
Quick Start Guide

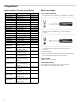
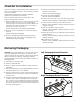
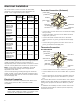
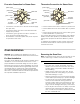
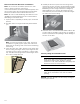
Table Of Contents
- Table of ContentsInstallation Instructions
- Safety DefinitionsSafety Definitions
- IMPORTANT SAFETY INSTRUCTIONS
- READ AND SAVE THESE INSTRUCTIONS
- Preparation
- Checklist for Installation
- 1. Before installing the oven, be sure to verify the cabinet dimensions are correct for your unit and that the required electrical connections are present. Make sure the electrical conduit provided on the unit is able to reach to the point of connection
- 2. Move the oven unit into place in front of the cabinet opening.
- 3. Remove packaging materials, leaving the bottom packaging on the unit to avoid damaging flooring.
- 4. Remove the T20 (star head) screws holding the unit to the base of the carton.
- 5. Perform Electrical Installation.
- 6. Remove the oven door or doors (bottom hinge only).
- 7. Team lift the unit directly into the cabinet cutout.
- 8. Slide the unit all the way into place.
- 9. Fasten the oven unit to the cabinetry opening with the screws supplied.
- 10. Reinstall the oven door(s).
- 1. Before installing the oven, be sure to verify the cabinet dimensions are correct for your unit and that the required electrical connections are present. Make sure the electrical conduit provided on the unit is able to reach to the point of connection
- Removing Packaging
- NOTICE:
- 1. Cut straps on outside of box.
- 2. Remove cardboard box.
- 3. Remove all top and side cardboard, foam and wood packaging.
- 4. Place oven (leaving it on the shipping base) in front of the cabinet where it is to be installed.
- 5. Remove all accessories, racks, packing materials and literature from the oven cavity. Check both cavities for double ovens.
- 6. Unscrew unit from packaging brackets as shown. The screws near the base mounting bracket are all T20 size. Only the one screw that goes through the slotted hole in the mounting bracket on the left and right sides of the unit needs to be removed in...
- Left Packaging Bracket Removal
- Right Packaging Bracket Removal
- Electrical Installation
- Oven Installation
- NOTICE:
- For Best Installation
- Removing the Oven Door
- Note:
- Remove Lower Oven Door Prior to Installation
- Note:
- Note:
- 1. Open the door completely to its fully open, horizontal position.
- 2. Flip latch levers on hinges all the way down toward you.
- Note:
- 3. Close the oven door until it catches on the hinge stop levers, locking the hinges at the proper angle for door removal. The door will be open about 7 inches at the top. This takes the spring tension off the hinges so the door can be easily lifted out
- 4. Carefully lift the door up and out of the hinge slots. Hold firmly; the door is heavy. Use both hands to firmly grip it by the sides. Do not grip the door by the handle. Maintaining the door angle, lift the door straight up approximately 3/4” to...
- 5. Place the door in a convenient and stable location until you are ready to reinstall it. Lay the door on a towel or section of protective foam padding to avoid damage to the door or the floor.
- Correctly Lifting the Combination Oven
- NOTICE:
- Lifting Recommendations
- Lifting Locations-Bottom Hinge Door
- Note:
- Lifting Locations-Side Hinge Door
- Note:
- Placing the Oven into the Cabinet Opening
- 9 CAUTION
- 1. The unit and its bottom packaging (pallet) should be positioned close to and in front of the cabinet opening prior to beginning to lift the unit into place.
- 2. Lift or slide unit into the cabinet cutout without allowing the unit base to contact the flooring.
- 3. Guide the unit straight back into the cabinet cutout. Push the unit straight in until the oven trim is about 2 inches from being flush with cabinet wall. Be careful not to crimp the flexible conduit between the oven and the cabinet back wall. If n...
- 4. Push the unit all the way back into the cabinet cutout until the front edge of the unit is flush with the front of the cabinet.
- 5. Install the supplied screws through the tap holes in the trim (2 screws for single ovens, 4 screws for double/ combo ovens). It is recommended to drill pilot holes for the trim screws.
- 6. Replace the oven door(s) according to the following instructions.
- Reinstalling Oven Doors with Bottom Hinge
- 1. Holding the door firmly in both hands, grip it on either side. Do not grip by the handle.
- 2. Tilt the door back slightly towards you until it opens about 7” at the top.
- 3. Slide the hinges into the slots as far as they will go and then lower the door straight down. The angle of the door may need to be adjusted slightly to allow the hinges to engage properly and the door to lower into place. The door should lower abo...
- 4. Lower the door into the fully open 90° position. If the door will not lower all the way to the 90° position, the hinges are not correctly seated. The door should be straight, not crooked.
- 5. Push the levers on both the hinges up and forward until they are locked into the slot, flush with the front of the oven body.
- 6. Close the door gently. It should close all the way. Gently open and close the door several times to be sure it is correctly installed and securely in place.
- 1. Holding the door firmly in both hands, grip it on either side. Do not grip by the handle.
- Aligning Side Hinge Oven Doors
- Note:
- Tip:
- 1. Check to see if the side hinge oven doors are properly aligned.
- 2. Fig. A-Door is too low if hinge side is above level. A bump will be felt when the striker comes in to contact with the realignment roller.
- 3. Fig. B-Door is too high if latch side is above level. Interference will be felt between the striker and the catch receiver. Door needs to move down on latch side.
- Side Hinge Door Alignment Procedure
- Side Hinge Door Troubleshooting Guide
- Testing Operation
- 1. Turn on power at the breaker.
- 2. Test the oven mode.
- 3. Verify that the oven light comes on and the oven begins to preheat.
- 4. Test the door lock.
- 5. If installing a double oven, test the second oven as well.
- 6. If any of the tests do not result as explained above, contact service for assistance. Otherwise, the installation is complete at this time.
- 1. Turn on power at the breaker.
- Service
- Cabinet Requirements
- Appliance and Cabinet Cutout Dimensions
- Dimensions for Single Oven Units
- NOTICES
- Single Oven Wall Mount Installation
- Single Oven Right Hinge
- Single Oven Left Hinge
- Single Oven Bottom Hinge
- Single Oven Wall Mount Installation
- Single Oven Flush Mount Installation
- Top View Right Hinge Door
- Top View Left Hinge Door
- Top View Bottom Hinge Door
- Side View-Right Hinge, Left Hinge and Bottom Hinge
- Dimensions for Under-Counter Installation
- Dimensions for Steam and Convection Oven Units
- Dimensions for Steam and Convection Oven with Storage Drawer
- NOTICES
- Steam and Convection Oven with Storage Drawer Wall Mount Installation
- Steam and Convection Oven with Storage Drawer
- Steam and Convection Oven with Storage Drawer Wall Mount Installation
- Steam and Convection Oven with Storage Drawer Flush Mount Installation
- Top View Bottom Hinge Door
- Side View-Steam and Convection Oven over Storage Drawer
- Steam Oven with Storage Drawer Under-Counter Installation
- Dimensions for Double Oven Units
- NOTICES
- Note:
- Double Oven Wall Mount Installation
- Double Oven Right Hinge
- Double Oven Left Hinge
- Double Oven Bottom Hinge
- Double Oven Wall Mount Installation
- Note:
- Double Oven Flush Mount Installation
- Top View Right Hinge Door
- Top View Left Hinge Door
- Top View Bottom Hinge Door
- Side View-Right Hinge, Left Hinge and Bottom Hinge
- Dimensions for Combination Oven with Steam and Convection Oven Units
- Dimensions for Combination Oven with Microwave or Speed Oven
- Dimensions for Triple Oven with Speed Oven and Warming Drawer
- Dimensions for Single Oven Units
- THERMADOR® Support
- Table des matièresDirectives d'installation
- Définitions de sécuritéDéfinitions de sécurité
- IMPORTANTES CONSIGNES DE SÉCURITÉ
- LIRE ET CONSERVER CES INSTRUCTIONS
- Préparation
- Liste de vérification de l’installation
- 1. Avant d'installer le four, prenez bien soin de vérifier que les dimensions de l'armoire conviennent à l’appareil et que les raccordements électriques requis sont présents. Assurez-vous que le conduit électrique fourni sur l’appareil est e...
- 2. Déplacez le four devant l’avant de l’ouverture du caisson.
- 3. Retirez les matériaux d’emballage. Conservez la partie inférieure de l'appareil pour éviter d’endommager le sol.
- 4. Dévissez les vis à tête en étoile (taille T-20) qui maintiennent l’appareil au fond de la boîte.
- 5. Procédez à l’installation électrique.
- 6. Retirez la ou les portes du four (uniquement des modèles à charnière inférieure).
- 7. L’équipe soulève l’appareil directement dans la découpe du caisson.
- 8. Faites glisser l'unité complètement pour la mettre en place.
- 9. Fixez le four à l'ouverture de l'armoire à l'aide des vis fournies.
- 10. Remettez en place la ou les portes du four.
- 1. Avant d'installer le four, prenez bien soin de vérifier que les dimensions de l'armoire conviennent à l’appareil et que les raccordements électriques requis sont présents. Assurez-vous que le conduit électrique fourni sur l’appareil est e...
- Pour enlever l’emballage
- AVIS :
- 1. Coupez les sangles sur l'extérieur de la boîte.
- 2. Retirez la boîte en carton.
- 3. Retirez tous les panneaux de carton ainsi que la protection de mousse et le bois placés sur le dessus et les côtés.
- 4. Placez le four (en le laissant sur le socle de transport) devant l'armoire où il doit être installé.
- 5. Retirez tous les accessoires, les grilles, le matériel d'emballage et la documentation de la cavité du four. Vérifiez le contenu des deux cavités avec un four double.
- 6. Dévissez les brides d'emballage, tel qu'illustré. Toutes les vis situées près du support de fixation du socle sont de dimension T-20. Il suffit de dévisser la vis qui passe par le trou allongé dans le support de fixation du côté droit et g...
- Retrait de la bride gauche de l'emballage
- Retrait de la bride droite de l'emballage
- Installation électrique
- Installation du four
- AVIS :
- Pour une installation optimale
- Retrait de la porte du four
- Remarque :
- Retirez la porte du four inférieur avant l'installation
- Remarque :
- Remarque :
- 1. Ouvrir complètement la porte du four jusqu'à ce qu'elle soit entièrement à l'horizontale.
- 2. Basculer complètement les leviers de fermeture des charnières vers soi.
- Remarque :
- 3. Fermer la porte du four jusqu'à ce qu'elle s'accroche sur les leviers d'arrêt des charnières, verrouillant ainsi les charnières au bon angle pour le démontage de la porte. La porte sera ouverte d'environ 7 po (17,8 cm) sur la partie supérieu...
- 4. Soulever soigneusement la porte pour la sortir des fentes des charnières. La maintenir fermement; la porte est lourde. Saisir la porte fermement à deux mains en la prenant par les côtés. Ne pas saisir la porte par la poignée. Tout en maintena...
- 5. Placer la porte sur une surface facilement accessible et stable jusqu'à ce que vous soyez prêt(e) à la remettre en place. Poser la porte sur une serviette ou une section de rembourrage de protection en mousse pour éviter d'endommager la porte ...
- Soulèvement approprié du four
- AVIS :
- Recommandations concernant le soulèvement
- Emplacements des points de soulèvements pour porte à charnière inférieure
- Remarque :
- Emplacements des points de soulèvements pour porte à charnière latérale
- Remarque :
- Mise en place du four dans l'ouverture de l'armoire
- 9 ATTENTION
- 1. L'appareil et la partie inférieure de l’emballage (palette) doivent être positionnés près de l'armoire et devant son ouverture avant de commencer à soulever l'appareil pour le mettre en place.
- 2. Soulevez ou glissez l’appareil dans l'ouverture de l'armoire en empêchant le socle d'entrer en contact avec le sol.
- 3. Guidez l'appareil directement vers l'arrière dans l'ouverture de l'armoire. Poussez l'appareil tout droit jusqu'à ce que la garniture du four soit à 2 po (5 cm) avant d'affleurer avec la paroi de l'armoire. Faites attention de ne pas pincer le ...
- 4. Encastrez l’appareil jusqu’au fond de l’ouverture de l’armoire. L'avant de l’appareil doit affleurer avec la face avant de l’armoire.
- 5. Insérez les vis fournies dans les trous taraudés de la garniture (2 vis pour les fours simples et 4 vis pour les fours doubles ou combinés). On recommande de percer des avant-trous pour les vis de la garniture.
- 6. Réinstallation de la ou des portes du four selon les directives suivantes.
- Réinstallation des portes de four à charnière inférieure
- 1. En tenant fermement la porte des deux mains, la saisir de chaque côté. Ne pas saisir la porte par la poignée.
- 2. Incliner légèrement la porte vers soi, jusqu'à ce que sa partie supérieure s'ouvre d'environ 7 po (18 cm).
- 3. Glisser les charnières dans leurs logements jusqu'en butée, puis baisser la porte en ligne droite. L'angle de la porte peut nécessiter un léger ajustement pour permettre d'engager les charnières convenablement et d'abaisser la porte en place....
- 4. Ouvrir entièrement la porte du four sur 90 degrés. Si elle ne s’abaisse pas au complet à 90 degrés, les charnières seraient éventuellement mal insérées. La porte doit être droite et non de travers.
- 5. Pousser les loquets à levier sur les deux charnières vers le haut et l'avant, jusqu'à ce qu'ils s'enclenchent dans logements, affleurant à l'avant du four.
- 6. Fermer la porte délicatement. Elle devrait bien se fermer. Fermer et ouvrir délicatement la porte du four à plusieurs reprises pour s'assurer qu'elle est correctement et solidement installée.
- 1. En tenant fermement la porte des deux mains, la saisir de chaque côté. Ne pas saisir la porte par la poignée.
- Alignement des portes de four à charnière latérale
- Remarque :
- Conseil :
- 1. Vérifier si les portes de four à charnière latérale sont correctement alignées.
- 2. Fig. A : La porte est trop basse si la charnière latérale est au-dessus du niveau. On devrait ressentir un petit heurt quand l’ergot touche au rouleau de réalignement.
- 3. Fig. B : La porte est trop haute si la gâche est au- dessus du niveau. Vous sentirez un petit heurt entre l’ergot et le pêne. La porte doit être abaissée du côté du pêne.
- Procédure d'alignement de la porte à charnière latérale
- Guide de dépannage la porte à charnière latérale
- Opération d’essai
- 1. Mettez sous tension au disjoncteur.
- 2. Essayez le mode four.
- 3. Vérifiez que l’éclairage du four s’allume et que le four se met à préchauffer.
- 4. Essayez le verrouillage de la porte.
- 5. Dans le cas d’un four double, testez également le deuxième four.
- 6. Si l’un des tests n’aboutit pas comme prévu ci-dessus, communiquez avec le service après-vente pour obtenir de l’aide. Sinon, l’installation est terminée à ce moment-ci.
- 1. Mettez sous tension au disjoncteur.
- Dépannage
- Exigences concernant les armoires
- Dimensions de l'appareil et de la découpe des armoires
- Dimensions pour les fours simples
- AVIS
- Installation murale d'un four simple
- Four simple à charnière latérale droite
- Four simple à charnière latérale gauche
- Four simple à charnière inférieure
- Installation murale d'un four simple
- Installation murale affleurante d'un four simple
- Vue du dessus porte à charnière latérale droite
- Vue du dessus porte à charnière latérale gauche
- Vue du dessus porte à charnière inférieure
- Vue de profil charnières latérales droite et gauche et charnière inférieure
- Dimensions pour une installation sous le plan de travail
- Dimensions pour un four à vapeur et à convection
- AVIS
- Installation murale d’un four à vapeur et à convection
- Four à vapeur et à convection à charnière inférieure
- Installation murale
- Installation murale affleurante d’un four à vapeur et à convection
- Vue du dessus; porte à charnière inférieure
- Vue de profil; porte à charnière inférieure
- Dimensions pour une installation sous le plan de travail
- Dimensions pour un four à vapeur et à convection avec tiroir de rangement
- AVIS
- Installation murale d’un four à vapeur et à convection avec tiroir de rangement
- Four à vapeur et à convection avec tiroir de rangement
- Installation murale d’un four à vapeur et à convection avec tiroir de rangement
- Installation murale affleurante d’un four à vapeur et à convection avec tiroir de rangement
- Vue du dessus; porte à charnière inférieure
- Vue de profil; four à vapeur et à convection au-dessus d’un tiroir de rangement
- Installation d’un four à vapeur avec tiroir de rangement sous le plan de travail
- Dimensions pour les fours doubles
- AVIS
- Remarque :
- Installation murale d'un four double
- Four double à charnière latérale droite
- Four double à charnière latérale gauche
- Four double à charnière inférieure
- Installation murale d'un four double
- Remarque :
- Installation murale affleurante d'un four double
- Vue du dessus porte à charnière latérale droite
- Vue du dessus porte à charnière latérale gauche
- Vue du dessus porte à charnière inférieure
- Vue de profil charnières latérales droite et gauche et charnière inférieure
- Dimensions pour un four combiné avec four à vapeur et à convection
- Dimensions pour un four combiné avec four à micro-ondes ou à micro-ondes à cuisson rapide
- AVIS
- Four combiné avec four à micro-ondes ou à micro- ondes à cuisson rapide
- Installation affleurante d’un four combiné avec four à micro-ondes ou à micro-ondes à cuisson rapide
- Vue du dessus porte à charnière inférieure
- Vue de profil four combiné avec four à micro-ondes ou à micro-ondes à cuisson rapide
- Dimensions pour un four triple avec micro-ondes à cuisson rapide et tiroir- réchaud
- Dimensions pour les fours simples
- Soutien THERMADOR®
- ÍndiceInstrucciones de instalación
- Definiciones de seguridadDefiniciones de seguridad
- INSTRUCCIONES DE SEGURIDAD IMPORTANTES
- LEA Y CONSERVE ESTAS INSTRUCCIONES
- Preparación
- Lista de verificación de instalación
- 1. Antes de instalar el horno, asegurarse de comprobar que las dimensiones del gabinete son correctas para la unidad y que están presentes las conexiones eléctricas necesarias. Asegurarse de que el tubo conduit pasacables suministrado con la unidad...
- 2. Mover la unidad del horno y colocarlo justo delante del espacio del gabinete.
- 3. Quitar los materiales de embalaje, pero dejar el embalaje de la parte inferior de la unidad para evitar dañar el piso.
- 4. Quitar los tornillos Torx T20 (de punta de estrella) que sujetan la unidad a la base del cartón.
- 5. Realizar la instalación eléctrica.
- 6. Retirar la puerta o puertas del horno (bisagra inferior solamente).
- 7. Levantar en equipo la unidad e introducirla directamente al espacio del gabinete.
- 8. Deslizar la unidad hasta su sitio.
- 9. Sujetar la unidad del horno al espacio del gabinete con los tornillos suministrados.
- 10. Volver a montar la puerta o puertas del horno.
- 1. Antes de instalar el horno, asegurarse de comprobar que las dimensiones del gabinete son correctas para la unidad y que están presentes las conexiones eléctricas necesarias. Asegurarse de que el tubo conduit pasacables suministrado con la unidad...
- Quitar el embalaje
- AVISO:
- 1. Cortar los flejes del exterior de la caja.
- 2. Sacar la caja de cartón.
- 3. Retirar todo el embalaje de cartón, espuma y madera de la parte superior y lateral.
- 4. Colocar el horno (dejándolo en la base de envío) delante del gabinete en el que se va a instalar.
- 5. Extraer todos los accesorios, rejillas, materiales de embalaje y documentación de la cavidad del horno. Revisar ambas cavidades si se trata de un horno doble.
- 6. Desatornillar la unidad de las placas de fijación del embalaje como se indica en la imagen. Los tornillos junto a la placa de fijación de instalación de la base son Torx medida T20. Solo hay que extraer un tornillo que pasa por el orificio long...
- Extraer la placa de fijación de embalaje del lateral izquierdo
- Extraer la placa de fijación de embalaje del lateral derecho
- Instalación eléctrica
- Instalar el horno
- AVISO:
- Para una mejor instalación
- Retirar la puerta del horno
- Nota:
- Quitar la puerta del horno inferior antes de la instalación.
- Nota:
- Nota:
- 1. Abrir la puerta completamente y ponerla en su posición horizontal.
- 2. Voltear las palancas de bloqueo de las bisagras hacia uno mismo.
- Nota:
- 3. Cerrar la puerta del horno hasta que se enganche en las palancas de tope de la bisagra, bloqueando las bisagras en el ángulo adecuado para extraer la puerta. La puerta se abrirá aprox. 7 pulgadas en la parte superior. Esto libera la tensión del...
- 4. Levantar con cuidado la puerta y sacarla de las ranuras de las bisagras. Sostener con firmeza; la puerta es pesada.Usar ambas manos para sujetarla con firmeza por ambos lados. No sujetar la puerta por la agarradera. Mantener el ángulo de la puert...
- 5. Colocar la puerta en una ubicación adecuada y estable hasta estar preparado para volver a instalarla. Colocar la puerta sobre una toalla o sección de relleno para embalajes de espuma protectora para evitar daños a la puerta o al piso.
- Levantar correctamente el horno de funcionamiento combinado
- AVISO:
- Recomendaciones de levantamiento
- Puntos de agarre, puerta con bisagra inferior
- Nota:
- Puntos de agarre, puerta con bisagra lateral
- Nota:
- Colocar el horno en la abertura del gabinete
- 9 ATENCION
- 1. La unidad y el material de embalaje bajo ella (palet) deben colocarse justo delante de la abertura del gabinete antes de comenzar a levantar la unidad para ponerla en su sitio.
- 2. Levantar o deslizar la unidad hasta el espacio del gabinete sin permitir que la base de la unidad entre en contacto con el piso.
- 3. Guiar la unidad directamente al espacio del gabinete. Empujar la unidad hacia adentro hasta que el borde del horno sobresalga unas 2 pulgadas del gabinete.Tener cuidado con no aplastar el tubo pasacables flexible entre el horno y la pared trasera ...
- 4. Empujar la unidad hasta el fondo del espacio del gabinete hasta que su borde frontal quede al mismo nivel que el frontal del gabinete.
- 5. Atornillar los tornillos suministrados en los orificios roscados de la moldura (2 tornillos para hornos sencillos, 4 tornillos para hornos dobles/combinados). Se recomienda taladrar orificios de guía para los tornillos de la moldura.
- 6. Sustituir la puerta o puertas del horno según las siguientes instrucciones.
- Volver a reinstalar las puertas de los hornos con bisagra inferior
- 1. Sujetando la puerta con firmeza con ambas manos, tomarla por los lados. No sujetarla por la manija.
- 2. Inclinar la puerta de nuevo ligeramente hacia uno hasta que se abra aprox. 7" en la parte superior.
- 3. Deslizar las bisagras en las ranuras tanto como sea posible y después bajar la puerta recta hacia abajo. Puede ser necesario ajustar el ángulo de la puerta ligeramente para permitir que las bisagras encajen adecuadamente y la puerta baje hasta s...
- 4. Bajar la puerta hasta su posición de 90°, totalmente abierta. Si la puerta no se puede bajar hasta un ángulo de 90°, las bisagras no están bien puestas. La puerta debe quedar recta, no torcida.
- 5. Presionar las palancas de ambas bisagras hacia arriba y adelante hasta que queden bloqueadas en la ranura y alineadas con el frente del cuerpo del horno.
- 6. Cerrar la puerta con cuidado.Debería cerrarse completamente. Abrir y cerrar la puerta con cuidado varias veces para asegurarse de que está colocada correctamente y de forma segura.
- 1. Sujetando la puerta con firmeza con ambas manos, tomarla por los lados. No sujetarla por la manija.
- Alinear las puertas de los hornos con bisagras laterales
- Nota:
- Consejo:
- 1. Comprobar si la puerta de horno con bisagra lateral está bien alineada.
- 2. Fig. A: La puerta está demasiado baja si el lado de la bisagra está por encima del nivel. Se percibe un golpe cuando el gancho entra en contacto con el rodillo de alineación.
- 3. Fig. B: La puerta está demasiado baja si el lado del cierre está por encima del nivel. Se percibirá una interferencia entre el gancho y su enganche. Se tiene que bajar la puerta en el lado del cierre.
- Procedimiento de alineación de las puertas con bisagra lateral
- Guía de solución de problemas para puertas con bisagra lateral
- Funcionamiento de prueba
- 1. Conectar la energía en el breaker.
- 2. Probar el modo horno.
- 3. Verificar que la luz del horno se encienda y que el horno comience a precalentar.
- 4. Probar el cierre de la puerta.
- 5. Si se está instalando un horno doble, probar el segundo horno también.
- 6. Si alguna de las pruebas no resulta como se explicó anteriormente, contactar con el servicio técnico para obtener ayuda.O si todo está bien, la instalación se ha completado en este momento.
- 1. Conectar la energía en el breaker.
- Servicio
- Requisitos del gabinete
- Dimensiones del electrodoméstico y del hueco para el gabinete
- Medidas para unidades de horno sencillo
- AVISO
- Instalación en pared del horno individual
- Horno individual, bisagra a la derecha
- Horno individual, bisagra a la izquierda
- Horno individual, bisagra inferior
- Instalación en pared del horno individual
- Instalación enrasada del horno individual
- Puerta con bisagra a la derecha, vista superior
- Puerta con bisagra a la izquierda, vista superior
- Puerta con bisagra inferior, vista superior
- Vista lateral: bisagras a la derecha, izquierda e inferior
- Medidas para la instalación debajo de la cubierta
- Medidas para unidades de horno de vapor y convección
- AVISO
- Instalación en pared del horno de convección y vapor
- Horno de vapor y convección con bisagra inferior
- Instalación en pared
- Instalación enrasada del horno de convección y vapor
- Puerta con bisagra inferior, vista superior
- Puerta con bisagra inferior, vista lateral
- Medidas para la instalación debajo de la cubierta
- Medidas para hornos de convección y vapor con cajón de almacenamiento
- AVISO
- Instalación en pared del horno de convección y vapor con cajón de almacenamiento
- Hornos de convección y vapor con cajón de almacenamiento
- Instalación en pared del horno de convección y vapor con cajón de almacenamiento
- Instalación enrasada del horno de convección y vapor con cajón de almacenamiento
- Puerta con bisagra inferior, vista superior
- Vista lateral: Horno de convección y vapor sobre cajón de almacenamiento
- Instalación debajo de la cubierta del horno de vapor con cajón de almacenamiento
- Medidas para unidades de horno doble
- AVISO
- Nota:
- Instalación en pared del horno doble
- Horno doble, bisagra derecha
- Horno doble, bisagra izquierda
- Horno doble, bisagra inferior
- Instalación en pared del horno doble
- Nota:
- Instalación enrasada del horno doble
- Puerta con bisagra a la derecha, vista superior
- Puerta con bisagra a la izquierda, vista superior
- Puerta con bisagra inferior, vista superior
- Vista lateral: bisagras a la derecha, izquierda e inferior
- Medidas para unidades de horno combinado con horno de vapor y convección
- Medidas del horno combinado con microondas u horno rápido
- Medidas del horno triple con horno rápido y cajón calientaplatos
- Medidas para unidades de horno sencillo
- Soporte técnico de THERMADOR®

7
Checklist for Installation
Use this checklist to verify that you have completed each
step of the installation process. This can help you avoid
common mistakes.
Always read and follow the complete installation
instructions contained in this manual.
Refer to detailed instructions for each step in the
sections following this checklist.
1.
Before installing the oven, be sure to verify the cabinet
dimensions are correct for your unit and that the
required electrical connections are present. Make sure
the electrical conduit provided on the unit is able to
reach to the point of connection.
Section: Dimensions and Cabinet Requirements
2.
Move the oven unit into place in front of the cabinet
opening.
Section: Removing Packaging
3.
Remove packaging materials, leaving the bottom
packaging on the unit to avoid damaging flooring.
Section: Removing Packaging
4.
Remove the T20 (star head) screws holding the unit to
the base of the carton.
Section: Removing Packaging
5.
Perform Electrical Installation.
Section: Electrical Installation
6.
Remove the oven door or doors (bottom hinge only).
Section: Oven Installation, "Removing the Oven Door"
7.
Team lift the unit directly into the cabinet cutout.
Section: Oven Installation, "Placing the Oven into the
Cabinet Opening"
8.
Slide the unit all the way into place.
Section: Oven Installation, "Placing the Oven into the
Cabinet Opening"
9.
Fasten the oven unit to the cabinetry opening with the
screws supplied.
Section: Oven Installation, "Placing the Oven into the
Cabinet Opening"
10.
Reinstall the oven door(s).
Section: Oven Installation, "Placing the Oven into the
Cabinet Opening"
Removing Packaging
NOTICE: To prevent damage to your floor keep the unit
in its packaging base until ready to be placed in the
cabinet opening. Do not slide the unit across the flooring.
Different models use different packaging materials.
Actual brackets may look differently. Bracket remains in
packaging base.
1.
Cut straps on outside of box.
2.
Remove cardboard box.
3.
Remove all top and side cardboard, foam and wood
packaging.
4.
Place oven (leaving it on the shipping base) in front of
the cabinet where it is to be installed.
5.
Remove all accessories, racks, packing materials and
literature from the oven cavity. Check both cavities for
double ovens.
6.
Unscrew unit from packaging brackets as shown. The
screws near the base mounting bracket are all T20
size. Only the one screw that goes through the slotted
hole in the mounting bracket on the left and right sides
of the unit needs to be removed in order to lift the unit
from the mounting base.
Left Packaging Bracket Removal
Right Packaging Bracket Removal