
Installation Guide


Page. 8
Installation procedure
Disassembling the rangetop
9 CAUTION
Shut off the gas supply to the appliance prior to
disconnecting the electrical power.
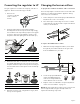
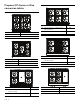
To disassemble the rangetop
1. Remove the rangetop grates and the burner caps.
2. To facilitate the removal of the spill tray, remove the T-
20 torx screws in the front face of the island trim or
backguard.
3. Use a 16 mm hex head bit for burners labeled ‘D’ or
‘F’. Use a 9 mm hex head bit for burners labeled ‘B’ to
remove the burner venturi from each burner base.
TIP: If a 16 mm hex head bit is not readily available, a
5/8'' hex bit can be selected. Alternatively, a bolt with
5/8'' head either “double-nutted” or tightened into
the chuck of a power driver can be used.
4. Disconnect the igniter. Carefully pull up on the burner
base.
5. Carefully remove each burner pedestal.
6. Remove the spill trays by rotating the trays up and out
the back.
7. Remove the heat shield on some models. Some
models have a double-width shield that extends under
adjacent spill tray.
1
2
a. Burner base
b. Electrode
c. Igniter housing
d. Igniter wire
a
b
c
d