
Installation Sheet


Page. 6
3. Disconnect the igniter. Carefully pull up on the burner
base.
4. Carefully remove each burner pedestal.
5. To facilitate the removal of the spill trays, depending
on model, remove the (3) or (4) T-20 Torx stainless
screws in the front face of the rear trim.
6. Remove the spill trays by rotating the trays up and out
the back.
7. Remove the heat shield, on some models. Some
models have a double-width shield that extends under
adjacent spill tray.
LP Regulator Conversion
The gas regulator is located in the cooktop, left side of
appliance. Exact location will vary per model.
3. Re-install conversion cap, configured for LP gas, back
into top of the regulator.
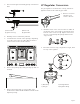
1) Burner Base 2) Electrode
3) Igniter Housing 4) Igniter Wire
1
2
3
4
1. Remove conversion
cap with a 7/8''
socket or wrench.
2. Read the letters on the stem. You will see “NAT” at
the bottom of the stem. Snap-out the plunger from
bottom of the conversion cap. Flip the stem over to
the “LP” end, and snap the plunger back into the
cap, as shown.
1) Brass Cap 2) Sealing Washer
3) Plunger 4) Regulator Body
LP
NAT
1
2
3
4