
installation instructions


Page. 10
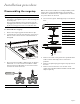
Converting the regulator to LP
The gas regulator is located in the rangetop, left side of
appliance. Exact location will vary per model.
2. Grasp the plastic button stem firmly and pull it
forcefully from the metal cap. The stem snaps snugly
into an indent in the cap and may require a strong pull
to remove. (Hint: it may be helpful to gently “rock”
the plastic stem while pulling it from the metal cap.)
3. Rotate the stem 180° so the letters “LP” on the stem
are upside down when the cap is set flat on its head.
Snap the stem back in place in this position inserting it
into the indent in the metal cap.The stem should snap
into place.
4. Reinstall conversion cap, configured for LP gas, back
into top of the regulator.
Changing the STAR
®
burner
orifices
Changing “D” and “F” STAR burners only
To prepare the 7 mm, 9/32'' socket, or ¼'' nut driver for
STAR burner orifice conversion
NOTE: This procedure facilitates the changing of the
orifices in the “D” and “F” STAR burners only. For the
smaller sized “B” burners in 305 models, this procedure
will not work because the socket is too big for insertion
through the orifice holders. To change “B” size STAR
burners, refer to page 11.
1. Trim a small piece of the foam tape provided with this
kit to about 1/4 – 1/2'' (6 – 12 mm).
2. Place foam tape over the edge of a 7 mm or a 9/32''
socket, or with 1/4'' nut driver used to replace the
burner orifices, as shown below.
• The foam tape helps to retain the orifice in the
end of the nut driver so it will not fall inside the
appliance during orifice removal or installation.
To replace the STAR “D” and “F” burner orifices
1. With the foam tape wrapped nut driver, reach down
through the jet holders and remove the gas orifice
from the STAR burner’s jet holder.
1. Remove the
conversion cap with
a 7/8'' socket or
wrench, or an
adjustable wrench.
a. Spring
b. Plastic button stem
c. Gasket
a. Natural gas b. LP gas
a
b
c
a
b
1
2