Installation INSTRUCTIONS Professional Series Rangetops THERMADOR.
Installation INSTRUCTIONS Professional Series Rangetops Table of contents (English) ................................................................ 2 Table de matières (Français)............................................................ 19 Índice de materias (Español) ........................................................... 38 Models | Modèles | Modelos: PCG305W PCG366W PCG364WD PCG364WL PCG486WL PCG486WD THERMADOR.
Table of Safety CONTENTS DEFINITIONS Safety ..................................................................................... 3 Important safety instructions ........................................... 3 Installation instructions ........................................................... 5 Planning information ....................................................... 5 9 WARNING This indicates that death or serious injuries may occur as a result of non-observance of this warning.
Safety 9 IMPORTANT SAFETY INSTRUCTIONS READ AND SAVE THESE INSTRUCTIONS INSTALLER: Save these Instructions for the Local Gas Inspector’s use. Please leave these Installation Instructions with this unit for the owner. Show the owner the location of the circuit breaker or fuse. Mark it for easy reference. Local codes vary. Installer is responsible for ensuring that the installation, gas connections, and grounding comply with all applicable codes.
9 IMPORTANT SAFETY INSTRUCTIONS READ AND SAVE THESE INSTRUCTIONS Always keep appliance area clear from combustible materials, gasoline and other flammable vapors and liquids. REAR CLEARANCE REQUIREMENTS: • Natural Gas — 7 inch water column. (17.4 mb) min., 14 inch (34.9 mb) maximum To avoid staining on the back wall, high temperature, non-porous construction materials suitable for use in a cooking environment are recommended. • Propane Gas — 11 inch water column. (27.4 mb) min., 14 inch (34.
Installation instructions Planning information 9 CAUTION To prevent possible damage to cabinets and cabinet finishes, use only materials and finishes that will not discolor or divide into layers. Materials should be able to withstand temperatures up to 194 °F (90 °C). Heat and moisture resistant adhesive must be used if the product is to be installed in laminated cabinetry. Check with the manufacturer to ensure materials meet these requirements. Before using your appliance, be sure to read this manual.
Installation clearances • • • • • To ensure professional results, the cabinet and countertop openings should be prepared by a qualified cabinet worker. The same clearances apply to island installations, except for the overhead cabinets, which must have a space wide enough to accept the island hood. See the Ventilation Planning Guide for recommended hood options.
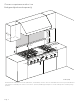
Clearance requirements with a Low Backguard (purchased separately) 13 " (33 0) 57) 18" (4 )– (762 30" 016) 1 ( 40" 0" 5 " (1 27) " or 48 36" 1,219 ) or ( 914 0" 0" inches (mm) as defined in the “National Fuel Gas Code” (ANSI Z223.1, Current Edition). Clearances from non-combustible materials are not part of the ANSI Z21.1 scope and are not certified by CSA. Clearances of less than 6'' (152 mm) should be approved by the local codes and/or by the local authority having jurisdiction. Page.
Clearance requirements with the island trim (included) 13 " (33 0) 457) 18" ((4 )– (762 30" 016) (1 40" 5 " (1 6" 27) 8" or 4 36" 1,219 ) r o (914 (15 2) 0" 0" inches (mm) as defined in the “National Fuel Gas Code” (ANSI Z223.1, Current Edition). Clearances from non-combustible materials are not part of the ANSI Z21.1 scope and are not certified by CSA. Clearances of less than 6'' (152 mm) should be approved by the local codes and/or by the local authority having jurisdiction. Page.
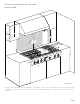
Clearance requirements with OTR – PCG305 ONLY 13 " (33 0) 57) 18" (4 * 30" ) (762 5 " (1 27) 0" ) (762 30" 0" 0" inches (mm) as defined in the “National Fuel Gas Code” (ANSI Z223.1, Current Edition). Clearances from non-combustible materials are not part of the ANSI Z21.1 scope and are not certified by CSA. Clearances of less than 6'' (152 mm) should be approved by the local codes and/or by the local authority having jurisdiction.
Countertop cutout Island installation without countertop backsplash Installing side support cleats (both sides) ¾" (19) minimum Detail A D 22 13/16" (580) A Counter sunk screws inches (mm) Detail A: front face of cabinet Wall installation with countertop backsplash Corner Notch Detail C B B Detail A D 2 x 4 Corner Support 23 5/16" (592) A 7 11/16" (195) inches (mm) inches (mm) 30'' Rangetop 36'' Rangetop 48'' Rangetop A 29-15/16'' (760 mm) 35-15/16'' (913 mm) 47-15/16'' (1,218 mm) B
Gas inlet location Side view of rangetop ½" (12.7) side flange 26¾" (680) 7/8" (22) 7 5/8" (194) A manual valve must be installed external to the appliance, in an accessible location from the front, for the purpose of shutting off the gas supply. Gas Inlet Location From left side to centerline of gas inlet Cabinet face for installation with projecting control panel.
3. Leave protective film over brushed-metal surfaces, to protect finish from scratches, until the rangetop is installed in its final position. 4. Use a Phillips head screwdriver to remove the screws from the pallet brackets on the left and right sides of the unit. Discard the screws and brackets after removal. • A metal flex line or fixed metal pipe shall be used to connect gas to the appliance.
Natural gas connection 9 WARNING To connect the gas 1. Make sure the gas supply is turned off at the manual shut-off valve before connecting the appliance. 2. Use a ¾'' (19 mm) flex line to connect between the gas supply and the appliance gas inlet. The gas supply line connection is located at the left rear of the appliance. The appliance gas inlet connection is ½'' (12.7 mm) NPT. ¾" (19) external threads ½" (12.
Electrical requirements and connection for gas units Electrical connection Electrical supply circuit requirements NEMA 5-15 NEMA 5-20 9 WARNING N Before installing, turn power OFF at the service panel. Lock service panel to prevent power from being turned ON accidentally. Always disconnect appliance from the electric supply either by disconnecting power cord or shutting off the breaker at the service panel before servicing the appliance. 9 WARNING This product must be properly grounded.
Low backguard installation (optional) 3. Secure the back with 8 x 1½'' (38 mm) screws. 9 WARNING Fingers or hands could get pinched when installing the backguard. Severe injury could result. Use extreme caution and wear thick protective gloves to avoid potential laceration to finger or hand while sliding the backguard down onto the range. 9 WARNING To reduce the risk of fire or injury to persons, check to make sure all packaging has been removed from accessory devices before use. 4.
Burner test 9 WARNING To prevent flare-ups and avoid the creation of harmful by-products, do not use the cooktop without all burner caps and all burner grates properly positioned. 2. Place burner cap gently on top of base so that the prongs of the burner base fit snugly into the groove of the burner cap. Checking the burner cap placement • Check each burner to make sure there is no gap between the burner cap and burner base.
Test rangetop burners See figures below for appropriate flame characteristics. If any of the rangetop burners continue to burn mostly or completely yellow, verify that the burner cap is positioned properly on the burner base, then re-test. If flame characteristics do not improve, call Thermador service. To test burner ignition 1. Select a rangetop burner knob. Push in and turn the knob to HI. • The igniter will produce a clicking sound.
Installer checklist Final checklist Operation Bezels centered on burner knobs, and knobs turn freely. Rangetop correctly positioned in countertop recess. Specified clearances maintained to cabinet surfaces. Purge air from gas system by operating one of the burners for several minutes. Burner caps positioned properly on burner bases. All packaging material removed. Each burner lights satisfactorily, both individually and with other burners operating.
Table des Définitions de MATIÈRES SÉCURITÉ Sécurité .................................................................................. 20 Instructions importants de sécurité ................................ 20 Consignes d'installation.......................................................... 23 9 AVERTISSEMENT Ceci indique que le non respect de cet avertissement peut entraîner des blessures graves, voire la mort. Renseignements de planification ....................................
Sécurité 9 INSTRUCTIONS IMPORTANTS DE SÉCURITÉ LIRE TOUTES LES INSTRUCTIONS AVANT DE PROCÉDER INSTALLATEUR : Conservez ces instructions pour l’inspecteur de la société gazière de votre localité. Laisser ces instructions avec l’appareil pour le propriétaire. Conserver ces instructions pour utilisation par l’inspecteur en électricité local. Les réglementations locales varient. L'installation, le branchement au gaz et la mise à la terre doivent être conformes à toutes les réglementations en vigueur.
9 INSTRUCTIONS IMPORTANTS DE SÉCURITÉ LIRE TOUTES LES INSTRUCTIONS AVANT DE PROCÉDER Vérifiez le type d'alimentation en gaz fourni sur le lieu d’installation. L’appareil doit être raccordé au type de gaz pour lequel il est certifié. Tous les modèles sont certifiés pour une utilisation avec gaz naturel. Conversion sur place pour utilisation au gaz propane exigeant le nécessaire de conversion.
9 INSTRUCTIONS IMPORTANTS DE SÉCURITÉ LIRE TOUTES LES INSTRUCTIONS AVANT DE PROCÉDER ATTENTION Cet appareil est conçu pour une utilisation culinaire. Pour des raisons de sécurité, ne l’utilisez jamais pour chauffer une pièce. Avertissement issu de la proposition 65 : Ce produit pourrait contenir un produit chimique reconnu par l'État de la Californie comme cancérigène ou ayant des effets nocifs sur la reproduction.
Consignes d'Installation Renseignements de planification Exigences en matière de ventilation 9 ATTENTION 9 AVERTISSEMENT Pour prévenir d'éventuels dommages aux armoiries ou aux finis des armoires, utilisez uniquement des matériaux et des finis qui ne se décolore pas ni se décollent en couches multiples. Les matériaux doivent être en mesure de supporter des températures pouvant atteindre 90 °C (194 °F).
Préparation de la ventilation • La table de cuisson est conçue pour être accrochée au plan de travail par ses brides latérales. Le plan de travail doit toutefois être suffisant solide pour porter ce appareil. Il sera éventuellement nécessaire d’ajouter un tasseau de chaque côté ou 2x4 montants d’angle (voir à la page 29). L’autre possibilité est de construire un plan de support pour y installer la table de cuisson.
ARRIÈRE EXIGENCES DE DÉGAGEMENT : Remarques : • Pour éviter de tacher le mur arrière, on recommande des matériaux de construction non-poreux, résistants à haute température qui conviennent à un environnement propre à la cuisson. • • Des modèles PCG305xx, PRD305xx, et PRD606xx convient pour un dégagement arrière de 0 '' pour alimenter les surfaces.
Armoires avec dosseret bas (acheter séparément) 13 " (33 0) 57) 18" (4 )– (762 30" 016) 1 ( 40" 0" 5 " (1 27) " or 48 36" 1,219 ) or ( 914 0" 0" pounces (mm) Les dégagements pour matériaux non-combustibles ne sont pas abordés dans la norme ANSI Z21.1 ni certifiés par la CSA. *Un dégagement de moins de 152 mm (6 po) doit être conforme aux codes locaux et/ou par les autorités locales ayant juridiction. Page.
Espace libre – Armoires avec garniture d’ilot incluse 13 " (33 0) 457) 18" ((4 )– (762 30" 016) 1 ( 40" 5 " (1 6" 27) 8" or 4 36" 1,219 ) or (914 (15 2) 0" 0" pounces (mm) Les dégagements pour matériaux non-combustibles ne sont pas abordés dans la norme ANSI Z21.1 ni certifiés par la CSA. *Un dégagement de moins de 152 mm (6 po) doit être conforme aux codes locaux et/ou par les autorités locales ayant juridiction. Page.
Espaces libres des armoires avec four à micro-ondes installé au-dessus de la cuisinière – PCG305 seulement 13 " (33 0) 18" (4 * 30" 57) ) (762 5 " (1 27) 0" 30" ) (762 0" 0" pounces (mm) Les dégagements pour matériaux non-combustibles ne sont pas abordés dans la norme ANSI Z21.1 ni certifiés par la CSA. *Un dégagement de moins de 152 mm (6 po) doit être conforme aux codes locaux et/ou par les autorités locales ayant juridiction. • 30 po (762 mm) min.
Préparation du plan de travail Installation en îlot (sans rebord de plan de travail) Installation de supports latéraux (des deux côtés) ¾" (19) minimum Detail A D 22 13/16" (580) A Vis à tête fraisée pounces (mm) Éclatée A : Face frontale de l’armoire Installation murale avec rebord de plan de travail C pounces (mm) B B Detail A D Montant d’angle 2x4 23 5/16" (592) A 7 11/16" (195) Détail de l’encoche en coin pounces (mm) Cuisson 30 po Cuisson 36 po Cuisson 48 po A 29-15/16 po (760 mm)
Raccordement gaz Vue latérale de la table de cuisson ½" (12.7) Bride latérale 26¾" (680) 7/8 " (22) 7 5/8 " (194) Panneau frontal de l’armoire pour installation avec panneau de commande projeté. 1½" (38) 22½" (573) Panneau frontal de l’armoire pour installation avec tableau de commande au ras. Un robinet manuel d’arrêt de gaz doit être installé à l’extérieur de l’appareil, à un endroit accessible parle devant, dans le but de pouvoir couper l’alimentation en gaz.
2. Enlevez les grilles de la surface de cuisson, la plaque chauffante (s’il y a lieu) et les chapeaux des brûleurs pour que la cuisinière soit moins lourde. 3. Laisser la mousse à côté adhésif sur les surfaces en métal brossé an de protéger le ni des égratignures jusqu’à ce que la surface de cuisson soit en position finale. 9 AVERTISSEMENT N'utilisez pas de flamme pour vérifier les fuites de gaz.
Si vous le souhaitez, pour les altitudes supérieures à 2,000 pieds (610 m) au-dessus du niveau de la mer, des ajustements peuvent être apportés aux brûleurs de la cuisinière à l'aide d'une trousse d'ajustement. Si la flamme réagit de manière satisfaisante, aucun ajustement n'est requis. Exigences pour le gaz 4. Les tests de fuite de l’appareil doivent toujours être réalisés conformément aux instructions du fabricant.
9 ATTENTION L’appareil doit être isolé du système d’arrivée de gaz en fermant le robinet manuel d’arrêt pendant tous les tests de pression d’alimentation en gaz lorsque ces pressions sont égales ou inférieures à 3,5 kPA (1/2 psig). L’appareil et son robinet individuel d’arrêt doivent être débranchés du système d’arrivée de gaz pendant tous les tests de pression du système si ces pressions dépassent 3,5 kPa (1/2 psig).
• Avant de débrancher le cordon électrique, s’assurer que tous les contrôles sont en position ARRÊT (OFF). • Un fil d’alimentation neutre doit être installé à partir de la source d’électricité (disjoncteur/panneau de fusibles) car certains composants de la cuisinière, dont le module de production d’étincelle pour les brûleurs de la table de cuisson, fonctionnent de manière sûre et adéquate.
Test de brûleurs 9 AVERTISSEMENT Pour prévenir toute brûlure, éviter de toucher les chapeaux et les grilles des brûleurs lorsqu’ils sont chauds. Éteignez la table de cuisson et laissez les brûleurs refroidir. Installer tout composant lâche, tels capuchons et grilles de brûleurs, ayant été retirés précédemment. S’assurer que les capuchons de brûleurs sont adéquatement placés sur les bases des brûleurs.
Vérifier les brûleurs de surface de cuisson Voir Figure pour les caractéristiques de flamme appropriées. Si un des brûleurs de surface de cuisson continue de presque brûler ou est complètement jaune, vérifier si le capuchon est positionné adéquatement sur la base du brûleur, puis essayer de nouveau. Si les caractéristiques de flamme ne s’améliorent pas, communiquer avec Thermador entretien. Certains brûleurs de surface sont munis de la technologie XLOmc.
Liste de vérification pour l’installateur Liste de vérification La table de cuisson bien positionnée sur son emplacement. Les distances indiquées entre l’appareil et les armoires adjacentes sont respectées. Les chapeaux des brûleurs sont bien placés sur les bases. Tout matériel d’emballage retiré. La garniture d’îlot ou le dosseret installé selon les instructions. Alimentation en gaz Raccord : un filetage NPT de 12,7 mm (1/2 po) avec tuyau flexible d’un diamètre minimum de 19,1 mm (3/4 po) est en place.
Índice de Definiciones de MATERIAS SEGURIDAD Seguridad ............................................................................ 39 9 ADVERTENCIA Instrucciones Importantes de seguridad .................. 39 Información importante para la instalación ......................... 42 Esto indica que se pueden producir lesiones graves o la muerte si no se cumple con esta advertencia. Información de planificación..................................... 42 Requisitos de ventilación ..........................
Seguridad 9 INSTRUCCIONES IMPORTANTES DE SEGURIDAD LEA TODAS LAS INSTRUCCIONES ANTES DE CONTINUAR INSTALADOR: Guarde estas instrucciones para el inspector de la empresa proveedora de gas de su localidad. Deje esas instrucciones de instalación con el aparato para el propietario. Mostrar al propietario la ubicación del disyuntor o del fusible. Marcarlo para recordar más fácilmente.
9 INSTRUCCIONES IMPORTANTES DE SEGURIDAD LEA TODAS LAS INSTRUCCIONES ANTES DE CONTINUAR Para Instalaciones en Massachusetts: 1. La instalación debe realizarse por un contratista, un plomero o un técnico de gas cualificado o autorizado por el estado, la provincia o región donde se está instalando este aparato. 2. La válvula de cierre debe ser un grifo de gas en T. 3. El conducto flexible de gas no debe medir más de 36 pulg. (914 mm). Verifique el tipo de gas suministrado en el lugar.
9 INSTRUCCIONES IMPORTANTES DE SEGURIDAD LEA TODAS LAS INSTRUCCIONES ANTES DE CONTINUAR ADVERTENCIA El aparato sirve para cocinar. Basado en consideraciones de seguridad, nunca debe usarlo para calentar una habitación. PRECAUCIÓN Para eliminar el riesgo de sufrir quemaduras o que se produzca un incendio al alcanzar las unidades cuya superficie esté caliente, se deberá evitar colocar gabinetes de almacenamiento encima de las unidades de la superficie.
Información de instalación Información de planificación Requisitos de ventilación 9 PRECAUCIÓN 9 ADVERTENCIA Para evitar posibles daños a los gabinetes y su acabados, usar solo materiales y acabados que no se decoloren ni se dividan en capas. Los materiales deben soportar temperaturas de hasta 194 °F (90 °C). Se debe usar adhesivo resistente al calor y la humedad si el producto se va a instalar en gabinetes laminados.
Preparación de la ventilación • El suministro de gas y la alimentación eléctrica deben estar dentro de la zona indicada en la “Ubicación de los Eléctricos y de Gas”. • El área sombreada detrás de la placa de cocción indica una oportunidad para que se decolore la pared trasera bajo ciertas condiciones de cocción. • Debe haber una distancia lateral mínima de 5'' (127 mm) entre el electrodoméstico y las superficies verticales combustibles a una altura de 36'' (914 mm) sobre la cubierta.
REQUISITOS DE ESPACIO LIBRE TRASERA: NOTAS: • Para evitar manchas en la pared posterior, se recomienda el uso de materiales de construcción no porosos y de alta temperatura, adecuados para un ambiente de cocina. • • Los modelos PCG305xx, PRD305xx y PRD606xx son adecuado para espacios libres traseros de 0'' en superficies combustibles.
Espacios libres con la consola trasera baja 13 " (33 0) 57) 18" (4 )– (762 30" 016) (1 40" 0" 5 " (1 27) " or 48 36" 1,219 ) or ( 914 0" 0" pulg. (mm) Las separaciones de materiales no combustibles no son parte del alcance ANSI Z21.1 y no están certificadas por CSA. Las separaciones de menos de 6'' (152 mm) deben ser aprobadas por los códigos locales y/o por la autoridad local competente. Página.
Espacios libres con la adorno tipo isla incluida 13 " (33 0) 457) 18" ((4 )– (762 30" 016) 1 ( 40" 5 " (1 6" 27) 8" or 4 36" 1,219 ) or (914 (15 2) 0" 0" pulg. (mm) pulg. (mm) Las separaciones de materiales no combustibles no son parte del alcance ANSI Z21.1 y no están certificadas por CSA. Las separaciones de menos de 6'' (152 mm) deben ser aprobadas por los códigos locales y/o por la autoridad local competente. Página.
Espacios libres con un microondas instalado sobre la estufa (PCG305 sólo) 13 " (33 0) 57) 18" (4 * 30" ) (762 5 " (1 27) 0" 30" ) (762 0" 0" pulg. (mm) Las separaciones de materiales no combustibles no son parte del alcance ANSI Z21.1 y no están certificadas por CSA. Las separaciones de menos de 6'' (152 mm) deben ser aprobadas por los códigos locales y/o por la autoridad local competente. • 30 pulg. (762 mm) min. parte inferior de la campana y la superficie de la estufa.
Preparar la cubierta Instalación tipo isla Instalar los soportes laterales (ambos lados) ¾" (19) mínimo Detalle A D 22 13/16" (580) A Tornillos embutidos pulgadas (mm Detalle A: Cara del gabinete Instalación de pared con salpicadero trasero en la cubierta pulgadas (mm) C B B Detalle A D 23 5/16" (59) 2 x 4 Ángulo A 7 11/16" (195) Detalle de entalladura pulgadas (mm) Modelo 30 pulg. Modelo 36 pulg. Modelo 48 pulg. A 29-15/16 pulg. (760 mm) 35-15/16 pulg. (913 mm) 47-15/16 pulg.
Entrada de gas Vista lateral de la parrilla ½" (12.7) 25½" (672) Reborde 7 5/8 " (194) 7/ 8 " (22) Cara de gabinete para instal. con panel de control saliente. 22½" (573) 1½" (38) Se debe instalar una válvula manual externa al aparato, en un lugar de fácil acceso desde el frente, para poder apagar el suministro de gas.
3. Deja la capa de espuma con adhesivo sobre superficies de metal cepillado, para proteger el acabado de rayones, hasta que la parilla esté instalada en su posición final. 9 PRECAUCIÓN El aparato debe estar aislado del sistema de tubería de suministro de gas cerrando la válvula manual de cierre durante cualquier prueba de la línea de suministro de gas a presiones de prueba igual a o inferior a ½ psi (3,5kPa.). 4.
Requerimientos gas • Burbujas que aparecen indican una fuga de gas. Repare todas las fugas de inmediato. Requerimientos para gas natural: • Conexión entrada: 1/2" NPT (conducto flexible de 3/ 4” diámetro) Conexión para gas propano • Presión suministro: 6" a 14" columna de agua (14.9 a 34.9 mb) • Presión manifold: 5" columna de agua (12.5 mb) Las parrillas vienen de fábrica con certicado para el uso con gas natural. Deben ser convertidas para ser utilizadas con propano.
9 PRECAUCIÓN Cuando conecte la unidad a gas propano, asegúrese que el tanque de gas propano venga con su propio regulador de alta presión además del regulador de presión que se incluye con la estufa. La presión de gas suministrada a este aparato no debe exceder 14.0 pulgadas de columna de agua (34.9 mb).
Instalación de la consola trasera de protección (opcional) 3. Fije la parte delantera de la consola trasera a la estufa con tres o cuatro tornillos e ½ pulg. (12,7 mm). Instale la consola trasera de protección antes de deslizar la parrilla a su posición final. 1. Según el modelo, quite los tres o cuatro tornillos de acero inoxidable proporcionadas con la moldura para isla. Quite los dos tornillos que sujetan la pieza al panel trasero. 4.
Probar el quemador 9 ADVERTENCIA Para prevenir quemaduras, evite tocar las tapas y las rejillas de los quemadores cuando estén calientes. Apague la estufa y deje los quemadores enfriarse. Instala cualquier componente flojo, como casquillos de quemador y rejillas, que se pudieron haber quitado con anterioridad. Asegúrese que los casquillos de quemador asienten apropiadamente en sus bases de quemador.
Probar los quemadores de la estufa Cuando la flama está ajustada correctamente: • Debe haber una flama en el puerto de cada quemador. • No debe haber un espacio de aire entre la flama y el quemador. Probar la ignición de quemadores 1. Seleccione una perilla de un quemador de la estufa. Cambie el quemador a HI. • El igniters módulo de chispas producirá un sonido de un clic (chasquido). Una vez que se haya purgado el aire de las líneas de suministro, el quemador debe encenderse dentro de (4) segundos.
Lista de chequeo de instalador Lista de chequeo final Instalador Escriba el número de modelo y el número de serie que se encuentran en la etiqueta de datos nominales en la Guía de uso y cuidado. Deje el Manual De Uso y Mantenimiento y las Instrucciones de Instalación al dueño del aparato. Parrilla posicionada y fijada correctamente en el recorte de la cubierta. Se observaron los espacios libres especificados a las superficies de los gabinetes. Tapas de quemador es correctamente colocadas sobre las bases.
Support Soutien Soporte Thank you for being a Thermador customer! Merci d'être un client Thermador! ¡Gracias por ser un cliente Thermador! Thermador is dedicated to supporting you and your appliance so you have many years of creative cooking. Please don't hesitate to contact us if you have any questions. We're happy to help you with cleaning and care instructions, cooking tips, accessories, troubleshooting, and more.