
Installation instructions


Page. 16
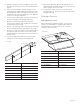
Horizontal Discharge Cutout
Horizontal discharge requires a wall cutout to provide
clearance for the transition. The location of the cutout is
determined by the hood installation height.
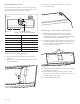
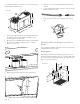
Prepare for the wire routing
12. Remove junction box channel covering the wires
(Figure, A).
13. Remove one circular knockout behind junction box
channel (Figure, B).
14. Install strain relief (not included) into one of the
circular knockouts.
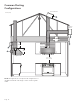
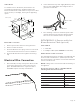
Mounting hood to the wood bracket
15. Before hanging hood, install the transition per
“Assembly of the Transition” on page 14. Fasten
transition with (2) 3/8'' sheet metal screws (supplied)
and aluminum tape per all applicable codes.
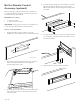
16. Using two people to lift, rest the hood on the screws
in the wood bracket. Use the keyholes labeled "F" in
the figure. Make sure the wood bracket fits into the
recess on the back of the hood.
17. Tighten the screws in keyholes. Check hood levelness
and adjust if necessary.
18. From inside the hood, drive 5/8'' (16 mm) screws
through holes in hood into wood support bracket. See
holes labeled “J” in the figure.
19. Connect additional ducting.
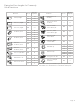
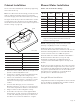
Hood Size A
30'' (762 mm) 15'' (381 mm)
36'' (914 mm) 18'' (457 mm)
42'' (1,067 mm) 21'' (533 mm)
48'' (1,219 mm) 24'' (610 mm)
54'' (1,372 mm) 27'' (686 mm)
60'' (1,524 mm) 30'' (762 mm)
Back Wall
12" (305)
5¼" (134)5¼" (134)
Hood mounting heights
30"– 40" (762 –1016) from cooking surface.
Hood mounting heights
30"– 40" (762 –1016) from cooking surface.
Electric
Conduit
Zone
AA
12
"
(305)
12
"
(305)
inches (mm)
A
B
J
F
F