
Instructions for Use
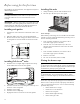
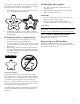
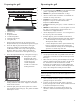
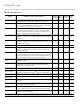
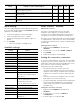
Table Of Contents
- Table of contents
- Familiarizing yourself with your appliance
- Before using for the first time
- Using the rangetop
- Rangetop recommendations
- Using the oven
- Mode descriptions
- Initial start-up
- Available settings
- Home ConnectTM assistant
- Setting the convection conversion
- Setting the oven offset
- Setting the cooking mode and oven temperature
- Setting the timers
- Setting fast preheat
- Setting the panel lock
- Setting the oven for proof
- Setting the keep warm mode
- Programming the meat probe
- Setting the Sabbath mode
- Initiating remote start
- Oven recommendations
- Home ConnectTM
- Care and maintenance
- Statement of limited product warranty
- Table des matières
- Familiarisez-vous avec votre appareil
- Avant d'utiliser pour la première fois
- Utilisation de la table de cuisson
- Recommandations pour la cuisinière
- Utilisation du four
- Descriptions des modes
- Démarrage initiale
- Réglages offerts
- Assistant Home ConnectTM
- Réglage de la conversion par convection
- Réglage du décalage du four
- Réglage du mode de cuisson et de la température du four
- Réglage des minuteries
- Réglage du préchauffage rapide
- Réglage du verrouillage du panneau
- Réglage du four pour faire lever
- Réglage du mode de maintien au chaud
- Programmation de la sonde thermique
- Réglage du mode Sabbat
- Lancement du démarrage à distance
- Recommandations sur la position des grilles
- Home ConnectTM
- Entretien et maintenance
- Déclaration de garantie limitée du produit
- Índice
- Para familiarizarse con el aparato
- Antes usar por primera vez
- Uso de la parrilla de gas
- Recomendaciones de la parrilla de gas
- Usar el horno
- Descripciones de los modos
- Inicio para poner en funcionamiento
- Ajustes disponibles
- Asistente Home Connect®
- Ajustar la conversión al modo de aire caliente
- Ajustar la compensación del horno
- Ajustar el modo de cocción y la temperatura del horno
- Ajustar los temporizadores
- Ajustar el precalentamiento rápido
- Ajustar el bloqueo del panel
- Ajustar el horno para leudar
- Ajustar el modo para conservar calientes los alimentos
- Programar la sonda para carne
- Ajuste del modo Sabbat
- Iniciar con inicio remoto
- Recomendaciones de colocación de las rejillas del horno
- Home Connect®
- Cuidado y mantenimiento
- Declaración de garantía limitada del producto

11
Each cap has a letter (B, D, or F) cast in the underside of
the cap that corresponds to a letter (B, D, or F) cast in the
burner base that is attached to the appliance.
1. Place each burner cap on its correct burner base per
its corresponding letter designation.
2. Place burner cap gently on top of base so that the
prongs of the burner base fit snugly into the groove of
the burner cap.
Checking the burner cap placement
• Check each burner to make sure there is no gap
between the burner cap and burner base.
• You may gently try to move the burner caps from side
to side to check if the caps are properly placed on the
burner bases.
• When properly placed, each burner cap will rest flat
on top of its burner base, and completely cover the
star-shape of the burner base when viewed from the
top as shown below.
Automatic re-ignition
Each burner has its own electronic igniter that sparks
when the burner is turned on. Each burner should light in
four seconds or less. If a burner does not light, check to
see that the cap is positioned correctly on the base.
If any one or more burners blow out, the electronic igniter
automatically activates to re-light the flame. Do not touch
the burners when the igniters are active.
For flame height verification and adjustment instructions,
refer to the Installation Instructions included with the
appliance.
Installing the burner grates
1. Place grates flat-side down and align into the
rangetop recess.
2. Grates should rest flush against each other and
against the sides of the recess.
IMPORTANT
• For proper combustion do not use the rangetop
without the burner grates in place.
• There is a slight sound associated with gas
combustion and ignition. This is a normal condition.
Power failure
9 WARNING
In the event of a power failure, turn all knobs to the OFF
position. Only the standard burners can be lit manually.
Refer to IN CASE OF AN ELECTRICAL FAILURE
instructions listed in the IMPORTANT SAFETY
INSTRUCTIONS on page 5.
Registering your BSH product
Register your BSH product to access to your product
related information. For product registration information
see “Before calling for service.”