
Instructions for Use
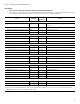

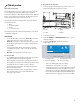

Table Of Contents
- Home ConnectTM user’s information
- Table of
- Safety
- Safety
- Description
- Before you begin
- Using the rangetop
- Using the oven
- Getting the most out of your appliance
- Home Connect®
- Before calling for service
- Statement of limited product warranty
- Table des
- Définitions de
- Sécurité
- Description
- Avant de commencer
- Utilisation de la table de cuisson
- Brûleurs STAR® scellés
- Brûleurs ExtraLow®
- POWERBOOST® (modèles sélectionnés)
- Plaque chauffante électrique
- Gril électrique
- Convection broil (gril à convection)
- Convection bake (cuisson à convection)
- True convection (convection véritable)
- Proof (apprêt)
- Roast (rôtissage)
- Convection roast (rôtissage par convection)
- Keep warm (garder-au- chaud)
- Utilisation du four
- Symboles et descriptions du four
- Configuration initiale
- Réglage du four
- Kitchen timer (minuterie cuisine)
- Oven timer (minuterie de four)
- End timer (fin de la minuterie)
- Fast preheat (préchauffage rapide)
- Panel lock (verrouillage panneau commande)
- Conversion de convection
- Réglage précis du four (décalage de température)
- Sonde thermométrique
- Sabbath (Sabbat)
- Sabbat – cuisson prolongée
- Remote start (démarrage à distance)
- Tirer le meilleur parti de l’appareil
- Home Connect®
- Entretien à faire soi-même
- Avant d’appeler le service technique
- Énoncé de garantie limitée du produit
- Índice de
- Definiciones de
- Seguridad
- Descripción
- Antes de comenzar
- Usar la placa de cocción
- Usar el horno
- Símbolos y descripciones
- Inicio para poner en funcionamiento
- Ajustar el horno
- Kitchen timer (temporizador de cocina)
- Oven timer (temporizador del horno)
- End timer (finalización del temporizador)
- Fast preheat (precalentamiento rápido)
- Panel lock (bloqueo de panel)
- Conversión automática a aire caliente
- Ajuste preciso de la hornilla (desfase de temperatura)
- Probe (sonda térmica)
- Sabbath (Sabbat)
- Sabbat – horneado extendido
- Remote start (inicio remoto)
- Sacar lo mejor del electrodoméstico
- Configurar Home Connect™
- Cuidado y mantenimiento
- Mantenimiento hecho por usted mismo
- Antes de solicitar servicio
- Declaración de garantía limitada del producto

35
Convection conversion
About the convection conversion
• To convert most baked items for use with convection
bake and true convection (cookies, cakes, pies, etc.),
the oven temperature often needs to be decreased by
25°F. The convection conversion setting reduces the
temperature you enter for you automatically.
• The unit will continue to run the convection
conversion value indefinitely until the user manually
changes it, or until the unit loses power, in which case
convection conversion will need to be reset.
• Convection conversion is available for the convection
bake and true convection modes only.
• For meats and poultry, the temperature should not be
reduced. The same temperature recommended in
recipes and cooking charts for meats and poultry
should be used.
To set the convection conversion
1. Begin from the STANDBY mode and select
SETTINGS.
2. Press the left ( or ) to scroll to CONVECT
CONVERSION.
3. Press the right ( or ) and select ON.
4. Press ENTER.
5. Turn the mode knob to CONV BAKE and the
TEMPERATURE knob to the recipe temperature.
– The oven automatically reduces the input
temperature by 25°F (10 °C) to the correct
temperature.
6. Allow oven to preheat and place food inside.
Fine-tuning the oven
About offset
The offset feature allows the cook to further fine-tune
their cooking parameters to their own personal optimal
settings by allowing them to adjust the temperature offset
of the oven. This feature is useful if you find that food is
consistently either too brown or too light for your tastes.
Offset does not affect broil, convection broil, self-clean,
warm, or proof.
On ovens with a digital display:
• By default, the temperature is set at 0°. Adjust the
temperature offset of the oven by +/-35°F in
increments of 5°F.
• The unit will continue to run the input offset value
indefinitely until the user manually changes it.
To set offset on ovens with a digital display
1. Begin from the STANDBY mode and select
SETTINGS.
2. Press the left ( or ) to scroll TEMP OFFSET: RIGHT/
LEFT OVEN.
3. Press the right ( or ) to set the temperature.
4. Press ENTER.
On ovens without a digital display:
• By default, the temperature is set at 0°. Adjust the
temperature offset of the oven by +/-50°F in
increments of 10°F.
• The unit will continue to run the input offset value
indefinitely until the user manually changes it.
To set offset on ovens without a digital display
IMPORTANT: Offset must be initiated within 5 minutes of
a power reset and must be started with the door closed.
All knobs must be set to OFF. The door latch (if applicable)
must be unlocked.
1. Reset the power at the breaker box.
Note: Power must remain off for at least 20 seconds.
2. Open the oven door.
3. Rotate the mode knob to BROIL and the temperature
knob to 350.
4. Close the oven door.
5. Rotate the temperature knob back to OFF.
Note: Steps 3, 4, and 5 must be completed within 5
seconds after door is opened (step #2).
– All oven LEDs will flash four times to indicate the
temperature offset has been initiated.
NOTE: If the mode encoder is rotated to any position
other than OFF or if more than 1 minute passes with no
activity while setting the temperature offset mode, the
mode is exited without any change to the offset. All LEDs
flash 8 times to indicate the offset has been exited.
Knob
position
Temperature offset value (°F)
225 -50
250 -40
275 -30
300 -20
325 -10
350 0
375 10
400 20
425 30
450 40
475 50