
Installation instructions


Installation Instructions English 21
Backguard Installation
When installing against a combustible surface, a Low
Backguard is required. A THERMADOR
TM
Low Backguard
must be purchased separately. See “Installation
Clearances with Lowback” beginning on page 7.
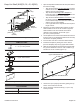
When using the Flush Island Trim, THERMADOR
recommends a minimum 12'' (305 mm) rear clearance to a
combustible surface (see “Installation Clearances”).
Clearances from non-combustible materials are not part of
the ANSI Z21.1 scope and are not certified by
CSA. Clearances of less than 12'' (305 mm) must be
approved by the local codes and/or by the local authority
having jurisdiction.
NOTE: If a Backsplash is to be used in addition to a
backguard, install the Backsplash first and the backguard
second before sliding range into place.
Backguard Installation
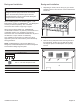
1. Depending on model, remove the (3) or (4) T-20 Torx
stainless screws in the front face of the included Flush
Island Trim.
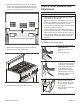
2. Remove the (4) drill point screws securing the trim to
the side panels, and the (2) to (4) drill point screws
securing the piece to the back panel. Lift up to fully
remove.
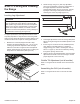
WARNING
Fingers or hands could get pinched when installing the
backguard. Severe injury could result. Use extreme
caution and wear thick protective gloves to avoid
potential laceration to finger or hand while sliding the
backguard down onto the range.
LOW BACK PARTS INCLUDED
1 – Low Back panel
8 or 9 – T-20 Torx stainless screws
8 or 6 – T-20 Torx drill point screws
TOOLS NEEDED
T-20 Torx head screwdriver or drill
Protective Work Gloves
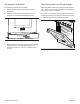
Figure 19: Flush Island Trim Front Face Screw Removal
Figure 20: Flush Island Trim Rear Screw Removal