
Installation Instruction
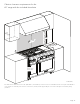
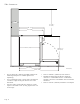
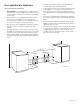
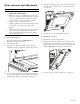
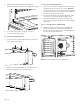
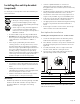
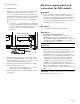
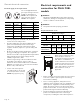
Table Of Contents

Page. 15
4. Flip the hinge until seated on the bracket. A
screwdriver may be required to carefully push the clip.
5. Close and open the door slowly to ensure it is
correctly and securely in place.
To remove the warming drawer
1. On the top of the warming drawer door, remove the
three (3) T-20 Torx screws.
2. Rotate the warming drawer door out and then pull
down to disengage from the retainer tabs.
To check door fit and adjustment
1. Open and close the door slowly to test the movement
and the fit of the door to the oven cavity. DO NOT
force the door to open or close. If the door is properly
installed, it should move smoothly and rest straight on
the front of the range when closed.
2. The range must be level for proper alignment of the
oven doors, see “Placing and leveling the range”.
3. Verify that the hinges are properly seated into the
hinge slots, and that the hinge clips are fully engaged
into the slots.
If door or handle appears slightly tilted
4. Rotate the large Torx head screw located directly
above the hinge receiver with a T-30 Torx driver.
Rotate each screw respective to its side and direction
the door needs to be adjusted.
NOTE: The steam oven door is not adjustable.
2
1