
Instructions for Use
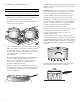

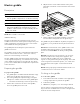

Table Of Contents
- Home ConnectTM user’s information
- Table of
- Safety
- Safety
- Description
- Before you begin
- Using the rangetop
- Using the oven
- Getting the most out of your appliance
- Home Connect®
- Before calling for service
- Statement of limited product warranty
- Table des
- Définitions de
- Sécurité
- Description
- Avant de commencer
- Utilisation de la table de cuisson
- Tirer le meilleur parti de l’appareil
- Utilisation du four
- Symboles et descriptions
- Configuration initiale
- Réglage du four
- Kitchen timer (minuterie cuisine)
- Oven timer (minuterie de four)
- End timer (fin de la minuterie)
- Fast preheat (préchauffage rapide)
- Panel lock (verrouillage panneau commande)
- Conversion de convection
- Réglage précis du four (décalage de température)
- Probe (sonde thermique)
- Sabbath (Sabbat)
- Remote start (démarrage à distance)
- Home Connect®
- Entretien à faire soi-même
- Avant d’appeler le service technique
- Énoncé de garantie limitée du produit
- Índice de
- Definiciones de
- Seguridad
- Descripción
- Antes de comenzar
- Usar la placa de cocción
- Usar el horno
- Símbolos y descripciones
- Inicio para poner en funcionamiento
- Ajustar el horno
- Kitchen timer (temporizador de cocina)
- Oven timer (temporizador del horno)
- End timer (finalización del temporizador)
- Fast preheat (precalentamiento rápido)
- Panel lock (bloqueo de panel)
- Conversión automática a aire caliente
- Ajuste preciso de la hornilla (desfase de temperatura)
- Probe (sonda térmica)
- Sabbath (Sabbat)
- Remote start (inicio remoto)
- Sacar lo mejor del electrodoméstico
- Configurar Home Connect™
- Cuidado y mantenimiento
- Mantenimiento hecho por usted mismo
- Antes de solicitar servicio
- Declaración de garantía limitada del producto

29
5. Fold both grill heating elements (5) down. The grill
heating elements must lie flat. Supports should rest
inside of side notches.
6. Install the grill grates (6). Ensure grates are seated
level inside the grill housing (1).
Operating the grill
9 WARNING
TO AVOID RISK OF BURNS:
• Use proper utensils with long handles that allow
the chef plenty of clearance from the heat and
potential flare ups.
• DO NOT wear loose clothing while cooking.
• Never leave grill unattended while cooking.
• After each use, remove grease buildup from the
grill surfaces and the trays below the grill to avoid
risk of fire. Ventilation hoods should also be
cleaned periodically as needed and as
recommended by the Use and Care Guide as well
as surrounding surfaces.
• Keep a fire extinguisher nearby and accessible.
9 CAUTION
Clean the grill after each use. Allow the appliance to
cool before cleaning.
IMPORTANT:
• If flames appear while grilling, turn off heat and
remove the food. Use caution to avoid any potential
injury while removing food.
• Often, such flames will extinguish themselves within a
few minutes once grease drippings have burned up.
DO NOT leave the grill unattended until all flames are
extinguished. If desired, flames can be extinguished
by generously shaking baking soda or salt over them
to smother the fire.
• If flames appear, ceramic briquettes should be
replaced and grease should be cleaned from grates,
grease tray, briquette basket, and other surfaces
before using the grill again. Built up grease which is
allowed to remain encourages flame and smoke
development while cooking.
• Moist food should be dried, before placing on grill.
• Marinated food may cause more smoke to be
produced!
• During grilling, dripping fat may flare up briefly.
To operate the grill
1. Start overhead ventilation system 10 minutes prior to
grilling to begin air movement.
2. The grill grates should be washed with warm soapy
water then rinsed with clear water prior to use.
3. Before turning on, make sure that there are ceramic
briquettes in the appliance and both grill grates are
correctly fitted.
4. Press and turn the knob to the desired temperature
setting.
• The two grill heating elements can be regulated
separately. This allows you to grill food with
different temperature requirements at the same
time, or you can use one area to grill and the
other to keep warm.
5. During the initial use, heat the grill for about 10
minutes to eliminate manufacturing residues and
smells.
6. For best results, allow the grill grates to preheat
before placing food on them.
Grilling tips
• The grill should be preheated a minimum of 10
minutes before cooking. Depending on browning
preference and the types of food being prepared, as
much as 15 minutes of preheat time may be required.
• Soak wooden skewers in water a minimum 20 minutes
before placing on the grill.
• Prior to grilling, you can coat the food with heat-
resistant oil (e.g. peanut oil) or marinate it. Make sure
not to use too much oil/marinade, as otherwise it may
catch fire and generate thick smoke.
• Lay the food directly on the grill grates. DO NOT use
aluminum foil or grill trays.
• Cured meat, such as ham or smoked pork chops, is
not suitable for grilling. Unhealthy chemical
compounds may form.
• To prevent flare-ups, remove excess fat from foods
prior to grilling.
• DO NOT use cleaners on the heating elements. Allow
grease to burn off the heating elements.
• To soak up fat on the grill plate, sprinkle coarse salt
onto the grilling surface after use.