
Instructions for Use

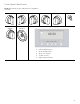
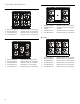
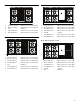
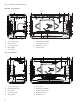
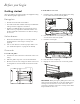
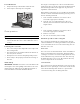
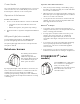
Table Of Contents
- Home ConnectTM user’s information
- Table of
- Safety
- Safety
- Description
- Before you begin
- Using the rangetop
- Using the oven
- Getting the most out of your appliance
- Home Connect®
- Before calling for service
- Statement of limited product warranty
- Table des
- Définitions de
- Sécurité
- Description
- Avant de commencer
- Utilisation de la table de cuisson
- Brûleurs STAR® scellés
- Brûleurs ExtraLow®
- POWERBOOST® (modèles sélectionnés)
- Plaque chauffante électrique
- Gril électrique
- Convection broil (gril à convection)
- Convection bake (cuisson à convection)
- True convection (convection véritable)
- Proof (apprêt)
- Roast (rôtissage)
- Convection roast (rôtissage par convection)
- Keep warm (garder-au- chaud)
- Utilisation du four
- Symboles et descriptions du four
- Configuration initiale
- Réglage du four
- Kitchen timer (minuterie cuisine)
- Oven timer (minuterie de four)
- End timer (fin de la minuterie)
- Fast preheat (préchauffage rapide)
- Panel lock (verrouillage panneau commande)
- Conversion de convection
- Réglage précis du four (décalage de température)
- Sonde thermométrique
- Sabbath (Sabbat)
- Sabbat – cuisson prolongée
- Remote start (démarrage à distance)
- Tirer le meilleur parti de l’appareil
- Home Connect®
- Entretien à faire soi-même
- Avant d’appeler le service technique
- Énoncé de garantie limitée du produit
- Índice de
- Definiciones de
- Seguridad
- Descripción
- Antes de comenzar
- Usar la placa de cocción
- Usar el horno
- Símbolos y descripciones
- Inicio para poner en funcionamiento
- Ajustar el horno
- Kitchen timer (temporizador de cocina)
- Oven timer (temporizador del horno)
- End timer (finalización del temporizador)
- Fast preheat (precalentamiento rápido)
- Panel lock (bloqueo de panel)
- Conversión automática a aire caliente
- Ajuste preciso de la hornilla (desfase de temperatura)
- Probe (sonda térmica)
- Sabbath (Sabbat)
- Sabbat – horneado extendido
- Remote start (inicio remoto)
- Sacar lo mejor del electrodoméstico
- Configurar Home Connect™
- Cuidado y mantenimiento
- Mantenimiento hecho por usted mismo
- Antes de solicitar servicio
- Declaración de garantía limitada del producto

16
Before you begin
Getting started
Note:
The graphics are representative. Your appliance may
have different graphic appearances.
Rating plate
• Record the model and serial number.
• The model and serial number must be provided when
calling customer support for assistance.
• Register your BSH product to ensure timely service
and access to your product related information. For
product registration information see “Before calling
for service”.
Surface burners
1. Ensure that the burner caps are correctly seated on
the burner bases of the range's cooktop (see
page 18).
2. Turn on each burner to check for proper flame color
(see “Flame description” on page 20 for details).
Oven racks
To install rack guides
1. Push the two rails in the holes in the back of the oven
cavity.
2. Slide the guide's key slots over the shoulder bolts.
3. At the front of the oven cavity press down on the front
of rack guide to clear the heads of the two shoulder
bolts.
To install Full Access
®
racks
1. Hold the rack on a slight angle and place the safety
hooks under the front of the rack guides.
2. Push the rack into the oven, lifting the rack stops
over the front of the rack guides.
3. Hold the rack straight.
4. Push the rack in completely.
5. Engage the rack’s front hooks on the rack guides.
IMPORTANT: When placing the gliding rack in the oven,
make sure the front supports on the rack guides rest in
the large slots at the front corners of the rack. This is
necessary to keep the rack in the correct position while
fully inserted into the oven.