
Installation Instructions


Installation Instructions English 26
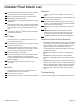
Installer Final Check List
Gas Supply
Electrical
Operation
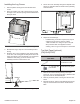
Clean and Protect Exterior Surfaces
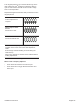
• The stainless steel surfaces may be cleaned by wiping
with a damp, soapy cloth, rinsing with clear water and
drying with a soft cloth to avoid water marks. Always
wipe in the direction of the stainless steel grain.
• For discolorations or deposits that persist, refer to the
Use and Care Guide.
• DO NOT allow deposits to remain for long periods of
time.
• DO NOT use ordinary steel wool or steel brushes.
Small bits of steel may adhere to the surface causing
rust.
• DO NOT allow salt solutions, disinfectants, bleaches or
cleaning compounds to remain in contact with stainless
steel for extended periods. Many of these compounds
contain chemicals which could prove harmful. Rinse
with water after exposure and wipe dry with a clean
cloth.
Troubleshooting
See Use and Care Guide for troubleshooting information.
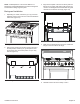
Specified clearances maintained to cabinet surfaces.
Unit level and leg covers have been installed.
Burner caps positioned properly on burner bases.
All packaging material removed.
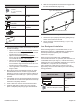
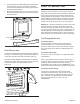
Flush Island Trim or backguard attached according to
instructions.
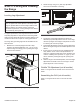
Verify flame at each burner. The flame should appear
as described in Step 10. Flame may need to burn for
several minutes to remove impurities from the gas
lines.
Verify that the ExtraLow
®
feature works and relights
around the entire burner.
Gas Connection: ¾'' (19 mm) N.P.T. with a min. ¾''
(19 mm) diameter flex line.
The appliance is connected only to the type of gas for
which it is certified for use.
Manual gas shut off valve installed in an accessible
location (without requiring removal of range). Owner is
aware of location of the gas shut-off valve.
Unit tested and free of gas leaks.
If used on propane gas, verify that the propane gas
supply is equipped with its own high pressure
regulator in addition to the pressure regulator supplied
with the appliance.
Gas supply pressure does not exceed 14" W.C.
(34.9 mb).
Receptacle with correct over-current protection is
provided for service cord connection.
Proper ground connection.
Owner is aware of location of the main circuit breaker.
Bezels centered on burner knobs, and knobs turn
freely.
Each burner lights satisfactorily, both individually and
with other burners operating.
Oven door hinges seated and hinge locks in proper
position. Oven handle and door is level and centered.
Door opens and closes properly.
Burner grates correctly positioned, level, and do not
rock.
INSTALLER: Write the model number and serial
number (see page 24 for location) in the Use and
Care Guide. Leave the Use and Care Guide and
Installation Manual with the owner of the appliance.