
Owners Manual


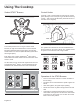

English 8
4. Position the racks correctly in the oven. The correct
rack position depends on the recipe and the cooking
mode. The rack positions are numbered from the
bottom of the oven, like an elevator. Rack position 3
is the most frequently used position. Place rack(s) in
the proper position before turning on the oven.
THERMADOR Full Access
®
oven racks are standard on
all models. Each gliding oven rack can be pulled out and
pushed back into the oven with minimal effort — even while
supporting a large turkey or roast.
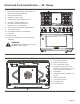
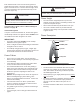
5. Ensure that the burner caps are correctly seated on
the burner bases of the range's cooktop (see
Figure 13 and Figure 14 on page 14). Turn on each
burner to check for proper flame color. See “Flame
Description” on page 15 for details.
IMPORTANT:
Always remove the Full Access oven racks before self-
cleaning the oven. If the gliding racks remain in the oven
during Self-Clean, lubricants in the glide mechanisms of
each rack will be lost and the finish will discolor.
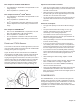
Placing Racks in the Oven:
Figure 1: Main Oven Rack Positions
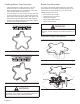
Figure 2: Full Access Oven Rack
WARNING:
To help prevent burns, NEVER remove or reposition the
oven racks while the oven is ON or while the oven is
cooling.
11
44
33
22
55
Always remove
before Self Clean
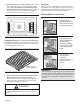
IMPORTANT:
When placing the gliding rack in the oven, make sure the
front supports on the rack guides rest in the large slots at
the front corners of the rack. This is necessary to keep
the rack in the correct position while fully inserted into
the oven.
Figure 3: Inserting the Oven Rack
1. Hold the rack on a
slight angle. Place the
safety hooks under the
front of the rack guides.
2. Push the rack into the
oven, lifting the rack
stops over the front of
the rack guides.
3. Hold the rack straight.
4. Push the rack in until it
is even with the front
hooks.
5. Lift the rack up.
6. Push the rack in
completely.
7. Engage the rack’s front
hooks on the rack
guides.