
Installation Guide
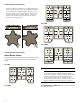
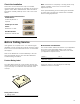

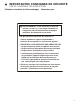
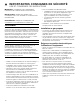
Table Of Contents
- Table of ContentsUse and care manual
- Safety DefinitionsSafety Definitions
- IMPORTANT SAFETY INSTRUCTIONS
- READ AND SAVE THESE INSTRUCTIONS
- Before You Begin
- Installation ProcedureInstallation Procedure
- Prepare the Countertop
- Seal the Cooktop with Foam Tape
- A
- A
- B/H
- C/E
- D
- G
- A
- B
- C
- A
- B
- C
- D
- E
- G
- H
- J
- K
- L
- 1. Turn on gas.
- 2. Apply a soap solution or non-corrosive leak detection fluid to all joints and fittings in the gas connection between the shut-off valve and the cooktop. Include gas fittings and joints in the cooktop if connections may have been disturbed during i...
- 3. If a leak appears, turn off supply line gas shut-off valve and tighten connections.
- 4. Retest for leaks by turning on the supply line gas shut- off valve. When leak check is complete (no bubbles appear), test is complete.
- 5. Wipe off all soap solution or detection fluid residue.
- Connect Electrical Supply
- Burner Cap Placement
- Install Burner Grates
- Check the Installation
- 1. Turn on gas.
- Before Calling Service
- THERMADOR® Support
- Table des MatièresNotice d’utilisation
- Définitions de sécuritéDéfinitions de sécurité
- IMPORTANTES CONSIGNES DE SÉCURITÉ
- LIRE ET CONSERVER CES INSTRUCTIONS
- Utilisation sécuritaire de l'électroménager alimenté au gaz :
- AVERTISSEMENT
- AVERTISSEMENT
- Installation au gaz propane
- Exigences en matière de sécurité pour l'utilisation et l'équipement
- Sécurité de manutention des appareils
- Codes et normes de sécurité
- Avertissement issue de la proposition 65 de l’État de la Californie :
- Sécurité électrique
- Installation à altitude élevée
- Avant de commencer
- Procédure d'installationProcédure d’installation
- Préparation du plan de travail
- Sceller la table de cuisson avec le ruban de mousse
- A
- A
- B/H
- C/E
- D
- G
- A
- B
- C
- A
- B
- C
- D
- E
- G
- H
- J
- K
- L
- 1. Ouvrir le gaz.
- 2. Appliquer une solution savonneuse ou un liquide de détection de fuites non corrosif à toutes les jonctions et tous les raccords des conduites de gaz entre le robinet d'arrêt et la table de cuisson. Inclure les raccords et les jonctions de gaz d...
- 3. En présence d'une fuite, couper l'alimentation en gaz en fermant le robinet d'arrêt et serrer le ou les raccords qui fuient.
- 4. Tester de nouveau la présence de fuites en ouvrant le robinet d'arrêt de l'alimentation de gaz. Quand aucune bulle n'apparaît, le test de fuite est terminé.
- 5. Essuyer tout résidu de la solution savonneuse ou du liquide de détection de fuite.
- Brancher l'alimentation électrique
- Montage des chapeaux de brûleur
- Installation des grilles du brûleur
- Vérification de l'installation
- 1. Ouvrir le gaz.
- Avant d'appeler le service de dépannage
- Soutien THERMADOR®
- LIRE ET CONSERVER CES INSTRUCTIONS
- ContenidoManual de instrucciones
- Definiciones de seguridadDefiniciones de seguridad
- INSTRUCCIONES DE SEGURIDAD IMPORTANTES
- LEA Y CONSERVE ESTAS INSTRUCCIONES
- Seguridad para aparatos de gas
- ADVERTENCIA
- ADVERTENCIA
- Instalación con gas propano
- Requisitos de seguridad del equipo y el uso
- Seguridad de manejo del electrodoméstico
- Códigos y normas de seguridad
- Advertencia en virtud de la Proposición 65 del estado de California:
- Seguridad con la electricidad
- Instalación a gran altitud
- Antes de empezar
- Procedimiento de instalaciónProcedimiento de instalación
- Preparar la cubierta
- Sellar la placa de cocción con cinta de espuma
- A
- A
- B/H
- C/E
- D
- G
- A
- B
- C
- A
- B
- C
- D
- E
- G
- H
- J
- K
- L
- 1. Abrir el gas.
- 2. Aplicar una solución jabonosa o un fluido de detección de fugas que no sea corrosivo en todas las juntas y acoplamientos en el suministro de gas entre la llave de cierre y la placa de cocción.Incluir también los acoplamientos y juntas de gas d...
- 3. Si se detecta una fuga, cerrar la llave de cierre del suministro de gas y apretar las conexiones.
- 4. Volver a comprobar si hay fugas abriendo la llave. Cuando se finaliza la comprobación de fugas (no aparecen burbujas), la prueba ha terminado.
- 5. Limpiar con un trapo todos los restos de fluido de detección o solución jabonosa.
- Conexión de la alimentación eléctrica
- Colocación de la tapa del quemador
- Colocar las rejillas de los quemadores
- Pruebe la instalación
- 1. Abrir el gas.
- Antes de llamar al servicio técnico
- Soporte técnico de THERMADOR®
- LEA Y CONSERVE ESTAS INSTRUCCIONES

13
Check the Installation
Place each correct sized burner cap in its seated,
notched position and check the operation of the electric
igniters. Check flame characteristics. Flame should be
blue with a minimal yellow tip on the outer cone of the
flames.
Checking Flame Characteristics
Note: If the flame is completely or mostly yellow, verify
that the regulator is set for the correct fuel. After
adjustment, retest.
Some yellow streaking is normal during the initial start-
up. Allow unit to operate 4-5 minutes and re-evaluate
before making adjustments.
Before Calling Service
If the igniters do not spark or the “on” indicator lights
(available in some models) do not glow, check the power
source to see if a fuse has blown or if the circuit breaker
has tripped.
Refer to the Statement of Limited Warranty in the Use
and Care Manual. See the Use and Care Manual for
troubleshooting information.
Product Rating Label
The rating label shows the model number and the FD
number (production number/product’s unique identifier)
of your cooktop. It is located on the underside of the
cooktop.
Rating Label Location
Model Number and FD Number
The model number and the FD number of your appliance
are found on the rating label. Make a note of these
numbers in the space below to save time in the event
your appliance requires service.
Keep your invoice or escrow papers for warranty
validation if service is needed.
Yellow Flames:
Further adjustment is
required.
Yellow Tips on Outer
Cones:
Normal for LP Gas
Soft Blue Flames:
Normal for Natural Gas
A Rating Label
$
Model # FD #
Thermador
Customer Support
800-735-4328