
Installation guide


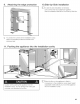
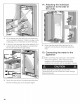

The height-adjustable feet at the front and rear can all
be adjusted from the front.
Front: with open-ended wrench 1/2" (SW13)
Rear: with 5/16" (8 mm) hex nut driver
via flexible shaft.
Never use a cordless screwdriver!
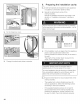
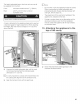
A mark is attached to the appliance base and is used as
a standard gage for height adjustment. When adjusting
the height, align this mark at a height of 1V4"(32 mm)
above the floor.
(32 mm)
Q Unscrew the height-adjustable feet until the mark
on the base has reached the indicated guide
dimension (11/4"/ 32 mm).
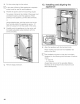
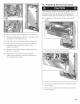
IT]It is very important to comply with this dimension for
the subsequent alignment of the furniture fronts.
Q Align the furniture fronts with the spirit level.
%
13,
Note:
Do not twist or jam the appliance inside the cavity!
When unscrewing the height-adjustable feet,
proceed gradually: Always alternate between left
and right, left and right, etc..
The adjustment of the rear feet is facilitated if the
appliance is unloaded at the rear.
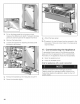
If using a wooden beam as an alternative anti-tip
device according to point 6 of this installation
manual, rotate the appliance all the way towards
the wooden beam.
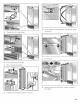
Attaching the appliance to the
top of the cavity
83
Screw the attachment plate lugs (top) to the
overhead furniture/fixtures.
27