
Installation Instructions


Page. 10
Choosing the correct blower
It is recommended to use only Thermador blowers with
Thermador ventilation hoods. See the
Ventilation Planning
Guide for recommended blowers. Contact Customer
Service for additional options (see the back page for
contact information).
IMPORTANT: Cutting off a connector to the appliance,
blower, or to the extension cable kit will void the warranty.
Blower selection will vary based on the volume of air that
needs to be moved and the length and location of the
duct run. For long duct runs with multiple turns and
bends, consider using a more powerful blower. For the
most efficient air flow exhaust, use a straight run or as few
elbows as possible.
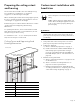
Integral blowers
These blowers are integrated into the hood at the time of
installation.
Remote blowers
Depending on preference and ducting situation, these
blowers can be mounted on the roof or exterior wall of the
home. An exterior installation may be more appealing to
reduce noise in the kitchen.
In-line blowers
To minimize noise in the kitchen, these blowers are
mounted along the duct line anywhere between the
kitchen and the exterior wall. If there is easy access to duct
line (in an attic, for example), this may be an appealing
option.
25 ft. remote and in-line blower extension
cable
The 25 ft. Remote and In-line Blower Extension Cable
(EXTNCB25W) is available to connect the hood to the In-
line and Remote Blowers for distances up to 25 ft.
Accessory cable must be purchased separately. DO NOT
use more than one Blower Connector Cable per
installation.
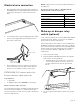
Hood transition
Discharge direction
The exhaust air is discharged upwards through a duct or
directly through the outside wall into the open.
The hood can be mounted on the wall only with a vertical
discharge.
Assembly of the transition
Hoods are supplied with a 10" (254 mm) round transition.
A locally supplied transition is required for other sizes.
1. A minimum height clearance of 7-7/16'' (189 mm) is
needed above the hood for transition mounting.
2. Align mounting holes at base of transition over the
mounting holes of the 1/2'' (13 mm) flange located at
the top of the hood.
3. Fasten transition to hood using four (4) 1/4'' (6 mm)
sheet metal screws included with hood.
Note: Screws must not hinder damper operation.
4. Seal connection between transition and hood with
aluminum tape. DO NOT use duct tape. Ensure that
the connection is completely sealed.
5. Remove tape holding damper closed.
20 ¼"20 ¼"20 ¼"
(514)(514)(514)
7
(189)
7
(189)
7
(189)
161616
""
12
(322)
12
(322)
12
(322)
11/
16
"
7/7/7/
inches (millimeters)