Wellness Shower Package Installation Manual For Tutorials and Troubleshooting visit www.thermasol.
ThermaTouch Control 7 Inch Screen Installation Manual For Tutorials and Troubleshooting visit www.thermasol.
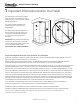
Wellness Shower Package 1 Important Information before You Install The ThermaTouch Control must be installed inside the shower. The ThermaTouch control will only function on the current TFX, SSA and PRO Series generators. The control should be installed 60" from the floor of the shower and away from the steamhead. The steamhead should be installed 24" from the floor and 6" from any wall. Locate as far as possible from the bathing seating area or location of the users and not below any fixtures.
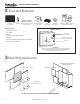
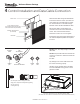
Wellness Shower Package 2 Tools and Materials Controller Item TT7X-XX Silicone 25-foot Yellow M12 Cable Item 03-7149-25 Power Supply Brick Item 03-7142 PDM Item 10-8147 Materials needed: Mud Ring Item 04-8544 Installation instructions, warranty, static cling warning label Back of Control o ThermaTouch control o M12 cable Power/Data M12 connection o Silicone o Power Distribution Module (PDM) Plug in network cable RJ-45 for updates over the internet o Mud Ring o Ethernet Cable with RJ-45 Connect
Wellness Shower Package 4 Control Installation and Data Cable Connection Shower wall Route the M12 cable through the finished wall to the back side of the control. (The other end of the cable runs to the PDM location.) NOTE: It is recommended to run the cable through electrical conduit. DO NOT STAPLE the cable! 3.5mm male audio cable (not included unless Serenitiy Light, Sound, Rain Head was purchased) Run the M12 cable so the 90-degree end connection will connect to the ThermaTouch control.
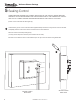
Wellness Shower Package 5 Sealing Control THESE STEPS MUST BE TAKEN FOR CORRECT INSTALLATION OF THE CONTROL. REMOVE MUD RING FROM WALL CUTOUT BEFORE MAKING FINAL CABLE CONNECTIONS TO THE THERMATOUCH CONTROL. TEST THAT ALL CONNECTIONS ARE WORKING BEFORE SEALING THE CONTROL TO THE WALL. (Power on the control and see that it lights up). A Coat the entire groove on the control back with supplied waterproof silicone to fully seal the control to the wall.
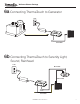
Wellness Shower Package 6a Connecting ThermaTouch to Generator 110v TTC SLS M8 Cable M12 Cable 6b Connecting ThermaTouch to Serenity Light, Sound, Rainhead 110v M12 Cable Audio Cable TTC SLS M12 Cable THERMASOL.COM I 800.776.
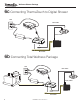
Wellness Shower Package 6c Connecting ThermaTouch to Digital Shower 110v M12 Cable Audio Cable TTC SLS M12 Cable 6b Connecting Total Wellness Package 110v M12 Cable Audio Cable M8 Cable TTC SLS M12 Cable 8 THERMASOL.COM I 800.776.
Wellness Shower Package THIS PAGE INTENTIONALLY LEFT BLANK THERMASOL.COM I 800.776.
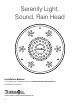
Serenity Light, Sound, Rain Head Installation Manual For Tutorials and Troubleshooting visit www.thermasol.
Wellness Shower Package 1 Important Information Before You Install PLEASE REVIEW WARNINGS BELOW AND LEAVE THIS MANUAL WITH HOMEOWNER DO NOT USE THIS PRODUCT UNLESS YOU HAVE CONSULTED WITH YOUR DOCTOR AND RECEIVED WRITTEN PERMISSION TO DO SO. USE OF THIS PRODUCT MAY BE HAZARDOUS TO YOUR HEALTH. PLEASE CONSULT YOUR PHYSICIAN BEFORE USING. IF YOU ARE PREGNANT, ELDERLY, HAVE HIGH BLOOD PRESSURE, DIABETES, SUFFERING FROM HEART DISEASE, ARE INTOXICATED, OR NOT IN GOOD HEALTH, DO NOT USE THIS STEAM BATH.
Wellness Shower Package 2 Tools and Materials Parts Enclosed: Serenity Light, Sound, Rain Head fixture and hardware Item SLSRX-XX Silicone 25-foot Yellow M12 Cable Item 03-7149-25 Bluetooth Module Installation instructions Compatable controls: Materials needed: o Tile Cutter ThermaTouch 7" and 10" o PDM (Item 10-8147) o Ply Wood Backing Board SignaTouch Control o Compatible controller o 36" long 3/8" Compression Flexible Water Line Signature Control o Drill o Separate water volume control
Wellness Shower Package 3 Placing and Cutting Template After completing the shower construction and running the necessary cables, water supplies and etc. using template included in these instructions (page 8) proceed to: Cutout • After choosing the desired location, use the printed template to drill the three 7/16” holes • Then proceed cutting the cutout 7/16” Note: Template must be printed out at actual size. Install suitable wood support between joists.
Wellness Shower Package 4 Mounting Hardware • Connect the 3 1/2” x 1/4” all-thread rod bolts (studs) together with supplied couplings. • Insert the 3 1/2” x 1/4” studs from the shower side into the 7/16” predrilled holes. Hold it in place while from the top side of the cut out insert supplied spring, washer and secure it with provided wing nut.
Wellness Shower Package • Carefully conceal in attic space any extra lengths of the cables or the water supply above the shower area. Align the Rain Head fixture to the three couplings. Make sure that the Rain Head will fit perfectly and flush with the ceiling. IF needed please adjust the studs and couplings to assure perfect fit.
Wellness Shower Package 1 2 3 4 5 6 7 Template must be full scale 1:1 when printed 1 2 3 4 16 5 5 6 7
Digital Shower Valve Installation Manual TDS-3000 OVER 60 YEARS OF STEAM SHOWER INNOVATION 17
Wellness Shower Package 1 Important Information Before You Install Make sure the walls, ceiling and floor materials are suitable for use with this product. Ensure electrical power is turned off for the duration of the installation. PLEASE REVIEW WARNINGS BELOW AND LEAVE THIS MANUAL WITH HOMEOWNER BEFORE USING THE SHOWER, TEST THE WATER TEMPERATURE WITH YOUR HAND BEFORE FULLY ENTERING THE SHOWER.
Wellness Shower Package 3 System Layout Serenity Light and Sound ThermaTouch Control (Inside Shower) TT C AU D IO OU T 110V Power TT C SL SI 24 VD C IN PU T NP UT CO IN To LAN/ROUTER PDM NT PU T CO NT Steam Generator RO L2 IN RO L1 IN PU T PU T Digital Interface 110V Power UT M EA ST NIT INP U TDS-3000 Digital Shower Valve 208/240VAC Easy Start Control (Outside Shower) Water Inlets (Hot/Cold) THERMASOL.COM I 800.776.
Wellness Shower Package 4 Scope of Application PDM Digital Interface TDS-3000 Digital Shower Valve IMPORTANT: The Digital Shower Valve must be accessible and should not be sealed in the wall 20 THERMASOL.COM I 800.776.
Wellness Shower Package 5 Remove Cover V 15 C AC U T EX -2 RS 32 R TO MO TL I X AU 6 Inside Valve System Controller Battery Compartment Fixing Holes 15V ACCU Power Supply TLI Hot Cold Connector Block Outlets Inlets THERMASOL.COM I 800.776.
Wellness Shower Package 7 Mark and Drill Holes 235mm / 9.25" 235mm / 9.25" 22 8mm / 0.31" THERMASOL.COM I 800.776.
Wellness Shower Package 8 Install Valve System Controller 15 V CU AC T EX -2 RS 32 R TO MO I TL X AU 9 Remove Inlet Retaining Bolt V 15 C AC U T EX 32 -2 RS R TO MO I TL X AU THERMASOL.COM I 800.776.
Wellness Shower Package 10 Connect Hot and Cold Water Supply V 15 U C AC T EX 32 -2 RS R TO MO I TL X AU 2. Insert inlet connectors 1. Connect hot and cold water supply V 15 3. re-insert retaining bolt U C AC T EX 32 -2 RS R TO MO I TL X AU IMPORTANT: Flush the pipework before connection 11 Remove Outlet Retaining Bolt V 15 CU AC T EX -2 RS 32 R TO MO I TL X AU 24 THERMASOL.COM I 800.776.
Wellness Shower Package 12 Connect Outlet Pipeworks 15 V CU AC EX T -2 RS 32 R TO MO I TL X AU 3. re-insert retaining bolt V 15 2. Insert outlet connectors CU AC T EX 32 -2 RS R TO MO I TL X AU 1. Connect outlet pipeworks 1 V 15 2 CU AC T EX 2 23 RS R TO MO I TL X AU 3 2 3 1 IMPORTANT: Flush the waterlines prior to connecting to clear any debris. THERMASOL.COM I 800.776.
Wellness Shower Package 13 Connect Back Up Battery V 15 CU AC T EX 32 -2 RS V R TO MO 15 CU AC I TL T EX 2 3 -2 RS X AU R TO MO TL I X AU 14 Connect The Digital Interface V 15 CU AC T EX Connect the digital interface to the RS232 port 32 -2 RS R TO MO U C AC EX T 32 -2 RS R TO MO I TL X AU THERMASOL.COM I 800.776.
Wellness Shower Package 15 Connect The PDM V 15 C AC U EX T 32 -2 RS R TO MO I TL X AU V 15 U C AC T EX 32 -2 RS R TO MO I TL X AU THERMASOL.COM I 800.776.
Wellness Shower Package 16 Re-fit Cover and Connect V 15 CU AC T EX 32 -2 RS R TO MO I TL X AU IMPORTANT: Electrical connection must be installed by a qualified electrician. 28 THERMASOL.COM I 800.776.
Wellness Shower Package ThermaSol Product Registration Dear ThermaSol End User: Please register your product at www.thermasol.com/warranty so we can assist you much quicker if you ever need to contact our Technical Support Department. In addition we’ll keep you informed about your product and time to time we’ll update you about new products and other company announcements. Thank you from all of us at ThermaSol and we wish you many relaxing and steamy days ahead.
1958 STEAM WAY ROUND ROCK, TX 78665 PHONE: 800.776.0711 | FAX: 800.556.5257 | WWW.THERMASOL.