
Installation Sheet


• Carefully conceal in attic space any extra lengths of
the cables or the water supply above the shower area.
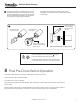
Align the Rain Head xture to the three couplings.
Make sure that the Rain Head will t perfectly and
ush with the ceiling. IF needed please adjust the
studs and couplings to assure perfect t.
• After you conrmed that the three couplings will
perfectly align and Rain Head will be ush with the
nished ceiling material apply silicone around center
groove on back of the xture. Push xture tight
against ceiling.
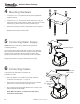
• Use the three provided screws and secure them into
the xture which will connect with the couplings.
Tighten them carefully so you don’t cross thread them
or you don’t damage the xture.
• Allow silicone to dry for 24 hours.
• Make sure that the M12 power/data cable is
connected from the Rain Head to PDM
• PDM must be plugged in to standard 110V
electrical outlet
• If your control is plugged in and powered ON
you can test the lights and etc.
AUDIO CABLE
PDM Provided and ships
with ThermaTouch control
M12 Power/
Data Cable
Silicone Bead
all around the
perimeter of groove.
Push xture tight
against the ceiling.
Securing Serenity Rain Head
7
Connecting to Power Distribution Module (PDM)
8
17
THERMASOL.COM
I
800.776.0711
Wellness Steam Package