
User Manual


All installations and services must be performed by qualified service personnel.
Check for air whistling thru seams in ducts,
cabinets or panels
Check for cabinet/duct deformation
• “Hunts” or “puffs” at high CFM (speed) • Does removing panel or filter reduce “puffing”?
Reduce restriction
Reduce max airflow
Evidence of Moisture
• Motor failure or malfunction has occurred and
moisture is present
• Replace motor and perform Moisture Check
• Evidence of moisture present inside air mover • Perform Moisture Check
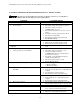
DO DON’T
• Check-out motor, controls, wiring and
connections thoroughly before replacing motor
• Automatically assume the motor is bad.
• Orient connectors down so water can’t get in
Install “drip loops”
• Locate connectors above 7 and 4 o’clock
positions
• Use authorized motor and control model #’s for
replacement
• Replace one motor or control model # with
another (unless an authorized replacement)
• Keep static pressure to a minimum:
Recommend high efficiency, low static
filters
Recommend keeping filters clean
Design ductwork for min static, max
comfort
Look for and recommend ductwork
improvement, where necessary, in
replacement
• Use high pressure drop filters – some have ½”
H
2
O drop!
• Use restricted returns
• Size the equipment wisely • Oversize system then compensate with low
airflow
• Check orientation before inserting motor
connectors
• Plug in power connector backwards
• Force plugs
Moisture Check
• Connectors are orientated “down” (or as recommended by equipment manufacturer)
• Arrange harnesses with “drip loop” under motor
• Is condensate drain plugged?
• Check for low airflow (too much latent capacity)
• Check for undercharged condition
• Check and plug leaks in return ducts, cabinet
Comfort Check
• Check proper airflow settings
• Low static pressure for lowest noise
• Set low continuous-fan CFM
• T’stat in bad location?
15