
User's Manual


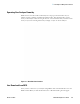

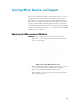
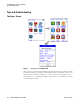
Table Of Contents
- Contact Us
- Manual Overview
- Using Your Analyzer
- How to Analyze
- Basic Operation
- Taking a Sample Analysis
- Analysis Modes
- General Metals Mode
- Electronic Metals Mode
- Precious Metals Mode
- Plastics Mode
- Soils Mode
- Mining Cu/Zn Mode
- Mining Ta/Hf Mode
- TestAll Mode
- TestAll Geo Mode
- Using General Metals Mode
- Using Electronic Metals Mode
- Using Precious Metals Mode
- Using Plastics Mode
- Using Soils Mode
- Using Mining Cu/Zn Mode
- Using Mining Ta/Hf Mode
- Using TestAll Mode
- Using TestAll Geo Mode
- Common Operations
- Data Management
- Connectivity
- Controlling Your Analyzer From Your PC
- Learning More, Service, and Support
- Advanced Settings
- Service

8
Learning More, Service, and Support
Replacing the Measurement Window
Thermo Scientific Niton XL2 Analyzer User’s Guide 131
Figure 4. Prolene Window PN 187-1454
• When the bracket is clean, remove the backing from the Measurement Window. Place the
window on the Bracket gently. Make sure the opaque portions of the window do not
intrude over the large measurement hole in the Bracket.
Figure 5. Removing the Backing from Prolene Window (Left) and Applying Window to Bracket (Right)
CAUTION Do not use fingers to press window into place! Use a smooth, hard surface such as back
of tweezers.
Figure 6. Measurement Window Replaced
• Replace Window Bracket on the front of your analyzer, then insert screws.