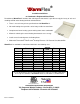
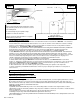
WarmFlex ® Installation Guidelines for Laminated & Engineered Wood Floors Revolutionary WarmFlex™ laminate floor underlayment now makes it possible to enjoy the luxury of safe and soothing warmth under floating laminate and wood floors: There is no easier way to heat your floor than with WarmFlex™. No metal heating wires provides safest heat possible for warm floors. Complements home heating system making rooms more comfortable.
Cautions: THIS EQUIPMENT SHALL BE INSTALLED ONLY BY QUALIFIED PERSONNEL WHO ARE FAMILIAR WITH THE CONSTRUCTION AND OPERATION OF THE APPARATUS AND THE RISKS INVOLVED. THE INSTALLATION OF THIS HEATING PRODUCT SHALL BE IN ACCORDANCE WITH THE MANUFACTURER’S INSTRUCTIONS AND LOCAL AND NATIONAL CODES. IN CANADA, THE INSTALLATION SHALL BE MADE ACCORDING TO THE PROVISIONS OF SECTION 62 OF THE CANADIAN ELECTRICAL CODE, PART 1.
1. FLOATING HARD SURFACE FLOORS (including laminate, wood and interlocking tile) 1-A Electrical Rough-In Install GFCI Breaker – (Over-current Protection) 1. WarmFlex™ must be installed with a ground fault circuit interrupter (GFCI) unless your WarmFlex model is equipped with ground wire in which case only wet area installations (kitchen, bath) require GFCI. We recommend installing WarmFlex with our programmable thermostat (purchased separately) with a built-in GFCI.
Installing a Power Module (Relay / Contactor) 12. Depending on the Amp requirements of multiple WarmFlex™ mats, a power module or relay may be required. Call Thermosoft Technical Support or consult with an electrician to determine the type and size of relay required. 1-B Planning & Preparation 1. Plan the heated area of the floor so that the desired traffic areas can be heated with a combination of the available WarmFlex sizes.
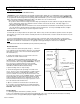
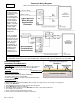
Sensor Wire Location Figure 2 Sensor wire Thermostat Figure 3 ThermoFlex *Relay if required WarmFlex ® conduit Sensor WarmFlex ® butt together and duct tape seams Tape WarmFlex ® Heating wire Leave 1” space from the wall to run lead wires. Small gaps around the perimeter do not need to be covered by an underlayment. * A contactor/relay may be required for large installations. Consult an electrician. ** Sensor can be run down the wall or in a separate conduit from the power leads.
Thermostat Wiring Diagrams Figure 4 ***Refer to Instructions that came with your specific thermostat*** All electrical work must be done by a qualified, licensed electrician in accordance with local building and electrical codes, and the National Electrical Code (NEC), especially Article 424, Part IX of the NEC, ANSI/NFPA 70 and Section 62 of CEC Part I.
Glued-Down Wood Method #2-2 2-2 Setting Material: (Same as Method #2-1) WarmFlex™ Trowel Size: (Same as Method #2-1) Sub-floor Requirements: • Must comply with NWFA sub-floor requirements. Underlayment pad • Sub-floor must be structurally sound and free of contaminants and sealers. Plywood Subfloor • Minimum variation of 1/4” in 10’, with a 16” on-center joists. Installing WarmFlex®: Same as Method #2-1.
Installation Methods: Ceramic & Porcelain Tile Method #3-1: Ceramic floor tile (8” or larger) on concrete sub-floor Setting Materials: • Use Latex Portland cement mortar that conforms to test requirements found in ANSI A118.4. • Hydrate (mix with water) according to the bag recommendations. • Use a slow mixer (300 rpm or less) or mix by hand. • Allow mixture to sit undisturbed for 15 minutes, then lightly remix. Trowel Size: • WarmFlex to sub-floor: 1/4”x1/4”x1/4” Square or “U” notch.
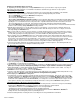
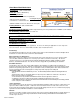
3-D Floor Covering Installation Setting Tile: 1. Dampen, but do not saturate, the WarmFlex with a sponge or mist sprayer prior to thin-set application. 2. Use a square or “U” notch trowel size that is appropriate for the size of tile. (Minimum 1/4” x 3/8” x 1/4”) 3. Use Latex Portland cement mortar that conforms to test requirements found in ANSI A118.4. 4.
4. CARPET TILE AND COMMERCIAL CARPET 4-A Electrical Rough-In: See section 1-A. 4-B Planning & Preparation: See section 1-B. 4-C WarmFlex™ Installation: See section 1-C. 4-D Fiberboard layer installation. 1. After laying WarmFlex according to section 1-C, you will need to cover it with one layer of 4’x8’x1/8” fiberboard also known as medium density fiberboard (MDF) or hardboard. This will become a floating sub-floor that will not be fixed to the floor below. 2.
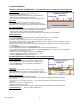
4-F Final Wiring & Connections: See section 1-E. Diagram A - Lay Fiberboard in Diagonal Pattern 5. Nailed –Down Wood Floors WarmFlex may be installed under nail-down wood floors provided the installation complies with all local and national codes, the installation steps outlined in Section 1, and the additional guidelines enumerated below. The installation methods and final approvals at the installation site are the responsibility of the Authority Having Jurisdiction.
TROUBLE-SHOOTING Steps for the electrician to trouble-shoot the radiant floor heating mats and programmable thermostat: 1. Turn power off at the main breaker. Check that the electrical connections are proper: 120V Power Lines connected to the 2 terminals marked LINE; heating mats connected to the 2 terminals marked LOAD (multiple mats connected in parallel: black-to-black and white-to-white); floor sensor connected to the 2 terminals marked Sensor. 2. Check to be sure all electrical connections are tight.
WarmFlex™ RADIANT FLOOR HEATING MAT 10-YEAR LIMITED WARRANTY Thermosoft International Corporation (“Manufacturer”) warrants that its WarmFlex™ radiant floor heating mat (“Product”) for floating laminate flooring, floating wood flooring ceramic flooring and porcelain flooring (“Applicable Flooring”) is free from defects in manufacturing, materials and workmanship in manufacture and to perform under normal use for a period of 10 years from the date the Product was originally purchased (“Limited Warranty Perio
CONDITIONS/EXCLUSIONS TO THE LIMITED WARRANTY THIS 10-YEAR LIMITED WARRANTY IS FURTHER MADE SUBJECT TO THE FOLLOWING CONDITIONS AND EXCLUSIONS, PLEASE READ THE FOLLOWING CAREFULLY: 1. Required Installation. To be covered by this Limited Warranty, the Product must be installed indoors following the Manufacturer’s recommended installation instructions for the Product and the manufacturer’s recommended installation instructions for the Applicable Flooring.