
Installation Guide
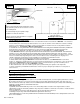

Rev.1.12.09.10 7
Glued-Down Wood Method #2-2
Setting Material: (Same as Method #2-1)
Trowel Size: (Same as Method #2-1)
Sub-floor Requirements:
• Must comply with NWFA sub-floor requirements.
• Sub-floor must be structurally
sound and free of contaminants and sealers.
• Minimum variation of 1/4” in 10’, with a 16” on-center joists.
Installing WarmFlex
®
: Same as Method #2-1.
2-D Floor Covering Installation: Install flooring material as per flooring manufacturers and NWFA recommendations.
2-E Final Wiring & Connections: See section 1-E.
3. CERAMIC & OTHER CEMENTITIOUS TILE AND STONE FLOORS
3-A Electrical Rough-In: See section 1-A.
3-B Planning & Preparation: See section 1-B.
3-C WarmFlex™ Installation
WarmFlex™ is approved for Type II tile applications. Do not use in shower pan applications or areas exposed to
excessive moisture. Do not use under marble, travertine, slate or natural stone floors.
Conditioning:
The underlayment and adhesives must be conditioned at 70 degrees Fahrenheit with the relative humidity between
25 and 65% for at least 24 hrs before and 72 hrs after installation.
Approved Surfaces for Applications:
Exterior Glue or Exposure 1 Plywood, concrete backer board, concrete in the absence of excess moisture and/or
excessive alkali, and well bonded VCT* or sheet vinyl* (non-embossed and non-cushioned). All sub-floor
structures must meet or exceed the American National Standard Specifications (ANSI) standards for quality,
thickness, and maximum deflection. The sub-floor must also comply with any local building code standards.
Unsuitable substrates:
The following is a list of sub-floor surfaces NOT suitable for tile installations as published by The National Tile
Contractors Association: masonite, all grades of lauan plywood, expanded polystyrene (styrofoam) insulation board,
particle board, paneling, stripwood floors, grease-saturated concrete, sheathing and/or other oriented strand board,
pressure-treated plywood, fire-resistant plywood, curing compounds, felt paper and scribing felt.
*Sheet Vinyl or VCT:
• If at all possible, remove the old sheet vinyl or VCT. It is almost always better to install over the original sub-floor
surface.
• Wood sub-floors that are structurally suitable for vinyl, may not be suitable for ceramic tile or wood floors.
Double-check the sub-floor requirements.
• If not removed, the vinyl must be well adhered to the sub-floor throughout the entire floor.
• If installing on top of vinyl, make sure the mortar or adhesive is approved for use on vinyl.
• Allow additional drying or “set” time (at least twice the manufacturer’s recommendation) for the setting material
used in each phase of the installation.
Surface preparation:
Floor must be clean, smooth, dry and free of foreign matter that would interfere with a good bond. Fill all cracks and
depressions with a suitable floor patch. If adhesive removal chemicals have been used, make sure the floor has
been properly rinsed and all chemical residues are removed. All existing cracks in excess of 1/16 inch must be properly
repaired in accordance with ANSI standards for ceramic installations.
Moisture:
All sub-floor assemblies should be tested for moisture vapor emission rates by utilizing anhydrous calcium chloride test
kits for concrete. Do not install flooring material when in excess of flooring manufacturer’s recommendations for
moisture vapor emissions.
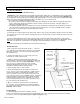
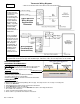
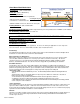
WarmFlex™
2-2
Plywood Subfloor
Underlayment pad