
Instruction Manual


RV Toilet Service Parts
for
Aria CLASSIC
11
Tools Needed
• 7/16”wrench
• Adjustablewrench
• Flat-bladescrewdriver
• Phillipsscrewdriver
• ShortPhillipsscrewdriver
• Pliers
• Towels
Note
•
Readallinstructionsbeforebeginningwork.
• Avoidcontactwithhumanwastebywearingprotectiveitems
suchasgloves,glasses,longsleevesandnose/facemask.
Washtoiletareayouwillbeworkingon.
• Toreduceholdingtankodor:Rinsetoiletwithatleast1gal-
lonofwater.DrainHoldingTank.Addappropriatedoseof
ThetfordHoldingTankDeodorant.
Remove Toilet
1. TurnoffRVwatersupplyperRVOwner’sManual.
2. PryoffBoltCapswithat-bladescrewdriver.Usewrenchto
remove7/16-inchLagScrews.
3. DisconnectWaterSupplyLinewithadjustablewrench.
4. Placeanoldtowelorsoftclothonworksurface.RemoveToilet
fromoorandplaceupsidedown,withbackfacingyou,on
worksurface.
Instructionsbelow(left,right,etc.)willassume
thisorientation.
5. RemoveoldClosetFlangeSeal(maybefoundinToiletorin
ooratClosetFlange).Discard.
6.
CoverHoldingTankopeningtocontainodor.
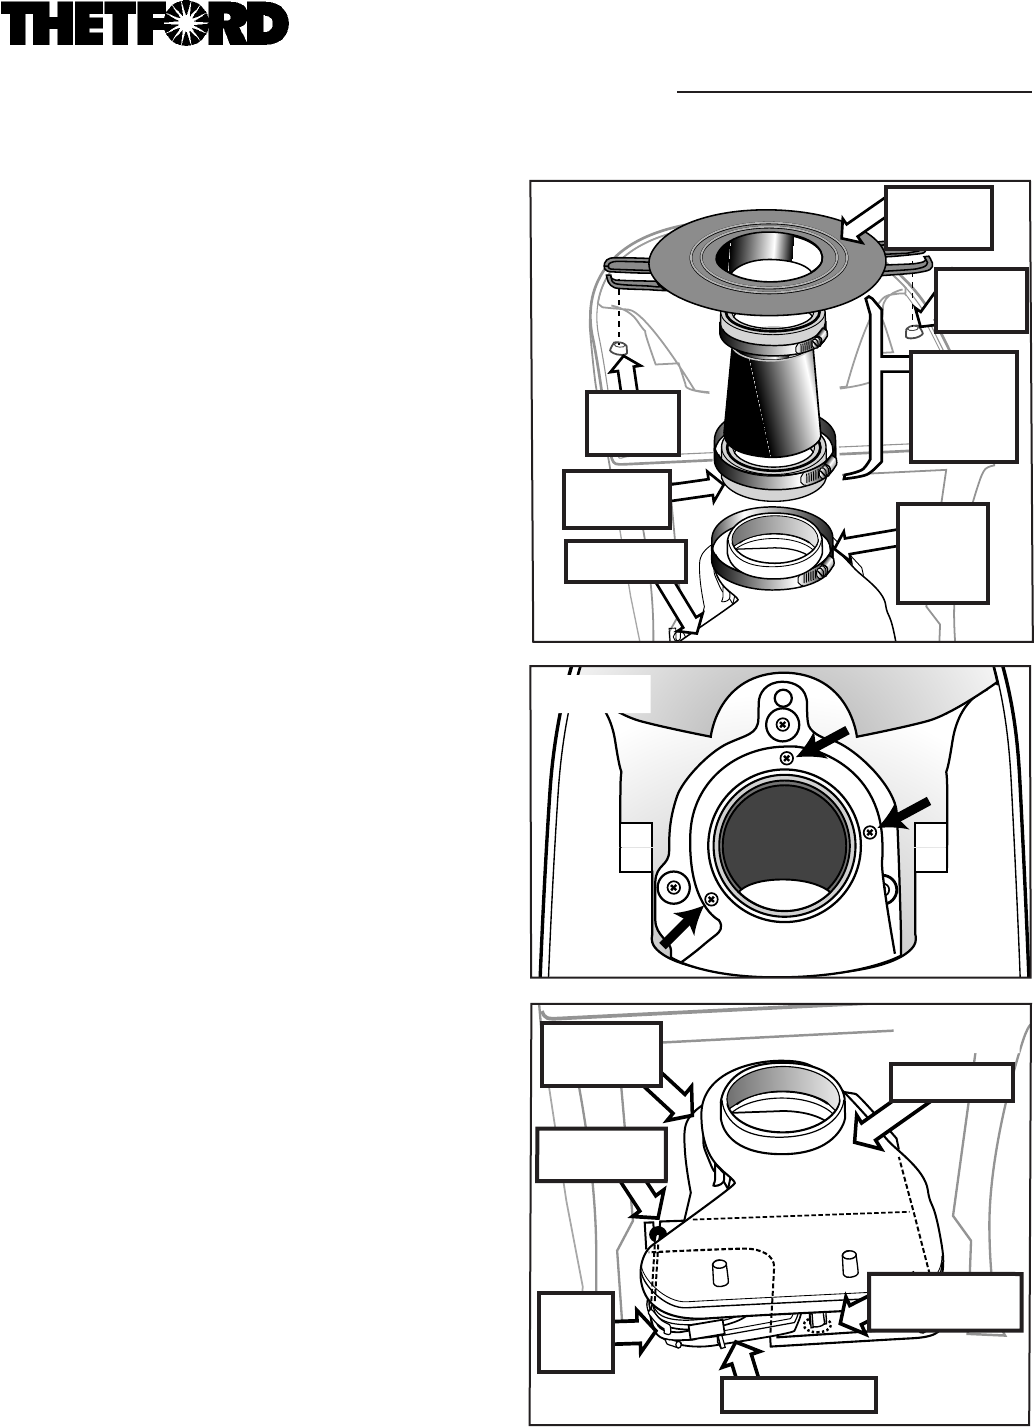
To Remove Blade Seal
1. LoosenClampclosesttoMechanismtoremoveMounting
Flange,MountingBushings,OutfallTube(high-proleunits
only)andHubSeal(Fig.A).
2. UsingPhillipsscrewdriver,removethreescrews(without
washers)attachingMechanismtoMechanismPlate(Fig.B).
3. UsingshortPhillipsscrewdriver,removeStandoffScrew
securingMechanismtoMechanismPlate(Fig.C,lower).
4. Disengageleft-sideCableSheathFittingfromMechanism
Plate(Fig.C,lower).
5. LiftMechanismout,turnitover,andpullBladeSealoutof
grooveinbowlsideofopening.
To Install New Blade Seal
1.
InstallnewBladeSealinMechanismsothatitsnapsintothe
Part No. 19833
Mechanism Blade Seal
FormNo.19842Rev.11/22/04
Fig. C
Fig. B
Mechanism
Mechanism
Plate
Cable Sheath
in Slot
Cable
End
Elbow
Fig. A
Mounting
Bushing
Mounting
Flange
Outfall
Tube, etc,
come out
together
Clamp–
loosen
this one
only
Mechanism
Mounting
Bushing
Connector
Seal
Blade Actuator
Standoff Screw
(dotted oval)