PN: 875-0066-01 RevB Nomad RFID Reader Setup Guide
Government Limited Rights Notice: All documentation and manuals were developed at private expense and no part of it was developed using Government funds. The U.S. Government’s rights to use, modify, reproduce, release, perform, display, or disclose the technical data contained herein are restricted by paragraph (b)(3) of the Rights in Technical Data — Noncommercial Items clause (DFARS 252.227-7013(b)(3)), as amended from time-to-time.
Contents Introduction to the Nomad RFID Reader................................................................................ 5 Related Documentation ....................................................................................................... 5 Nomad RFID Reader Hardware ............................................................................................ 5 Tools Required....................................................................................................................
Nomad RFID Reader Setup Guide Introduction to the Nomad RFID Reader The Nomad® RFID Reader and mounting kit lets users easily add UHF RFID capability to Trimble’s popular Nomad rugged handheld PC. This reader allows handheld reading and writing of EPC Global Gen2 tags in the harshest outdoor environments. Like the Nomad itself, this accessory meets the rigorous MILSTD- 810F military standard for drops, vibration, humidity, altitude and extreme temperatures, and also has an IP67 rating.
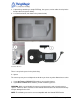
3. A plastic bag containing a sample RFID tag, One spacer, and an adhesive strip for the bumper (#3 in the picture below) 4. A Quickstart Guide (not shown in the picture below) Contents of the box There is one plastic spacer in the plastic bag. A. Spacer The correct spacer you need depends on whether you have any other Nomad accessories. 1. If you don’t have a WWAN/GPRS modem, you need the Spacer 2. If you have a WWAN/GPRS modem, you don’t need any spacers.
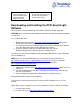
Nomad Deluxe case Nomad standard case Nomad AA battery pack Nomad Serial boot Nomad Pistol Grip Nomad hand strap Nomad black nylon carry case Nomad range pole bracket Nomad vehicle mount Downloading and Installing the RFID SearchLight Software There are three methods to download and install the RFID SearchLight application. WARNING: Do not connect the RFID Reader’s USB cable until after the software installation is completed. Use a USB FLASH drive 1. Download the package from http://www.trimble.
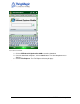
Internet Browser window 3. Click on RFIDSearchLightinstaller.CAB to start the download. 4. Once the download completes, click on Start button. The Start dropdown menu displays. 5. Click on File Explorer. The File Explorer directory displays. .
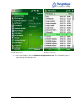
Start Dropdown Menu File Explorer directory 6. In the File Explorer, click on RFIDSearchLightInstaller.cab. The installation process steps through installing five files.
The installer installs the following files: RFIDSearchLightInstaller.CAB RFIDSearchLight.CAB FtdiVcpInstaller.CAB NETCFv35.Messages.EN.wm.CAB NETCFv35.wm.armv4i.CAB After each component is installed, you have to press “OK” in the top-right hand corner to install the next component. NOTE: You must restart the Nomad after installation. RFIDSearchLightInstaller.CAB window 7. After each component is installed, click on the OK button in the upper right of each window.
Assembling the Nomad RFID Reader 1. All Documentation, Software and Firmware are available for download from: http://www.trimble.com/nomad-drivers - Drivers http://www.trimble.com/nomadsupport - Setup Guide NOTE: The RFID SearchLight application must be installed on the Nomad Handheld in order to use the RFID reader. Use of all software and firmware is governed by the then-current End User License Agreement or Shrinkwrap License Agreement (Software). 2.
3. Remove screws from WWAN cellular antenna, if present. WARNING: DO NOT remove the cellular antenna, it will damage the antenna. 4. Attach Nomad RFID reader to battery door. Insert the Spacer first, if non-cellular device. 5. Ensure the reader cable is secured under the wire guide and allows the battery door to seat properly. 6. Screw six screws to secure unit: 4x battery door, 2x for WWAN antenna connection. 7. Install the USB protective bumper as shown below.
Final assembly of the USB bumper before USB cable installation Before Running the RFID SearchLight Software Before running the RFID SearchLight software, several Nomad features may be enabled. These include: GPS (If tag location desired) Local time zone Enabling GPS For all Nomads, follow these steps to turn on GPS: NOTE: Please make sure SatViewer is not running in background. If it is, exit SatViewer and restart it after completing the following steps. 1. 2. 3. 4. 5. 6. Click Start.
GPS Settings tab 7. Click OK. The Settings window displays. Additionally, if you have Windows Mobile 6.1 (not available on 6.0), you may also turn on Assisted GPS, which may improve your user experience (allows faster, but possibly less accurate, GPS lock). Turning on Assisted-GPS To turn on the Assisted-GPS feature, do the following: 1. 2. 3. 4. 5. 6. 14 Click Start. The Start dropdown menu displays. Click on Settings. The Settings window displays. Click on the System tab. Click on the GPS icon.
GPS Settings A-GPS tab 7. Click OK. The Settings window displays. GPS metadata in RFID SearchLight is now enabled. You can now restart SatViewer. Please ensure that SatViewer is connecting on COM3. Setting the Time Zone WARNING: You must set the local time zone before using the RFID SearchLight application. Failure to do this could cause the device not to comply with local RF regulatory requirements. Setting the time zone automatically sets the correct region for your location.
Settings window, System tab 3. In the System tab, click on the Clock & Alarms icon. The Clock & Alarms pane displays.
4. In the Time tab, click on the Home radio button. 5. In the top right dropdown list, click on the correct time zone for your location. Using the RFID SearchLight Application WARNING: Do not suspend the Nomad while actively reading tags.
Start window dropdown menu 2. Click on the RFID SearchLight menu item. The RFID SearchLight application displays. RFID SearchLight main window The About window provides basic hardware and software information about the Nomad RFID Reader. Click on About to display this window.
About window From the main menu, you can: Enable/disable the keyboard wedge. All tag information will be send to the active application, such as Notepad, Excel, or Word Configure the application Read RFID tags Enabling and Disabling the RFID Keyboard Wedge Enable the keyboard wedge if you want to send RFID tag reads to a text application such as Pocket Word, Notepad, or Excel. To enable RFID keyboard wedge, do the following: 1. Click on the Enable RFID keyboard wedge radio button.
Reading tags into OneNote Mobile To disable RFID as keyboard wedge, do the following: 1. Click on the Disable RFID keyboard wedge button in the main RFID SearchLight window. You can either use the Start menu or click on the ThingMagic icon on the bottom right hand corner to get back to this screen.
2. Click OK to complete this task. The keyboard wedge is now disabled. Keyboard Wedge disable warning Configuring the Application The Configure Application feature allows you to configure the following: Display Format Read Parameters Prefix/Suffix Reader Settings The sections that follow detail how to configure each. To use the Configuration Application window, do the following: 1. Click on the Configure Application radio button. The Configuration window displays.
RFID SearchLight main window Configuration window Display Format The RFID SearchLight Application allows you to display tag reads in either a hexadecimal format or in a Base-36 Alphanumeric format. Please see the image below for examples of these encodings. To configure the display format, follow these steps: 1. Click on Display Format. The following window displays.
EXAMPLE: EPC in hexadecimal representation: 3028354D8202028000000000 Reverse Base-36 alphanumeric representation for human-readable text: CHL58FYDITHJ83VN0G1 Display Format window 2. Click on EPC in Hex or EPC in Base 36. 3. Click Save, Cancel, or Restore Defaults. Read Parameters Use the Read Parameters window to set the path for read alert wav files, start scan wav files, and end scan wav files to use and setting the Keyboard Wedge read parameters: read duration, metadata separator, and tag metadata.
Read Parameters window Setting Audible Alerts You may set your own preferred alert sounds using this menu. NOTE: Use very small WAV files. To configure the audible settings, follow these steps: 1. Click on the Audible Alerts box. A dropdown menu displays. 2. Click on Yes or No.
Setting the Read, Start Scan, and End Scan Alert Wav Files NOTE: Use very small WAV files.
Read Parameters window Setting Scan Duration in Seconds Click in the text box, then type in the amount of time to allow for a scan, in seconds or fractions of a second. The scan time should be set depending on the number of expected tags. If you are reading a less than 10 tags at a time, you can set the scan time to 1 second. If you are expecting more than a 100 tags, set it to 5 seconds. Setting a Metadata Separator 1. Click on the triangle in the box. A dropdown list appears. 2.
Prefix/Suffix The Prefix/Suffix menu allows you to add a prefix and suffix for EPC string. Prefix Suffix window Adding a Prefix Click on the Prefix box and type in a prefix. Adding a Suffix Click on the Suffix box and type in a suffix. Selecting a Tag Separator Click on the Multiple Tag Separator box. A dropdown box displays. Choose one of the following delimiters: Comma, Tab, Space, or Pipe.
Reader Settings window 1. Click on the Read Power box. A down menu displays. 2. Click on the appropriate power setting. Higher values represent longer read distances. 23dBm provides the maximum possible read distance. Setting the Tag Population Size Click on one of the three tag population radio buttons.
Setting a Tag Selection 1. Click on the Tag Selection box. A dropdown menu displays. 2. From that menu, click On EPC, On TID, or On User Data. . Tag Selection dropdown menu Tag Selection, Selection Address, and Selection Mask set Setting a Selection Address 1. Click the Selection Address Box. 2. Type in the number of bytes. Creating a Selection Mask 1. Click on the Selection Mask. 2. Type in the selection mask. This selects only certain tags.
One tag read, which matches the settings A read showing all tags in the field Selecting Tags Not Matching the Mask Click the Select Tags Not Matching the Mask check box. Checking this checkbox displays the tags not matching the Tag Selection, Selection Address, and Selection Mask that you just set.
Select tags not matching mask checkbox Resulting screen showing the non-selected tags Finally, you may save your changes, cancel your changes, or restore the default settings by clicking on the appropriate button at the bottom of the screen. Reading Tags The Read Tags menu provides for reading and displaying multiple tags. Tags are read based upon the reader settings. Tag read results are based upon filter criteria as defined in Reader Settings window.
Read Tags window NOTE: The Total Unique Tags Found box lists the number of unique tags read. However, the pane below may list those unique tags as being read multiple times, so the list and the count may NOT be the same. To read tags, do the following: Click on the Start Read button. The Ready pane to the right changes to Reading. As you read tags, tag data appears in the lower part of the window. To stop reading Tags, do the following: Click on the Stop Reads button.
Saving the Tag Read Data Using the Save button, you can save the accumulated tag read data. Follow this procedure to save your tag data: 1. In the Read Tags window, click on the Save Tags button. The Read Tags Save As window displays. Read Tags Save As window 2. 3. 4. 5. Using the keyboard, type in a file name. Select a folder from the Folder dropdown list. Select the type from the Type dropdown list: .txt, doc, or .csv.
Troubleshooting 1. RFID Reader is not detecting tags a. Ensure that the RFID Searchlight Application is correctly installed. b. Ensure that the RFID Reader is securely plugged in to the USB boot. c. Restart the Nomad d. Make sure that the tag you are trying to read is a UHF Gen2 tag. e. Tags which are directly on metal or on large liquid containers will not typically be readable from a long distance. Please put the RFID Reader in close proximity to the tags. f.
Support Support for the Nomad RFID Reader is available by contacting: ThingMagic, A Division of Trimble Four Cambridge Center, 12th floor Cambridge, MA 02142 866-833-4069 Support@ThingMagic.com Or through the company website: www.ThingMagic.
Compliance Information FCC Compliance This equipment complies with Part 15 of the FCC rules for intentional radiators and Class A digital devices when installed and used in accordance with the instruction manual. Following these rules provides reasonable protection against harmful interference from equipment operated in a commercial area.