
Quick Start Guide


English
7
Front/Rear camera
Front/Rear camera lens
Records the front view.
Camera cable
Connect to the main unit’s camera port.
Horizontal reference point
Attach the product to the mount
based on the marked point
( ).
Check the thickness of each cable to identify the front camera and the rear camera. The front
camera cable is thicker than the rear camera cable.
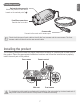
Installing the product
The following illustration shows the proper installation locations on a motorcycle for each part of
the product. Select the appropriate installation locations and follow the instructions to properly
install the each part of the product.
Rear camera Remote control
Main unit Front camera
The hardwiring cable must be professionally installed on the motorcycle by a trained mechanic. It
may result in fire or electric shock if the product is installed incorrectly.
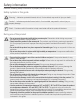
Part names
The product design may change without prior notice.
Main unit
Remote control
Used to control
the product.
Memory card slot
Insert a memory card
to save recordings.
Front camera port
Used to connect the
product to the front
camera.
(thick cable)
Rear camera port
Used to connect the
product to the rear
camera.
(thin cable)
Power cable
Connect each wire (ACC, GND)
to your motorcycle’s battery.
Check the thickness of each cable to identify the front camera and the rear camera. The front
camera cable is thicker than the rear camera cable.
Remote control
Manual recording button
Press to start manual
recording.
Status LED
Indicates the product status.
Microphone
Used for voice recording.
Wi-Fi button
Press to turn on the AP mode*
that connects the product to a
smartphone via Wi-Fi network.
* The AP mode allows the product to operate as a router (HUB).