
User manual


3
• Do not modify the product in any way. Doing so voids the
warranty.
• Do not use the product if the adapter, connection cable
or power cable is damaged.
• Do not attempt to service or repair the product yourself.
Leave any and all service work to qualied experts.
• Do not open the device or continue to operate it if it
becomes damaged.
5. Introduction
This 2.4 GHz digital wireless chin headset operates using
the latest radio technology and allows even older people
to enjoy clean, crystal-clear sound when watching TV and
listening to music at home.
Simply connect the transmitter with the desired audio
source: a DVD player, CD player, TV set, hi- system or iPod.
You’ll be enjoying vivid, mind-blowing sound in minutes
– no complicated wiring or installation required. And the
built-in external microphone will make sure that the entire
family can enjoy watching TV together at a comfortable
volume for everyone.
Note
Always remember to reduce the volume when switching
to the internal microphone. Otherwise the volume may
increase suddenly. This can cause hearing damage.
6. Data
• 2.4 GHz digital frequency jumping technology
• Charging station with LED display
• Automatic power-off of the HF transmitter (when no
audio signal is being received)
• Mute switch for speech capture with the internal micro-
phone
• Quick-charging system
• Microphone adapter for direct audio capture from the
speakers of the playback device (e.g. TV, radio, etc.)
• Left/right balance adjustment
• 4 selectable sound settings
- Neutral
- Amplied bass and treble
- Amplied treble
- Amplied bass
• Mono/stereo switch
• Volume control
7.Technical specications
Transmitting mode
Digital frequency jumping
technology
Carrier frequency 2,4 GHz
Operating voltage
Transmitter: 5 V, 550 mA
Receiver: 3.7 V, 350 mAh
lithium polymer rechargea-
ble battery
Frequency range 30 Hz – 20 KHz
Distortion < 0,5 %
Signal-to-noise ratio > 75 dB
Range
Up to 20 metres (depend-
ing on the composition of
intervening walls)
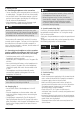
8. Transmitter installation, g. 3
• Connect the power supply to the power socket on the
rear side of the AV selector.
• Connect the power supply to a mains socket.
• The cinch adapter cable, audio cable, 6.3 mm-to-3.5 mm
adapter plug and an external microphone offer a wide
variety of ways to connect to your audio source (such as a
TV, hi- system, mp3 player or iPod).
• Put the power on/off switch on the rear side of the trans-
mitter in the ON position.
Note
• Depending on your TV, using its 3.5 mm headphone
jack may mute the sound through the speakers.
Switching to the microphone means that the
headphones will reproduce the sound only after it
has been emitted by the TV’s speakers. This will allow
everyone in the room to hear the TV at a comfortable
volume, including people other than the person
wearing the headphones.
• The external microphone will also pick up sounds
from the surroundings. This will allow you to hear the
doorbell or telephone ringing even while using the
headphones.
The red power LED will light up as soon as the power
supply is connected to the mains. When an audio signal is
received from the audio source, the green LED will shine
steadily.