
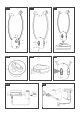
Instructions


6
8.3 Multi-point pairing (wired connection in combina-
tion with wireless Bluetooth connection)
In addition to connecting the stethoset headphones to aTV
or hi- with acable, you can also connect them wirelessly.For
example, thisallows you to accept calls via your smartphone
while watching TV.
Note
To enable this, the wireless headphone system WHP6309BT
must already have an active wireless (Bluetooth) connection
as described in section 8.2 to aterminal device (e.g. a
smartphone).
• Now switch off the wireless connection on the terminal
device (Bluetooth set to OFF e.g. on the smartphone).
• Disconnect the mains cable from the socket on the charging
station (g. 4, socket no. 3inyellow).
• Make surethat the headphones areswitched off (g. 1,
switch no. 1set to OFF).
• Now switch the headphones on (g. 1, switch no. 1set to
ON).
• Press the microphone/pairing button on the chin bar (g. 2,
button no. 6) for approx. 7seconds. The LED begins to ash
BLUE quickly.
Note
If the LED is lit green, it indicates that you did not press the
button for long enough. Repeat the procedure.
• Now insert the mains cable of the transmitter back into the
socket of the charging station (g. 4, socket no. 3inyellow)
and press the PAIR button once (g. 4, button no. 4). The
LED on the charging station ashing quickly in BLUE.
• Wait for afew seconds (up to 15 seconds) until the transmit-
ter and receiver have been synchronised and paired. When
pairing has succeeded, both LEDs remain steadily lit in BLUE.
• Please note that the system shuts off automatically if the
transmitter and headphones arenot paired within two min-
utes. Now make surethe connection is active by starting
playback on the audio source (TV/hi-).
• Next, activate Bluetooth on the terminal device (e.g. smart-
phone Bluetooth ON) and select the previously paired
Bluetooth connection “WHP6309BT”.
• Now both the wired connection and the wireless Bluetooth
connection areestablished (similarly to multi-pairing).
• Calls can be accepted while e.g. watching TV.
8.4 Charging, g. 7
Beforerecharging, make surethat the headphones are
switched off (g. 1, switch no. 1set to OFF).
Place the headphones on the transmitter station and make
surethat the charging contacts aretouching the charging
pins. Charging begins automatically.The LED indicator ashes
slowly in GREEN (g. 1, LED no. 2) during charging. When the
battery is fully charged, the status LED remains steadily lit in
GREEN. Afully charging process takes approx. 2hours.
Note
To prevent damage to the batteries, always switch off the
headphones when they arenot in use. Beforeusing them
for the rst time, the batteries should be fully charged.
To guarantee an acceptable charge, the batteries should
initially be charged for 3hours. Make surethat the stethoset
headphones areswitched off during charging.
8.5 Additional functions
8.5.1.1 Using the microphone and general notes on
pausing (g. 2, button no. 6) +LED (g. 1, LED no. 2)
Thanks to an integrated microphone, you have the option of
having ambient sounds (e.g. the doorbell or conversations) re-
produced over the headphones (LED lit GREEN) while listening
to an audio source (TV/hi-).
Note
Please note that the microphone is very sensitive.
Be careful to avoid hearing damage!
Pressing the Play/Pause button at any time pauses the audio
(g. 2, button no. 5). Please note that the LED on the head-
phones starts ashing slowly in GREEN (during playback, it
remains steadily lit in BLUE).
8.5.1.2 Using the microphone for phone calls (Blue-
tooth with smartphone/tablet, g. 2,
button no. 5) +LED (g. 1, LED no. 2)
With an active wireless Bluetooth connection to asmartphone
or tablet, you can press the Play/Pause button (g. 2, button
no. 5) to accept calls and speak through the microphone
(provided this is supported by the terminal device). When a
callcomes in, the LED ashes green/blue, and during acall, it
remains lit blue. Any running audio playback is paused until
the conversation is ended.
8.5.1.3 Balance control (g. 1, control no. 4)
Using the controller,you can balance out ahearing sensitivity
difference between the right and left.
8.5.1.4 Note on battery charge level (stethoset head-
phones)
When the battery charge level of the stethoset headphones is
low,the LED (g. 1, LED no. 2) starts ashing slowly in BLUE.
8.6 Troubleshooting
8.6.1 No sound
• Check that the power supply plug is fully inserted into the
mains socket and the other end is properly connected to the
power supply socket on the transmitter.
• Make surethat the power on/off switches on both the trans-
mitter and the headphones areinthe ON position.
• The battery in the headphones may have insucient remain-