21115 2.
EQUIPMENT APPROVAL INFORMATION Your telephone equipment is approved for connection to the Public Switched Telephone Network and is in compliance with parts 15 and 68, FCC Rules and Regulations and the Technical Requirements for Telephone Terminal Equipment published by ACTA. 1 Notification to the Local Telephone Company On the bottom of this equipment is a label indicating, among other information, the US number and Ringer Equivalence Number (REN) for the equipment.
INTERFERENCE INFORMATION This device complies with Part 15 of the FCC Rules. Operation is subject to the following two conditions: (1) This device may not cause harmful interference; and (2) This device must accept any interference received, including interference that may cause undesired operation. This equipment has been tested and found to comply with the limits for a Class B digital device, pursuant to Part 15 of the FCC Rules.
TABLE OF CONTENTS EQUIPMENT APPROVAL INFORMATION .................................................................. 2 INTERFERENCE INFORMATION ............................................................................. 3 FCC RF EXPOSURE REQUIREMENTS .................................................................. 3 HEARING AID COMPATIBILITY (HAC) .................................................................. 3 INTRODUCTION .............................................................................
HEADSET ................................................................................................. 33 REDIAL ............................................................................................... 33 REDIAL PREVIEW DIALING ...................................................................... 34 HOLD ..................................................................................................... 34 HOLD REMINDER ............................................................................
OUT OF RANGE WARNING ......................................................................... 63 BATTERY LOW WARNING ........................................................................... 63 3-WAY CONFERENCE (FLASH 3-WAY EXIT) ............................................ 63 TELEPHONE COMPANY SERVICE BUTTONS ..................................................... 63 VOICE MAIL BUTTON ............................................................................. 63 INFO BUTTON .............................
INTRODUCTION GETTING TO KNOW YOUR MULTI-HANDSET CORDLESS SYSTEM CAUTION: When using telephone equipment, there are basic safety instructions that should always be followed. Refer to the IMPORTANT SAFETY INSTRUCTIONS provided with this product and save them for future reference. Congratulations on purchasing this Multi-handset Telephone System. This system operates in the 2.4 GHz frequencies and is unique to conventional cordless telephones.
Your Call Waiting Caller ID phone allows you to: • View the name and telephone number of a caller (Call Waiting Caller ID). • Identify callers before you answer the phone. • View the time and date of each incoming call. • Record up to 50 Caller ID messages sequentially. • Know who called while you are on the line or when you were away. • Screen unwanted calls, eliminate harassment from annoying calls, or to get prepared before answering a call.
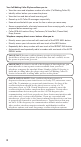
HANDSET & BASE LAYOUT VOICE MAIL/VISUAL RING indicator button display VOICE MAIL button VOLUME buttons SPEAKERPHONE button REPEAT DIAL button REDIAL/FORMAT button INFO button AUTO REDIAL button TALK button INFO REPEAT DIAL VOICE MAIL REDIAL/ AUTO FORMAT REDIAL PROGRAM/OK button OK headset jack PROGRAM DIR CID TALK UP/CID button DELETE DOWN/ DIRECTORY button INTERCOM/ TRANSFER button 1 4 GHI 7 PQRS * INT 3 2 ABC 5 JKL 8 TUV 0 OPER 6 MNO 9 WXYZ # PAUSE FLASH TRANSFER HOLD
OK/PROGRAM button IN USE V-MAIL/visual ring button VOICE MAIL button CHARGE PAGE/ registration mode indicator REDIAL/ FORMAT button REPEAT DIAL button CID button voice announcement ON/OFF indicator CID button AUTO REDIAL button INFO button voice announcement ON/OFF button VOICE MAIL REPEAT DIAL IN USE V-MAIL REDIAL INFO AUTO REDIAL CHARGE PAGE FORMAT OK VA ON/OFF VA RECORD PROGRAM DIR CID DELETE PAGE INTERCOM TRANSFER 1 2 ABC JKL 3 DEF VOL HOLD 4 GHI 5 7 PQRS 8 0 6 M
MULTI-HANDSET SYSTEM BUTTONS DEFINED HANDSET AND BASE BUTTONS NUMBER/ TOUCH TONE PAD Dials numbers and enters. TALK Starts external calls, answers calls, and turns handset off. FLASH Activates special phone company services such as call waiting. EXIT Exits programming, directory, or Caller ID mode. MUTE Turns the handset and base microphone off so that the party on the other end of the line cannot hear any conversation. REDIAL Redials last number dialed.
HANDSET SIDE BUTTONS VOL Adjusts receiver, headset, and speakerphone volume level. SPEAKER Accesses handset speakerphone. BASE BUTTONS PAGE Triggers a page ringer on cordless handset; helps locate a misplaced handset. VA RECORD Starts recording your Caller ID Voice Announcement. VA ON/OFF Turns on or off your Caller ID Voice Announcement. VOL Adjusts Caller ID voice announcement and speakerphone volume level. PARTS CHECKLIST Make sure your package includes the items shown here.
IMPORTANT INSTALLATION GUIDELINES • Install telephone near both a telephone (modular) jack and an electrical power outlet. • Avoid sources of noise, such as a window by a busy street, and electrical noise, such motors, microwave ovens, and fluorescent lighting. • Avoid heat sources, such as heating air ducts, heating appliances, radiators, and direct sunlight. • Avoid areas of excessive moisture or extremely low temperature. • Avoid dusty locations. • Avoid other cordless telephones or personal computers.
6. After the handset is properly charged, connect the telephone line cord by plugging one end of the line into the jack on the back of the base marked TEL LINE and the other end into a telephone wall jack. 7. Attach the belt clip. Align the tabs on the inside edges of the belt clip with the slots on each side of the handset and snap the belt clip into place. NOTE: Only the base needs a phone line connection. Extra cordless handsets with charge cradles can be installed anywhere electrical power is available.
HOLD REMINDER OFF/15/30*/45/60 (seconds) RESET Base: YES ?/NO? DE-REGISTER Handset: YES ?/NO? #1, 2, 3, 4, ALL REGISTRATION YES ?/NO? MENU MODE Use the Menu Mode to customize your multi-handset system to meet your needs. You must be in the Menu Mode to program your multi-handset system. NOTE: The settings for the base and handset are identical, except for RESET and REGISTRATION. Make sure your phone is OFF (not in TALK mode). 1. Press the PROGRAM/OK button to enter the menu mode. 2.
3. Press the PROGRAM/OK button to select the desired language setting. The display shows: 4. Press or button to change the language selection. 5. Press the PROGRAM/OK button to confirm and save your selection. The display shows: NOTE: The unit generates a confirmation beep when the setting is OK. After three seconds, the display returns to the main menu to program the other items. The display shows: INTERCOM RINGER 1. Make sure your phone is OFF (not in TALK mode). 2.
5. Press the PROGRAM/OK button to confirm and save your selection. The display shows: NOTE: Press the FLASH/3 WAY/EXIT button to keep the previous setting and return to the main menu. If you don’t press a button within 30 seconds, the system automatically exits the menu mode. LINE RINGER 1. Make sure your phone is OFF (not in TALK mode). 2. Press the PROGRAM/OK button to enter the menu mode. 3. Press the or button until the arrow in the display points to LINE RING. 4.
5. Press the or button to scroll to your selection. The choices are: high, middle, and low. NOTE: The handset or base generates a ring when you make your selection. 6. Press the PROGRAM/OK button to confirm and save your selection. The display shows: NOTE: Press the FLASH/3 WAY/EXIT button to keep the previous setting and return to the main menu. If you don’t press a button within 30 seconds, the system automatically exits the menu mode. RINGER TYPE 1. Make sure your phone is OFF (not in TALK mode).
NOTE: Press the FLASH/3 WAY/EXIT button to keep the previous setting and return to the main menu. If you don’t press a button within 30 seconds, the system automatically exits the menu mode. LOCAL AREA CODE If you enter your local 3-digit area code, Caller ID messages received from your local area will be displayed as a seven digit number. The telephone uses the programmed area codes to determine the number format to display when a valid Caller ID signal is received.
7. Press the PROGRAM/OK button to confirm and save your selection. The display shows: REGIONAL AREA CODES You may set up to six 3-digit regional area codes. Each code must only be three digits long. Do not use the * or # characters. If you enter more or less than three digits, you will hear a warning beep. 1. Make sure your phone is OFF (not in TALK mode). 2. Press the PROGRAM/OK button to enter the menu mode. 3. Press the or button until the arrow in the display points to AREA CODE.
NOTE: If you program your voice mail access password into the voice mail number string, you may use the #/PAUSE button to insert a delay prior to voice mail password entry by pressing the #/PAUSE button twice. A pause displays as “ P.” You may add more than one pause if a longer delay is needed in the dialing sequence. 6. Press the PROGRAM/OK button to confirm and save your selection. The display shows: NOTE: Each handset may have a different voice mail number.
5. Enter your info service code (up to 11 digits, for example, 3155551324). NOTE: If you enter more than 11 digits, you will hear a warning beep. 6. Press the PROGRAM/OK button to confirm and save your selection. The display shows: NOTE: Each handset may have a different info service number. NOTE: To delete the info service number, press the DELETE button twice.
4. Press the PROGRAM/OK button to go to HOLD REMINDER. The default setting is 30 seconds. 5. Press the or button to select 15, 30, 45, 60 seconds or OFF. For example, to select 45 seconds move the arrow to 45. The display shows: 6. Press the PROGRAM/OK button to confirm and save your selection. The display shows: NOTE: If you choose OFF, you will turn off the reminder beeps. NOTE: Press the 3 WAY/EXIT button to keep the previous setting and return to the main menu screen.
4. Press PROGRAM/OK button to go to RESET BASE or RESET HANDSET. The display shows: BASE HANDSET 5. Press the or button to select YES?. BASE HANDSET NOTE: Select YES to reset to the factory default settings, or select NO to exit. 6. Press the PROGRAM/OK to confirm and save your selection. The display shows: NOTE: After three seconds, the handset or base returns to the default settings.
3. Press the or button until the arrow in the display points to the DEREGISTER. 4. Press the PROGRAM/OK button to go to DE-REGISTER. The display shows: 5. Press the or button to move the arrow in the display to YES? NOTE: Select YES to de-register, or NO to exit. 6. Press the PROGRAM/OK button to confirm your selection. The display shows: 7. Place the handset on the base cradle.
NOTE: The base doesn’t need to be in DE-REGISTER mode while the handset is de-registered. NOTE: You must place the handset on the base cradle during de-registration. NOTE: A handset may register to another base without de-registering via the original base. But the original base, however, will keep the handset’s registration information. BASE To de-register all handsets or remove one handset, use the base. The handset must be kept near the base during the de-registration process.
After de-registration, the display shows: NOTE: It takes a few seconds for each handset to deregister (approximately 3 to 10 seconds). The more handsets you want to deregister at one time, the longer the deregistration process takes. NOTE: Occasionally, the de-registration process finishes very quickly and the message DE-REGISTER PLEASE WAIT! may not appear. HANDSET REGISTRATION Registration links the base to a cordless handset. Once a handset is registered it can use the base’s phone connection.
NOTE: REGISTRATION MODE shows in the display for 30 seconds, and the CHARGE/PAGE indicator flashes slowly. 7. Repeat step 1-5 for the handset. TIP: If the handset display shows PLEASE REGISTER! or TO REGISTER PUT HANDSET IN BASE, handset is ready for registration. You may skip steps 1-5 & 8 for the handset. 8. Press the PROGRAM/OK button to confirm. The handset display shows: 9. Place the handset in the base cradle to complete the registration.
ADDING HANDSETS AND RE-INSTALLING THE SYSTEM If you buy additional handsets to expand this system, you must register each new handset to the base. A maximum of four handsets can be registered to the base. ADDING ONE NEW HANDSET TO THE SYSTEM Once your new handset is initialized, the display shows: Follow instructions in the Handset Registration section to register your new handset. IMPORTANT: Your new cordless handset will not operate until it is registered to the base.
BASE DISPLAY When the phone is OFF, the base display shows the Current Time on the upper row of the screen, and Line Status/Prompt Message/Number of new CID or total Caller ID records received on the next line. It is not necessary for you to set up the clock time. The clock time is automatically updated when the unit receives Caller ID information.
NOTE: If you dial more than 14 digits, the display only shows the last 14 digits. Pre-dialing: 1. Make sure the phone is OFF (not in TALK mode). 2. Dial the number you want to call. The telephone number shows in the display. NOTE: If you make a mistake with the pre-dial number, you may use the or buttons to move the cursor forward or backward in the display, use the DELETE button to remove the wrong digit, and enter the correct digit. 3. Press the TALK button on the handset.
HEADSET VOLUME When in headset mode, adjust the headset volume with the / buttons on the handset. There are five volume levels. You will hear a warning tone when the volume reaches the maximum or minimum level. HANDSET SPEAKERPHONE VOLUME In handset speakerphone mode, you may also adjust the handset speakerphone volume with the / keys. There are eight volume levels for the speakerphone.
HEADSET 1. Plug the headset into the headset jack on the handset. When you are using the headset in TALK mode, the display shows: OR 2. Unplug the headset when you want to use the handset or speakerphone. NOTE: The speakerphone and speakerphone button is disabled when the headset is plugged in. If the headset is unplugged, the system returns to normal operation in handset speakerphone mode. The base speakerphone operates normally when the headset is plugged into the handset. REDIAL 1.
REDIAL PREVIEW DIALING 1. Make sure the phone is OFF (not in TALK mode). 2. Press the REDIAL button. The display shows: 3. Press the TALK or SPEAKERPHONE button to pick up the line and automatically dial the number: OR HOLD Press the HOLD button to place the call on hold and LINE ON HOLD shows in the display. The call remains on hold until you press the TALK button or the HOLD button on any registered handset.
INTERCOM A 2-way call (intercom) is possible between two cordless handsets or between a registered handset and the base. And since the telephone line is not used, you may still receive incoming calls. MAKING INTERCOM CALLS HANDSET 1. Press the INT/TRANSFER button on the handset when the phone is OFF (not in TALK mode). The display shows: 2. Enter the handset number you want to call.
If the system is busy (the intercom path is in use by another intercom caller or the Caller ID Database is busy), you will hear a warning tone when you press the INT button. The display shows: OR If Handset #2 is busy, Handset #1’s display shows the following (Handset #2 will not hear an intercom tone): NOTE: The called party remains undisturbed, and will not hear a call waiting triple beep for intercom call.
It means the handset you are calling either does not exist, is out of the range of the system, or is out of battery power. NOTE: To terminate the intercom call, the intercom caller may press the INT or EXIT button during intercom ringing. NOTE: If the intercom is not answered within 60 seconds, the call is automatically cancelled. BASE 1. When the phone is OFF (not in TALK mode), press the INTERCOM/PAGE/ TRANSFER button on the base unit. The display shows: 2. Using or button to select INTERCOM mode.
NOTE: If you initiate an intercom call intercom and don’t input a number (0-4), the intercom call is automatically cancelled after 10 seconds. ANSWERING INTERCOM CALLS When you receive an intercom call, your handset or base rings and the display shows: OR 1. Press the INT/TRANSFER or TALK button to answer the intercom call. Your display shows: OR Or, press the SPEAKER button to answer the call in speakerphone mode. Your display shows: 2.
3. Enter the handset number you want to call. The handset you are calling rings. 4. To end the intercom call, either party may press the INT/TRANSFER or TALK button. The call on the line remains on hold until you release it. RECEIVING AN INCOMING TELEPHONE CALL DURING AN INTERCOM CALL If you receive a telephone call during an intercom call, both users are alerted with a ringing tone. Before you answer the telephone call, press the INT/ TRANSFER button to end the intercom call.
4. You may either wait for the party to answer and then press the TALK button or simply press the TALK button to complete the transfer. To answer a transferred call with the cordless handset, press the TALK or HOLD button when the handset rings. After the paging party hangs up, you may speak to the external caller. NOTE: 1. If the line has already been transferred, it cannot be transferred again until the transferred call is answered first. 2.
CONFERENCING WITH AN EXTERNAL CALL AND INTERCOM You can also make a conference call through an intercom call. 1. During an external call, press the INT/TRANSFER button to make an intercom call. The external call is automatically placed on hold. The display shows: 2. Press the PROGRAM/OK button to confirm the intercom followed by the handset number you want to intercom with. For example, if you want to intercom with Handset #2, press the 2 button.
STORING NAMES AND NUMBERS IN MEMORY 1. Make sure the phone is OFF (not in TALK mode). 2. Press the DIRECTORY button. The display shows: # MEMO 01 3. Press the or button to select a different index or press the index number (01, 02.....10) directly to access the record. 4. Press the PROGRAM/OK button. The display shows: # MEMO 01 5. Use the touch tone pad on your handset or base to enter a name (up to 15 characters). More than one letter is stored in each of the number keys.
NOTE: Use the # PAUSE button to insert a delay in the dialing sequence of a stored telephone number when a pause is needed (for example, when you must dial a 9 to get an outside line or when you must enter codes to access your bank’s information line). Press #PAUSE button twice to insert a pause. Pause is displayed as “P.” NOTE: If a telephone number is more than 15 characters longs, press the FORMAT button to view the remaining numbers. 8. Press the OK button to store the name and number in memory.
3. After hearing the beep tone, you can begin recording the message. Each record has 2-second message only. The display will show as follows and start to count the timer from 00 to 02. 4. When time is up (Time: 02), it will automatically stop recording. The display shows: 5. Then, it will play the voice message automatically for your reference. The display will show the following message. If you want to record it again, press the VA RECORD button to repeat steps 3 - 5. 6.
4. Press PROGRAM/OK button to enter the editing mode. The display shows: # MEMO 01 NOTE: Press the or button to move the cursor. 5. Change the name (for example: Bill Smith). # MEMO 01 6. Press PROGRAM/OK button to store the name. The display shows: # MEMO 01 7. Change the number (for example: 3171234567). After editing the number, the LCD display: 8. Press OK to store the name and number into the memory. It will generate a confirmation tone and show the following message for 3 seconds.
REVIEWING AND DELETING NAMES AND NUMBERS FROM DIRECTORY 1. Make sure the phone is OFF (not in TALK mode). 2. Press the DIRECTORY button into the directory mode. The display shows the memory #01. # MEMO 01 3. Press or button or enter the index number to select the directory index: # MEMO 03 4. Press DELETE button to delete the record. The display shows: 5. Press DELETE button again to confirm. You will hear a confirmation tone and the display shows: # MEMO 03 DIALING A NUMBER FROM DIRECTORY 1.
4. Press TALK button to take the line and dial out the number. The display shows: NOTE: If the content is “EMPTY,” and you press the TALK button, the phone takes the line but will not dial a number. DIALING AFTER PICKING UP THE LINE 1. Make sure the phone is ON by pressing TALK button. The display shows: 2. Press the DIRECTORY button, the display shows: # MEMO 3. Enter the index number (for example: “01”). The phone will dial out the #01 record number automatically.
The Number For Memory Location Long Distance Access Number 07 Authorization Code 08 Frequently called long distance number 09 1. Make sure the phone is ON (in TALK mode) by pressing the TALK button. 2. Press the DIR button, and then press 07. 3. When you hear the access tone, press the DIR button, and then press 08. 4. At the next access tone, press the DIR button and then 09. NOTE: 1.
CALLER ID DISPLAY SCREEN You will see this display screen when you receive a new call. 11:55 AM 2/01 NEW CALL# REPT 05 Callers number Callers name CALLER ID INFORMATION VOICE ANNOUNCEMENT (FOR CALLER ID TYPE 1 ONLY) Press the VA ON/OFF button to turn on the feature. The VA ON/OFF indicator turns on. This phone system checks the base directory database when it receives CID information.
NOTE: A call may be new and repeated if two calls from the same caller are received on the same date. For example, the display shows: 11:55 AM 2/01 NEW CALL# REPT 36 NOTE: If you try to access the CID database while another user is accessing the CID Database, the display shows SYSTEM BUSY.
1. Make sure the phone is OFF (not in TALK mode). 2. Press the CID button to enter the CID retrieve mode. The display shows: 3. Press the DELETE button to delete all Caller ID records. The display shows: 4. Press the DELETE button again to confirm. The display shows: DIALING A CID RECORD While reviewing the Caller ID records, you may dial the phone number showing in the display. For example: The display shows the caller information, and you want to return the call.
2. Add the original area code. The display shows: 9:54 AM 1/21 NEW CALL# REPT 03 3. Add the leading digit (1) and original area code: 9:54 AM 1/21 NEW CALL# REPT 03 After you select the dialing format, press the TALK button the number is dialed automatically. NOTE: If you do not press the FORMAT button, the system checks all local area and all regional area codes. If the caller’s area code is the same as your local area code, it automatically dials the original 7 digits.
3. Press the or button to select the memory location (Memo #). # MEMO 03 4. Press the OK button to confirm the selection. The display shows: 5. Press the or to select YES. 6. For handsets, press the OK button to confirm. You will hear a confirmation tone and the display returns to the Caller ID retrieve mode. 9:54 AM 1/21 NEW CALL# REPT 03 For the base, press the OK button. You will not hear a confirmation tone.
NOTE: If you don’t press the OK button, record is not stored in the directory. To record the voice message, refer to “RECORDING VOICE ANNOUNCEMENT ON THE BASE.” NOTE: 1. If you press the DIRECTORY button for less than one second, you will scroll the directory contents. 2. If you don’t press the FORMAT button to store the record, the system checks all regional area codes.
NOTE: 1. If you don’t press any buttons for 15 seconds, the icons on the bottom row of the display show for 15 seconds. When icons disappear, the functions are disabled. 2. When the Type 2.5 function is ON, only TALK, FLASH, and the corresponding button are functional. The other buttons are disabled and will generate a warning beep if you press them. 3. Caller ID Type 2.5 works on both handsets and the base unit. CALLER ID TYPE 2.5 FUNCTIONS BUSY 1. Make sure Caller ID Type 2.5 is ON.
2. Press the CONF/REPEAT DIAL button to send the conference signal to the central office. The display shows: 3. Press the TALK button to release the conference call, press 4 to drop the last call, or press 5 to drop the first call. NOTE: If you press 4 to drop the last call, the central office drops the last call and keeps the first call. If you press 5 to drop the first call, the central office drops the first call and keeps the last call. In both cases, the display shows: VOICE MAIL 1.
PLEASE HOLD 1. Make sure Caller ID Type 2.5 is ON. If you receive CID information while you are on the line, the display shows: 9:54 AM 2/10 NEW CALL# 01 BUSY CONF TO VM PLS HLD DROP 2. Press the REDIAL/PLS HOLD button to send the “Hold the First Call and Connect the Last Call” command to the central office. The central office automatically holds the first call and connects the last call. The display shows: 9:54 AM 2/10 NEW CALL# 01 3.
• If you press 4 to drop the last call, the central office automatically drops the last call and keeps the first call. If you press 5 to drop the first call, the automatically drops the first call and keeps the last call. In both cases, the display shows: DROP THE LAST CALL • When you press 7, the central office automatically drops the last call and picks up the first call. The unit still displays: DROP 1. Make sure Caller ID Type 2.5 is ON.
ANSWER 1. Make sure Caller ID Type 2.5 is ON. When you receive CID information while you are on the line, the display shows: 9:54 AM 2/10 NEW CALL# 01 BUSY CONF TO VM PLS HLD DROP 2. Press the FLASH button. The display shows: And then the display shows: DISPLAY MESSAGES When the system is in standby mode, the following messages may show in the display according to the handset and line status: XX NEW CALLS XX represents the number of new Caller ID records not reviewed.
UNKNOWN NUMBER: The caller’s number is unknown or out of area. BLOCKED NAME: The caller’s name is private and is blocked from transmission. BLOCKED NUMBER: The caller’s number is private and is blocked from transmission. UNKNOWN CALL: Both the caller’s name and number is unknown or out of area. BLOCKED CALL: Both the caller’s name and number is private and is blocked from transmission. LONG DISTANCE: The number is a long Distance number. INCOMPLETE DATA: The Caller ID information is incomplete.
MESSAGE WAITING Your telephone company may send you a “Message Waiting” signal when you receive voice mail messages. You may retrieve the messages from your telephone company with an access code. MESSAGE WAITING shows in the display, and the IN USE/V-MAIL indicator on the base and Voice Mail indicator on the handset flashes to let you know a message is waiting. To retrieve messages, refer to instructions in VOICE MAIL BUTTON section.
FLASH Use the FLASH button to activate custom calling services such as call waiting or call forwarding, which are available through your local phone company. If you subscribe to the combined Call Waiting Caller ID service from your local telephone company, you will receive Caller ID information (if available) on Call Waiting calls. During a phone call, you will hear a beep to indicate another call is waiting on the line and Caller ID information for the waiting call shows on the handset display.
OUT OF RANGE WARNING While using your cordless handset, if you move too far away from the base, you will hear a five-second double warning tone and the display shows OUT OF RANGE. Move closer to the base and the warning tone stops. If you do not move back within range of the base within 30 seconds, the handset looses its link with the base and the base automatically puts your call on hold. BATTERY LOW WARNING When the battery voltage level is low, a warning message appears and you will hear a warning beep.
1. If the number you dial is busy, press the REPEAT DIAL button and the system automatically sends the command to your local telephone company where the number is repeatedly dialed on your behalf. OR 2. When the system is idle, press the REPEAT DIAL button and the system automatically takes the line and sends your command to your local telephone company where the number is repeatedly dialed by the telephone company on your behalf. 3.
REPLACING THE BATTERY CAUTION: To reduce the risk of fire or personal injury, use only the battery, part number 5-2569, which is compatible with this unit. 1. Make sure the telephone is OFF before you replace the battery. 2. Remove the battery compartment cover located on the back of the handset. 3. Disconnect the battery pack cord from the jack inside the battery compartment and remove the old battery. 4. Connect the new battery pack and place it in the compartment. 5.
• You may have too many extension phones on your line. Try unplugging some extension phones. • Check for a dial tone. You experience static, noise, or fading in and out: • The handset may be out of range of the base. Move closer to the base • Make sure base is not plugged into an electrical outlet with another household appliance. If necessary, relocate the base. • Charge the battery (for 16 hours).
BATTERY SOLUTIONS If you experience any of the following problems, even after recharging the battery, you may need to replace the battery pack: • Short talk time • Poor sound quality • Limited range • Charge indicator fails to turn on GENERAL PRODUCT CARE To keep your unit working and looking good, follow these guidelines: • Avoid dropping the handset, as well as other rough treatment to the phone. • Clean the phone with a soft cloth.
LIMITED WARRANTY What your warranty covers: • Defects in materials or workmanship. For how long after your purchase: • One year. (The warranty period for rental units begins with the first rental or 45 days from date of shipment to the rental firm, whichever comes first.) What we will do: • Provide you with a new or, at our option, a refurbished unit. • The exchange unit is under warranty for the remainder of the original product’s warranty period.
INDEX Symbols 3-Way Conference (FLASH 3-WAY EXIT) 63 A Adding Handsets and Re-Installing the System 29 Adding One New Handset to the System 29 Answer 59 Answering Calls 31 Answering Calls with the Speakerphone 32 Answering Intercom Calls 38 Auto Redial Button 64 B Base 26, 37 Base Display 30 Base Layout 9 Base Speakerphone Volume 32 Basic Operation 29 Battery Low Warning 63 Battery Safety Instructions 65 Battery Solutions 67 Build the Conference Call 57 Busy 55 Buttons Defined Handset and Base Buttons 11
E Editing Names and Numbers from Memory 44 Editing the Info Service Number 21 Editing the Voice Mail Number 20 Equipment Approval Information 2 F FCC RF Exposure Requirements 3 Flash 62 G General Product Care 67 Getting to Know Your Multi-handset Cordless System 7 H Handset 24, 35 Handset & Base Layout 9 Handset Receiver Volume 31 Handset Registration 27 Handset Speakerphone Volume 32 Headset 33 Headset Volume 32 Hearing Aid Compatibility (HAC) 3 Hold 34 Hold Recall Ringer 34 Hold Reminder 34 Hold Remind
Muting Your Conversation 62 O Out of Range Warning 63 P Paging All Handsets 62 Parts Checklist 12 Pause 62 Please Hold 57 Programmable Functions 14 R Re-Installing the System 29 Receiving an Incoming Telephone Call During an Intercom Call 39 Recording Voice Announcement on the Base 43 Redial 33 Redial Preview Dialing 34 Regional Area Codes 20 Repeat Dial Button 63 Replacing the Battery 65 Resetting the Handset and Base to the Factory Default 23 Return the other Call 57 Reviewing and Deleting Names and Nu
Model 21115 15951570 (Rev 0 E/S) 03-34 Printed in China