
Operation Manual


EN
9
English
5.
Once the automatic search ends, press
MENU
to
return to the previous step or press
OK
to restart
your channel search.
6.
After the automatic search, channels are arranged
in a preset order. If you wish to skip channels,
modify the preset order or rename channels, select
Settings > Setup > Organiser
and press
OK/►
to
enter.
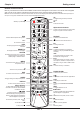
Using your TV
Accessing channels
Using the alphanumeric buttons:
press the
corresponding alphanumeric buttons to access the
channels.
Using the PR+/- or P+/- buttons:
scroll through the
channels.
Watching connected devices
Repeatedly press
SOURCE
on the remote control
or
OK
on the TV set to toggle between TV and
other input sources. To resume TV viewing, press
any numeric button to enter the channel, while
P+/-
will cycle through all TV channels and other input
sources.
Note: Not all models have OK button on the set.
Volume
Volume control: use the
VOL +/-
or
VOL ◄/►
buttons
on the TV set or
V+/-
buttons on the remote control to
increase or decrease the volume.
Sound mute: press the button to temporarily mute
the sound. Press this button again or the
V+
button to
restore it.
Using TV menus
1.
Press
MENU
to display the main menu. (Refer to
Figure 3.)
2.
Press
▲/▼/◄/►
to select the desired item, then
press
OK
to open the corresponding submenu.
3.
In submenus, use
▲/▼
to select menu options,
use
◄/►
to set functions or change values. Use
OK
to activate a setting. Use
OK/►
to open the
corresponding submenu.
4.
Press
MENU
to return to the previous menu.
5.
Press
EXIT
to close the menu.
Note: Some options may not be available for
certain signal sources.
Selecting menu language
You can choose your preferred menu language
following the instructions below.
1.
Press
MENU
to display the main menu.
2.
Press
▲/▼/◄/►
to select
Settings > Setup
, then
press
OK
to enter.
3.
Select
Language
and press
OK/►
to enter.
Using your TV
Chapter 4
according to your country. At this step, you will be
requested to enter your password.
3.
Press
▲/▼
to select
Tuner mode
, then
press
◄/►
to select
Antenna
or
Cable
or
Satellite
.
(Note: Satellite option may not be
available for certain models.) Then follow a) or b)
or c) below.
- a) If you have selected
Antenna
.
• Press
▲/▼
to select
Channel install
, and
press
OK/►
to enter.
• Select
Automatic search
(Refer to Figure 2.),
then press
OK/►
to display
Automatic search
.
• Press
OK
to skip the country selection and
enter the next step. Or use
◄/►
to reselect
your country, then press
OK
to enter.
• Select
Digital & Analogue
or
Digital
or
Analogue
, then press
OK/►
to start the
automatic search, which relates to all DVB-T
digital and/or analogue channels.
- b) If you have selected
Cable
.
• Press
▲/▼
to select
Channel install
, and
press
OK/►
to enter.
• Select
Automatic search
, then press
OK/►
to
display
Automatic search
.
• Press
OK
to skip the country selection and
enter the next step. Or use
◄/►
to reselect
your country, then press
OK
to enter.
•
- If you select
Digital & Analogue
, then
press
OK/►
to enter. Select your scan
mode if available and congure proper cable
information in the same way as in Initial
setup. Press
▲/▼
to select
Scan
and press
OK/►
to start your automatic search relating
to all DVB-C digital and analogue channels.
- If you select
Digital
, then follow the same
process as above to start your automatic
search relating to all DVB-C digital channels.
- If you select
Analogue
, then press
OK/►
to start your automatic search relating to all
analogue channels.
- c) If you have selected
Satellite
.
• Press
▲/▼
to select
Channel install
, and
press
OK/►
to enter.
• Select
Automatic search
, then press
OK/►
to enter. You can select a proper satellite or an
operator.
• Press
OK
to go to the next step. Before you
start scanning, you can press
OK
to edit the
parameters of the selected satellite. Then
with your desired options of
Scan mode
and
Channels
, select
Scan
and press
OK/►
to
start scanning.
4.
The search may take a few minutes. During the
process, you can press
MENU
to abort halfway.