
User manual


2
G Operating Instructions
Thank you for choosing aThomson product.
Take your time and read the following instructions and information
completely.Please keep these instructions in asafe place for
futurereference. If you sell the device, please pass these operating
instructions on to the new owner.
1. Explanation of Warning Symbols and Notes
Warning
This symbol is used to indicate safety instructions or to draw
your attention to specic hazards and risks.
Note
This symbol is used to indicate additional information or
important notes.
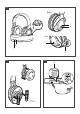
2. Controls and displays, Fig. 1+3
1. Charge status LED indicator (green)
2. Power/signal LED indicator (red)
3. Power button
4. Volume control
5. Autoscan button
6. Frequency channel switch
7. Power LED indicator (green)
3. Package contents
• 1WHP3777 UHF wireless headphones
• 1transmitter with charging station
• 2NiMH AAA batteries
• 1power supply unit
• 1audio adapter cable, RCAstereo to 3.5 mm jack
• 1jack adapter 6.3 mm/3.5 mm
4. Safety Notes
Warning
• Using this product limits your perception of ambient noise.
Forthis reason, do not operate any vehicles or machines
while using this product.
• Always keep the volume at areasonable
level. Loud volumes, even over short
periods, can cause hearing loss.
• Never open, damage or swallow batteries or allow them to
enter the environment. They can contain toxic, environmentally
unfriendly heavy metals.
• Do not tamper with or damage/heat/disassemble the batteries/
rechargeable batteries.
• The product is intended for private, non-commercial use only.
• Use the product for its intended purpose only.
• Children should be supervised to ensurethat they do not play
with the device.
• Do not use the product in areas wherethe use of electronic
devices is not permitted.
• Only connect the product to asocket that has been approved for
the device. The socket must be installed close to the product and
easily accessible.
• Disconnect the product from the network using the power button
–ifthis is not available, unplug the power cordfromthe socket.
• Lay all cables so that they do not pose atripping hazard.
• Do not bend or crush the cable.
• Do not drop the product and do not expose it to any major
shocks.
• Dispose of packaging material immediately according to locally
applicable regulations.
• Do not modify the product in any way.Doing so voids the
warranty.
• Do not use the product if the adapter,connection cable or power
cable is damaged.
• Do not attempt to service or repair the product yourself.Leave
any and all service work to qualied experts.
• Do not open the device or continue to operate it if it becomes
damaged.
5. Technical specifications
Transmitting mode UHF stereo
Frequency band(s) 863.53 –864.53 MHz
Maximum radio-frequency
power transmitted
<8dBm
Operating voltage
Transmitter: 8V,70mA
Receiver: 2.4 V,
(2 x1.2 VNiMH AAA)
Frequency range 20 Hz –20KHz
Distortion <2%
Signal-to-noise ratio >54dB
Range
100 mmax. (outdoors)
20–30 m(indoors)
Operating time 8hrs (at medium volume)
6. Installing the transmitter/charging station, Fig. 3
• Connect the power supply to the power socket on the rear side
of the transmitter.
• Connect the power supply to amains socket.
• Connect the RCAplugs of the audio adapter cable to the RCA
sockets on the rear side of the transmitter.Connect the other
end (jack plug) to the headphone jack of your audio source
(television, hi- system, DVD player,MP3 player,etc.).
• The redLED (2) lights up.
7. Installing the receiver/headphones, Fig. 2
• Carefully pulloff the earpad on the right-hand side.
• Insert the two batteries supplied, making sureyou observe
correct polarity.
• Reinsert the earpad until it audibly clicks into place.
8. Getting started
• Switch on the audio source connected to the transmitter (TV or
audio player).
• Switch on the headphones by pressing the Power button (3). The
LED (7) of the headphones lights up green. Make surethat the
redLED (2) is lit. This conrms that the rechargeable batteries
arecharged.