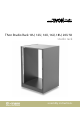
Thon Studio Rack 10U, 12U, 14U, 16U, 18U, 20U 50 studio rack assembly instructions
Musikhaus Thomann Thomann GmbH Hans-Thomann-Straße 1 96138 Burgebrach Germany Telephone: +49 (0) 9546 9223-0 E-mail: info@thomann.de Internet: www.thomann.de 21.09.2021, ID: 372110, 372118, 372123, 372126, 372155, ...
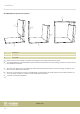
Table of contents Table of contents 1 Safety instructions.......................................................................................................................................................................................................... 4 2 Scope of delivery.............................................................................................................................................................................................................. 5 3 Installation..
Safety instructions 1 Safety instructions DANGER! Danger for children Ensure that plastic bags, packaging, etc. are properly disposed of and are not in the reach of babies and young children. Choking hazard! Ensure that children do not detach any small parts (e.g. knobs or the like) from the product. They could swallow the pieces and choke! Never let children play unattended with the product.
Scope of delivery 2 Scope of delivery Before you assemble your racks, make sure the contents of the package are complete according to the following list.
Scope of delivery Option rack strip set for rear assembly n n n n 2 × metal rack strip, continuous, fitted with nuts and rubber edging 1 × set screws 1 × set fixing screws M6 × 12 with matching washers 1 × assembly instructions studio rack 6
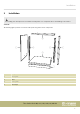
Installation 3 Installation For assembly, place all components on a suitable assembly surface. Use a soft pad in order to avoid damage to the surfaces. Overview The following figure provides an overview of the positioning of the various components.
Installation Preparation of components Insert the connector housings and connecting bolts into the blind holes provided for them in the base plate (4 × connecting bolts, 6 × connector housings), the cover plate (6 × connector housings) and the bases (2 × connector housings each). After inserting the connecting bolts, they are loose the holes and only spread apart after fastening the connector housings at the corresponding component.
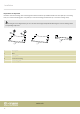
Installation Push eight connecting bolts into the blind holes provided for them in both side panels. ö 1 Side panels B Connecting bolt ö Assembling the base $ $ 2 Floor plate 3 Base # 1. Place each of the two bases on two connecting bolts of the base plate. Make sure that the connector housings are posi‐ tioned so that the connecting bolts can be inserted. 2. Turn the connector housings clockwise to lock the connection with the bolts inserted. 3.
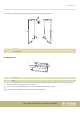
Installation Assembling the side panels and cover plate ö # % # ö 1 Side panels 2 Floor plate 4 Cover plate ö 1. Position all connector housings so that the connecting bolts can be fully inserted into the holes. 2. First, bolt together the base plate with the horizontal side panel. Turn the connector housings clockwise to lock the connec‐ tion with the bolt inserted. 3. Place the cover plate on the connecting bolts of the horizontal side panel.
Installation Assembling the rack strips Screw the rack strips into the rack on the inside so they are parallel the front edge, using the 24 wood screws supplied. The assembly position of the front rack strips supplied and optional rack strips for rear assembly is dependent on the required installa‐ tion depth. n Assembly depth without door: 0 … 55 mm. n Assembly depth with door: min. 75 mm.
Installation Assembly of optional doors The locks of the lockable doors are pre-assembled. Check for tightness and, if required, re-tighten the fixing nuts of the locks before assembling the doors. For the assembly of the optional glass door, a minimum of 75 mm must be provided for between the front outer edges and the rack strips (see figure). If doors were not intended during the initial assembly, first move the rack strips accordingly.
Installation For the assembly of the optional furniture door, a minimum of 75 mm must be provided for between the back outer edges and the additional rack strips (see figure). The back furniture door leaves sufficient room between the cabinet roof and the cabinet floor for feeding through cables.
Installation Assembly of optional castors Place the rack upside down for the assembly of the castors. Screw the four castors to the underside of the rack using four screws each.
Installation Rack with assembled glass door Rack with assembled furniture door Thon Studio Rack 10U, 12U, 14U, 16U, 18U, 20U 50 15
Technical specifications 4 Technical specifications Thon Studio Rack 10U 50 Thon Studio Rack 10U 50 BK, graphite Item number 372363 Thon Studio Rack 10U 50 WH, white Item number 375266 Thon Studio Rack 10U 50 oak Item number 512927 Thon Studio Rack 10U 50 maple Item number 524422 Thon Studio Rack 10U 50 beech Item number 524421 Rack units 10 Installation depth max. 495 mm Dimensions (W × H × D) 540 mm × 545 mm × 500 mm Weight Approx. 16.3 kg Tab.
Technical specifications Thon Studio Rack 12U 50 Thon Studio Rack 12U 50 BK, graphite Item number 372110 Thon Studio Rack 12U 50 WH, white Item number 375268 Thon Studio Rack 12U 50 oak Item number 512946 Thon Studio Rack 12U 50 maple Item number 524435 Thon Studio Rack 12U 50 beech Item number 524434 Rack units 12 Installation depth max. 495 mm Dimensions (W × H × D) 540 mm × 635 mm × 500 mm Weight Approx. 17.6 kg Tab.
Technical specifications Thon Studio Rack 14U 50 Thon Studio Rack 14U 50 BK, graphite Item number 372118 Thon Studio Rack 14U 50 WH, white Item number 375285 Thon Studio Rack 14U 50 oak Item number 512953 Thon Studio Rack 14U 50 maple Item number 524439 Thon Studio Rack 14U 50 beech Item number 524438 Rack units 14 Installation depth max. 495 mm Dimensions (W × H × D) 540 mm × 725 mm × 500 mm Weight Approx. 18.9 kg Tab.
Technical specifications Thon Studio Rack 16U 50 Thon Studio Rack 16U 50 BK, graphite Item number 372123 Thon Studio Rack 16U 50 WH, white Item number 375289 Thon Studio Rack 16U 50 oak Item number 512965 Thon Studio Rack 16U 50 maple Item number 524445 Thon Studio Rack 16U 50 beech Item number 524444 Rack units 16 Installation depth max. 495 mm Dimensions (W × H × D) 540 mm × 815 mm × 500 mm Weight Approx. 20.9 kg Tab.
Technical specifications Thon Studio Rack 18U 50 Thon Studio Rack 18U 50 BK, graphite Item number 372126 Thon Studio Rack 18U 50 WH, white Item number 375291 Thon Studio Rack 18U 50 oak Item number 512966 Thon Studio Rack 18U 50 maple Item number 524449 Thon Studio Rack 18U 50 beech Item number 524447 Rack units 18 Installation depth max. 495 mm Dimensions (W × H × D) 540 mm × 905 mm × 500 mm Weight Approx. 22 kg Tab.
Technical specifications Thon Studio Rack 20U 50 Thon Studio Rack 20U 50 BK, graphite Item number 372155 Thon Studio Rack 20U 50 WH, white Item number 375293 Thon Studio Rack 20U 50 oak Item number 512968 Thon Studio Rack 20U 50 maple Item number 524455 Thon Studio Rack 20U 50 beech Item number 524454 Rack units 20 Installation depth max. 495 mm Dimensions (W × H × D) 540 mm × 995 mm × 500 mm Weight Approx. 24 kg Tab.
Protecting the environment 5 Protecting the environment Disposal of the packaging material For the transport and protective packaging, environmentally friendly materials have been chosen that can be supplied to normal recycling. Ensure that plastic bags, packaging, etc. are properly disposed of. Do not just dispose of these materials with your normal household waste, but make sure that they are collected for recycling. Please follow the notes and markings on the packaging.
Musikhaus Thomann · Hans-Thomann-Straße 1 · 96138 Burgebrach · Germany · www.thomann.