Dishwasher Use & Care Manual Dishwasher Use & Care Manual Table of Contents Important Safety Instructions-------------------------2 Features of your new dishwasher-----------------3-4 Operating Instructions-------------------------------5-8 Preparing and loading dishes---------------------9-13 Care & cleaning-------------------------------------14-16 Troubleshooting------------------------------------17-18 1
Important safety instruction WARNING For your safety, the information in this manual must be followed to minimize the risk of fire or explosion, electric shock, and to prevent property damage, personal injury. Proper installation Please install your dishwasher properly follow the installation guide. Water supply temperature should be 120℉ or 149℉. Dispose of the discarded appliance and packing material properly. The dishwasher must be grounded, or it can result in a risk of electric shock.
Features of your new dishwasher Specification Capacity 14 place settings Dimension 606 x 650 x 858 mm (Wx D x H) Weight unpacked 91lb (41 kg) Power Supply 120volts, 60Hz Rated power usage Wash motor 95W Heater 840W Water Feed Pressure 20 ~ 120 psi (138~ 828kPa) 1 8 9 2 10 11 3 12 4 5 6 7 1 Upper Spray Arm 7 Rinse Aid Dispenser 2 Middle Spray Arm 8 Tub Gasket 3 Low Spray Arm 9 Cup Shelf 4 Heating Element 10 Adjustable Upper Rack 5 Bottom Rack 11 Serial Label (Locatedon rig
Features of your new dishwasher Features Filter System Adjustable Upper Rack Your dishwasher has amultiple Filter the System there are four filter-meshes.Itcan separate soiled water and clean water in different chambers. The multiple filter system helps your dishwasher to get better performance with less water and less energy . The Upper Rack can be raised or lowered to accommodate loading taller dishes in either rack. The Upper Rack clearance height H1 goes from 8" to 10".
Getting Started How your dishwasher cleans 1.Load dishwasher (Seepreparing and loading dishes). 2. Add detergent (SeeFill detergent to the dispenser). 3. Add rinse aid,if needed (SeeFill rinse to dispenser). 4. Close door to latch. 5. Select desired CYCLE (SeeCycle Chart).The indicator light above the pad will glow when selected. 6. Select desired OPTIONS (SeeEnergy Options). The indicator light above the pad will glow when selected. 7. Run hot water faucet nearest dishwasher until water is hot.
ntrol panel Control 1 2 3 4 Pots & PANS 7 Normal wash This cycle is for regularly soiled dinner dishes or silverware. 3 China crystal 8 This cycle is for lightly soiled china and crystal. 4 Rinse only This cycle is for pre-rinsingdishes or glasses. This is only a rinse that keeps food from drying on your dishes and reduces odor buildup in your dishwasher until you are ready to wash a full load.Do not use detergent.
Operating dishwasher 7 Delay 8 9 10 11 12 10 To delay the start of a selected Delay Start pad until the desired delay time shows in the LED indicator it allows you to automatically start your dishwasher for a1 to 24 hour delay. To cancel the Delay Start option and begin the cycle before the delay period is over pressthe Start/Cancel pad. Child Lock 12 You can lock all controls to prevent children from accidently changing the dishwasher cycle or starting the dishwasher.
Operating dishwasher Status Window NOTE The time remaining could suddenly increase or drop several minutes. Thismeans the Smart Sensor has checked the soil level and determined if additional water fills are needed or if water fills can be deleted. 01-24 If the Delay Start option is sel of hours shows in the Status the dishwasher is working and the wash cycle time is more than a of hours and minutes left shows alternately in the Status Window.
Adjustable Upper Rack The upper rack height can be easily adjusted to accommodate loading taller dishes in either rack. To accommodate taller dishes in the bottom rack, there are 2 positions available: Note: Height should be adjusted without dishes in the racks. 1. Toraise the rack to the upper position,simply lift the rack .Thelever is spring loaded to engage the upper position. Dish Preparation Scrape away large pieces of food, bones, pits, toothpicks,etc.
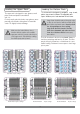
Loading the Upper Rack Loading the Bottom Rack The bottom rack is designed to load plates, soup bowls, plates,saucers and cookware.The adjustable rack space willallow you to load maximum 13 inch items. The upper rack is designed for cups,glasses,small plates,bowls and plastic items marked safe etc. For best results,place the bowls,cups,glasses,sauce pans with soiled surface facing down or toward the center.Tilt slightly for better drainage.
Preparing and loading dishes Loading the Silverware Basket Adding A Dish The silverware basket could be divided into three separate modules that can be used in both upper and lower racks To add or remove items after wash cycle starts: 1 Open door slightly and wait a few seconds until wash action stops before completely opening. 2 Add the item. 3 Close door firmly to latch and cycle will automatically resume. 1.Small forks 2.Spoons 3. .Knives 4. Smallforks 5. Largespoons 6.
Preparing and loading dishes Filling the rinse aid dispenser Your dishwasher is designed to use a liquid rinse aid. Theuse of rinse greatly improves drying performance after the final rinse. Donot use a solid or bar-type rinse aid. Under normal conditions, the rinse aid will last approximately one month, try to keep it full, but do not over fill. 1.Open the door,turn the dispenser cap to left and lift it out. 3.
Preparing and loading dishes 3.Close the dispenser cover The amount of the detergent needed depends on the cycle and soil level of dishes,refer to the table below and adjust the recommended amount as necessary for your load.
Cleaning the exterior door and panel 1. Stainlesssteel panel Clean the stainless steel door and handle regularly to remove the debris with cleaning soft cloth. Do not use appliance wax,polish,bleach or products containing chlorine to clean the stainless steel door. 2.Control panel Clean the control panel with a lightly dampened cloth,clean it gently . Clean the Stainless Steel Inner Door and Tub The tub is made of Stainless Steel,it will not rust or corrode if the dishwasher should be scratched or dented.
Clean the Fine Filter Take out the Cylinder Filter and remove the Fine Filter from the dishwasher tub bottom. To remove the Fine Filter you must first remove the bottom spray arm as shown below. Flush the Fine Filter by holding it under running water and replace.
Clean the door gasket Air gap Clean the door gasket with a damp cloth to remove food particles regularly. If there is an air gap installed with your dishwasher, make sure it is clean so the dishwasher will drain properly. Air gap is not part of your dishwasher. Before you clean the air gap,turn off the dishwasher firstly and lift off the cover Remove the plastic cap and clean with a toothpick. Protect against freezing Inside The inside of the dishwasher is self-cleaningwith normal use.
Troubleshooting before calling for service Problem Dishwasher won't start Dishwasher beeps at the end of the cycle Rinse Aid light on Dishwasher operates too long Door may not be closed properly Shut the door completely make sure it is latched Power supply or power line is not connected Check and connect the power supply Delay Start option has been selected Refer Child Lock activated(selected models) Deactivate the child lock,refer to child lock section in this manual Dishes not drying enough S
Troubleshooting Problem Solution Possible cause Detergent dispenser will not shut Improper operation of the detergent cover Add the detergent and rinse aid as indicated by the manual Water remains in the dishwasher Previous cycle has not finished orhas been interrupted Select the proper cycle as introduced by the manual Check the air gap if you have Dishwasher does not drain properly Suds in the tub Dishwasher leaks Black or gray marks on dishes Make sure the disposer is empty if the dishwashe