
Installation Guide

4
Built In Application.
Your wine cellar can be installed built into cabinetry. The minimum dimensions of the built in area are as follows:
24 ½” W X 26 ½” D X 34” H
Door Swing
Your wine cellar was shipped from the factory with the door opening from left to right. If necessary, you can reverse the
door opening direction from right to left by following these steps:
1. Remove the upper hinge by prying up the hinge cap and removing the screws holding the hinge in place.
2. Lift the door off the bottom hinge.
3. Loosen and remove the screws holding the bottom hinge in place and move to the opposite side.
4. Place the door over the bottom hinge and secure in place by attaching the upper hinge.
5. Loosen and remove the screws holding the handle in place. The screws can be accessed from the interior of
the door by pulling back the door gasket.
6. Attach the handle on the opposite side of the door in the same manner.
Operating Your Wine Cellar
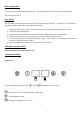
Setting the Temperature Control/Display panel
Temperature Control
Control Panel
To turn the appliance ON or OFF, touch the and simultaneously for 5 seconds.
Zone selector to view or set the temperature of each zone.
Turns the light ON or OFF.
Increases the temperature by 1°C or 1°F.