Operating instructions
Manuals
Brands
Thorens Manuals
audio & home theatre
MINI Turntable
1
2
3
4
5
6
7
8
4
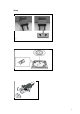
Setup
Fig. 1
Fig. 2
Fig. 3
1
...
2
3
4
5
6
7
...
8