OWNERS MANUAL & ASSEMBLY INSTRUCTIONS BED FRAME
WARNING WARNING! • Due to the size of this bed we recommend assembling it in the room intended for use. • Check the packaging to make sure you have all the parts listed on this instruction. • Before use, make sure this bed is fully assembled. Do not over-tighten screws. • Do not use power tools to assemble this bed. Additional tools not needed. • This product should be used only on firm, level ground. • Do not destroy the packaging until after the product is fully assembled.
PARTS C-2X B-1X E-1X D-2X F-2X King-4X G-2X H-1X S-2X King-2X __________________________________________________________________________ J-5X King-10X M-2X 5mm-1X 4mm-1X 2
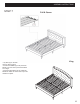
ASSEMBLY INSTRUCTIONS STEP 1 • Lay parts (A) and (B) flat on the floor and attach plastic legs (I) underneath headboard and Footboard. • Acueste las partes (A) y (B) sobre el piso y acople las patas de plástico (I) por debajo de la cabecera y el pie de cama. • Posez les pièces (A) et (B) sur le sol et raccordez les pieds en plastique (I) sous la tête de lit et le pied de lit. STEP 2 • Lay part (D) and (C) flat on the floor next to each other as shown.
ASSEMBLY INSTRUCTIONS STEP 3 • Lift Assembly (C), (D), (G) above the pre-attached screws on the side of the headboard (A) and footboard (B). • Levante la parte armada (C), (D), (G) por encima de los tornillos previamente colocados del lado de la cabecera (A) y el pie de cama (B). • Soulevez le bloc (C), (D), (G) au-dessus des vis pré-raccordées sur le côté de la tête de lit (A) et du pied de lit (B).
ASSEMBLY INSTRUCTIONS STEP 5 J J F F _____ X 2 FOR KING H • Place the two full assembles from previous step side by side. Attach the leg (H) with screws (J) from the top. • Coloque las dos partes armadas del paso anterior una al lado de la otra. Acople la pata (H) con los tornillos (J) de la parte superior. • Placez les deux blocs complets des étapes précédentes l’un à côté de l’autre. Raccordez le pied (H) avec des vis (J) à partir du haut.
ASSEMBLY INSTRUCTIONS STEP 7 • Lay Slats (S) on the sideboard and use Velcro to keep in place. • Acueste las tablillas (S) en la protección lateral y use cinta velcro para mantenerlas en su lugar. • Posez les planchettes (S) sur la planche latérale et utilisez le crochet Velcro pour les maintenir en place.
WARRANTY 5 YEAR LIMITED WARRANTY Our furnitures are warranted for a one (5) year period from the date of purchase against defects in materials and/or workmanship. Unless there is a clear warranty issue, our furniture are not returnable. During this warranty period, if the product is deemed to be defective, our responsibility for the defective product is limited to replacement as stated below. All transportation costs are the responsibility of the purchaser during the entire warranty period.